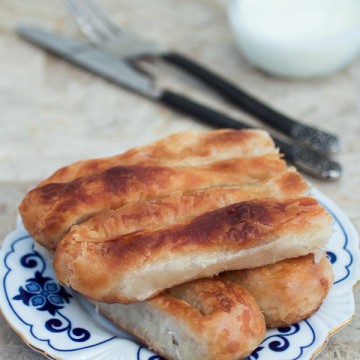
How To Make Homemade Phyllo (Jufka) And A Potato Pie
Ingredients
- DOUGH
- 2 pounds all-purpose flour plus more
- 1 teaspoon salt any type
- FILLING
- 4-5 large Russet or yellow potatoes
- 1 large yellow onion
- ½ teaspoon salt
- ½ teaspoon pepper
- Oil
Instructions
- Read the article above first. Cover your working space with a tablecloth and dust your hands with flour.
- Combine flour and salt in a mixing bowl. Slowly add approximately 2 cups of warm water and start working the flour. Fold, press, knead, push and punch the mixture. (Just as if you were making bread, or pizza.) Do this vigorously for 7-10 minutes until your dough is elastic, and feels somewhere between dry and sticky to touch. If it’s too sticky add a little more flour to make it less so. If it’s dry add a little more water. When you’re finished kneading, the dough should have a consistency of an earlobe.
- Transfer the dough to your working space. Cut it in half, and knead each ball separately for a couple of more minutes. Dab both with oil, cover with a kitchen towel, and leave to rest for 30-60 minutes.
- Peel and (finely) dice the potatoes. Keep them in cold water to prevent browning. When you’re ready to add the onion, squeeze the diced potatoes, and transfer to a dry bowl. Mince or grate the onion. Combine the onion and potatoes, add salt, pepper and two tablespoons of oil. Mix well.
- Dust your working space generously with flour. Take one dough ball and knead it again for a minute or two. Follow A or B directions depending on the type of a rolling pin you have.
- (A) If you have a thin rolling pin, aka oklagija, you’ll be able to roll the dough out quite a lot before working it with your hands. Roll the dough out on the working space until it’s the thickness of one or two stacked pennies, and the size of a large hula hoop.
- (B) A regular, thick rolling pin will get the dough down only to the size of an extra large pizza. Once you roll the dough out as much as it will stretch, dab with oil lightly, and drape it over the pin. Lift the pin up, and let the dough weigh itself down. After it’s stretched out as much as it will under its own weight, turn the dough 45 degrees on the pin so it stretches on the other side as well. Patch up any rips by pinching the dough together. Now comes the challenging part. With the tops of your hands carefully take the dough off the pin and drape over one arm. Continue stretching the dough by pulling the dough ends with the top of the opposite hand. The pull is a slow, light and patient motion outward. If the small rips occur, patch them up and continue. Continue this all around until the dough is about the thickness of one or two pennies stacked together, and the size of a large hula hoop. Transfer onto your working space.
- (From here directions are the same for A and B) Dab the dough with oil lightly and continue stretching the dough out with your hands a little bit more. Do that by slowly lifting the dough ends and then pulling the dough toward yourself. Again, try to avoid rips, but if they happen, just patch them up the best you can. As you are stretching it out, walk around the working space so the dough is even on all sides.
- Cut one inch of dough ends with a knife. Discard. Grab batches of stuffing with your hands, squeeze the juice out, and start lining the remaining dough ends generously. Make sure to only use half of the stuffing as you have another dough ball to go.
- Wrap the dough around the stuffing by slowly lifting the dough ends and covering the stuffing with it. Make sure to wrap stuffing evenly on all sides by walking around the dough as you are doing it. After covering the stuffing with dough ends, roll everything inward toward the center of the phyllo circle for 2-3 revolutions on all sides. Then lift each part of the dough wrapped around the stuffing, and pull back toward yourself. Your pita will now look like a big hose surrounding a thin film of dough inside. Roll, lift, and bring the dough plus stuffing back a few times. The dough inside the circle will start ripping up. This is fine as all your stuffing is fully rolled in the dough “hose.” Cut the remaining dough from the center, and discard with the dough ends.
- Cut the dough “hose” in one place, and start lining it into an oiled pan like tight coils. Dab oil on top of pita.
- Preheat oven to 460F. Repeat steps 5 through 11 for the remaining dough ball.
- Place pan on medium rack and bake pita for 20 minutes until golden on top. Lower heat to 375F, and bake an additional 10 minutes. If at any point pita gets too brown on top, cover with foil and bake an additional few more minutes. Turn the oven off.
- Boil one cup of water with 4-5 tablespoons of oil. Sprinkle generously over pita. Return to turned off but warm oven for a couple more minutes. Wait a little bit to cool down, cut through the middle, then eat.
Notes
Serve with a salad, and yoghurt or buttermilk.
Do not store this pita too long (not that you’ll be able to, I promise) as potatoes don’t store well.
Some people reuse the dough that’s been cut off. I find it’s overworked so I discard it. Avoid working the with fingers and nails to prevent rips.
Do not store this pita too long (not that you’ll be able to, I promise) as potatoes don’t store well.
Some people reuse the dough that’s been cut off. I find it’s overworked so I discard it. Avoid working the with fingers and nails to prevent rips.
Tried this recipe?Let us know how it was!