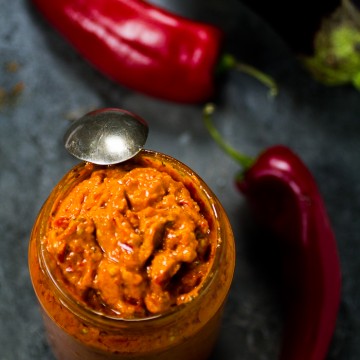
Ajvar
Here's our traditional family recipe for ajvar. Known as the Balkan vegetable caviar, this is a delicious spread made with red peppers and eggplant. (For best results, read the article!)
Equipment
- Stove (old-school wood stove works best, an electric range stove is the second best option, while a gas range stove is our least favorite but it'll work);
- Foil (to cover the oven)
- Vintage meat or sausage grinder (or food processor, or a sharp knife plus extra time);
- Large cooking pot (16-quart or 20-quart, short and wide work best, or two or more smaller pots);
- Several plastic bags
- Several large bowls
- Glass jars (approximately 5-7, 28-ounce (or 750-gram) jars, however, any sized glass jars will work as long as they have a wide brim, and a lid);
- (Optional) Protective plastic sheet (to protect the working area)
- (Optional) Few pairs of latex gloves (to protect fingers from turning red)
- (Optional) Oven Mittens (to protect fingers from hot jars)
Ingredients
Ajvar:
- 23-25 pounds red bull’s horn peppers or red bell peppers
- 8-9 pounds eggplants medium to large
- 3 to 4 cups vegetable or sunflower oil about one 1 liter
- 1 tablespoon sugar
- 2 tablespoons salt
Jarring:
- 1-2 cups vegetable or sunflower oil
Instructions
- Oven and Vegetable Preparation: cover oven racks (or a rack and oven bottom) with foil. Heat the oven to 480°F (250°C). Then thoroughly wash, and pat dry eggplants and peppers.*
- Roasting the Peppers: lower the temperature to 400-440°F (200-220°C). Roast the first batch of peppers by lining as many as you can on the racks (and/or oven bottom) covered with foil, and leave some space between them. Roast for 25-30 minutes (check them once or twice), and then turn each one over using tongs, so they roast equally. (Depending on the size of your oven, you'll probably have to roast all peppers in a few batches.) After turning them over, roast peppers for an additional 20-25 minutes. Check frequently, and roast all sides as necessary. Peppers should be fully roasted at approximately 50-55 minutes total. (Finished peppers are soft, they'll exert some of their fluid, and will have an occasional black patch on the skin which will be coming off in places.) Place roasted peppers in bowls, and then put each bowl into a plastic bag. Seal the bags really well. Leave to cool overnight. Repeat this for all pepper batches.*
- Roasting the Eggplants: roast eggplants the exact same way. (Depending on your oven, they may need less time.) Finished eggplants also have occasional black patches, and the skin will be coming up in places. (However, eggplant skin will be harder than the pepper skin.) Like peppers, place roasted eggplants in bowls, and then place bowls into plastic bags. Seal well. Leave to cool overnight. Repeat this step for all eggplant batches.
- STOP! After you're done roasting the vegetables and sealing them in bags, stop for the day.
- Protecting the Working Area: the next day, start by first protecting your working area (table, floor, counter, etc.) with plastic covering (optional but smart). Then, set up a trash bag or two nearby (or a compost bin if you use them). Also, put your latex gloves on, if you'll be using those. Fill one or two bowls up with water ⅓ of the way (for deseeding). Finally, set out a few bowls for peeled veggies.
- NOW GO GET YOUR TEAM!
- Peeling the Peppers: peel each pepper by first removing the stem and discarding it. Then cut the pepper open, and flatten it out so you can see its insides. With a dull side of a knife remove as many seeds as you can from the pepper. Follow up with peeling of the pepper skin (with fingers or the knife), and then use the knife to scrape off black patches that formed while the pepper roasted. (This here is the tricky part. You may lose some of the pepper meat, and even whole peppers due to lower quality and/ or thinness. Save whatever you can.) Now quickly dip the peeled pepper in the water bowl to get rid of any remaining seeds. (By quick, we mean super quick!) Once each pepper is peeled and deseeded, transfer it to a dry bowl. Repeat this process until your peel all your peppers.*
- Peeling the Eggplant: take an eggplant, cut off its stem, and discard it. Then use a knife to take off its skin. Keep as much meat and seeds intact as possible. (Unlike the peppers, you should keep eggplant seeds for ajvar.) After it's peeled, transfer each eggplant to a dry bowl. (Don't mix eggplant and peppers at this point!) Repeat this process until you peel all your eggplants.
- Grinding the Vegetables: Grind the vegetables using your preferred method. Keep all the juices. If using a food processor, keep the vegetables chunkier. (At this point still keep eggplants separate from peppers.)
- WARNING! This is the time to get little children, elderly, clumsy family members, or anyone who could get hurt, out of the kitchen! The ingredients are essentially boiling the entire time and could cause major burns if handled incorrectly.
- Cooking Ajvar (adding oil and eggplant): Fill your pot up with oil the thickness of one finger. If able, place the pot on the range closest to the wall. Heat it up on high until the oil produces light smoke. Stir in eggplant really well. Simmer for 15-20 minutes stirring very frequently.*
- Cooking Ajvar (adding peppers and more oil): bring the temperature down to low. Stir the peppers in slowly until they integrate with the eggplant. Stir well. Ajvar will be cooking for the next three hours or a little longer. As the ingredients will be boiling most of the time, the air bubbles will be coming out. It’s imperative to continue stirring ajvar throughout the entire cooking time (EVERY COUPLE OF MINUTES!), to allow the air to evaporate, and to prevent burning. (If there are too many bubbles, this means you need to stir it more.) Approximately every 15 minutes stir in about ½ cup of oil, or a little more, for a total of 3-4 cups during the entire cooking process.
- Cooking Ajvar (adding salt and sugar): approximately 45 min before the end of cooking, stir in sugar and salt.
- Sterilizing Jars: approximately 30 minutes before ajvar is finished, heat the oven to 230°F (110°C). Wash your jars and lids in hot, soapy water and rinse well. Dry really well. Put jars on a baking sheet and place in the oven for 15-20 minutes. By the time jars are sterilized, ajvar will be cooked.
- Transferring Ajvar to Jars: once the jars are sterilized, turn ajvar off. Being very careful of your fingers, transfer ajvar to jars with a ladle or a spoon. This step is where oven mittens come in handy, but it's best to wear them only on the hand you'll be touching the jars with, as you need to be precise with the other. Fill each jar up almost to the top, leaving about a centimeter (½ inch) free.
- Releasing the Air from Jars: as you fill each jar up with ajvar, take a spoon and press ajvar all the way down into the jar. Push it down as much as you can, releasing any air bubbles left in the jar. Do this step meticulously, and do it for every jar. (Air is what makes ajvar go bad, so you want to release any pockets of it that may have gotten trapped inside.)
- Forming the Crust: place jars on a baking sheet and return them to the warm, turned-off oven. (Keep the lids off.) Leave them inside the oven overnight, or at least for several hours. A thin, hard crust will form on the top of ajvar in each jar.
- Closing the Lids: the following day (or several hours later) pour a few tablespoons of oil on top of the crust in each jar (remember that 1cm we left free?) and screw the lids on tightly.
- Handling and Serving Ajvar: Keep ajvar in a dark and cool place. Ajvar in jars can last about 4 months. As you open each jar, pour the oil out, give ajvar a stir, then serve. Open jars need to be stored in the fridge and can last up to 7-10 days.
Video
Notes
- Time Notes:
- We purposely left the total time needed to make ajvar empty. You'll need an extensive amount of time for all the steps. We're talking several hours, preferably spread over 2 days. However, you can shorten it considerably by having more people help you.
- The actual cooking process takes about 3-4 hours. As the time depends on several factors (thickness of your cooking pot, vegetable water content, whether you're cooking on gas, electric, or wood stove, etc.), your best bet is to look at outward signs that it is finished.
- Knowing when the ajvar is ready: check with a spoon to see that it is creamy. In some instances, like with jam, you can draw a line with a wooden spatula on the bottom of the pan, and see how well it separates. Its color will be deep orange. Finally, you can taste it, but be very careful because it's extremely hot. The rule is that the longer it cooks, the better and smoother it is.
- Overcooking is not good either: If you overcook it though, it'll turn brown and/or burn. So don't cook for 5-6 hours.
- Equipment Notes:
- Ingredient Notes:
- Instruction Notes:
Step 2: our roasting temperature is only a suggestion; roast them at whatever temperature works for your oven. Total roasting time depends on your oven. ALWAYS go by your oven and visible signs that the vegetables are done, rather than an exact time. All batches after the first batch usually take less time. Re: bags, placing the peppers in the bags will allow for the steam to raise the skin off the peppers, and will make peeling infinitely easier. Step 6: you don't necessarily need anyone to help you with roasting. Although long, that part is easy. (If you have someone who is willing to roast some of the veggies at their own house, and bring it over, even better!) Peeling vegetables, however, is the time to get everyone else involved. Trust us, do not attempt to do this by yourself! Step 7: peeling is the first reason why we always get more ingredients than necessary. You'll lose a small volume of peppers almost every time. Another important thing to remember is to remove as many seeds as you can. Also, some ajvar recipes call for placing vegetables in a colander or a strainer after peeling them, so they're drier for grinding and cooking. However, we find that the extra juices really add to that perfect ajvar flavor.
- Expert Tips:
Tried this recipe?Let us know how it was!