Homemade Pickled Vegetables (Turšija) [How To Pickle Veggies, A Guide]
Homemade pickled vegetables (turšija) are a colorful medley of crisp vegetables preserved in a simple, flavorful brine. Our easy guide will have you pickling all the veggies in no time. Shall we?

Jump to:
Background
Pickling and fermenting are respected traditions in the Balkan cuisine. One of the most beloved examples is turšija, a medley of homemade pickled veggies that are plump, chunky, bursting with juices, and deliciously sour.
Turšija pickled veggies are considered a form of a versatile cold salad. They're served as an appetizer, or alongside hearty main dishes. It's pickled from late summer to early winter - in small or large batches.
Great thing about pickled veggies is that you get to pick what to pickle. Almost anything works - from peppers, carrots, cauliflower, cabbage - to celery root.
Moreover, homemade pickled vegetables are fantastic immunity boosters. They pack a great amount of Vitamin C, and serve as probiotics too, depending on the preparation method.
Why You'll Love It
- Burst of Freshness. Pickled veggies add a tang, crunch and freshness to heartier winter dishes.
- Your Favorite Veggies, Pickled. You get to mix-and-match your own medley of veggies to pickle.
- Long-lasting. Homemade pickled veggies can last you throughout spring, and into the summer even. (Almost in time to pickle another batch!)
- Meza + Turšija = ❤️ Talk about a marriage made in heaven!
- Great for Gifting. Who doesn't love a jar of beautifully pickled colorful vegetables? (Especially if you wrap them deliciously too!)
Ingredients
Here are the ingredients you'll need to make homemade pickled veggies (turšija). We did not include ingredient photo because you can choose any of the veggies below, and mix them together in any way you'd like.
Brine:
- Water. Regular tap water. Avoid sparkling.
- Salt. Regular table salt.
- Sugar. White granulated sugar is best.
- White Vinegar. Best due to the neutral flavor.
- Potassium Metabisulfite (E224). Preservative powder usually used in wine and vinegar industry. Look for it on Amazon in small quantities and classified as food grade. (Goes by vinobran in the Balkans.)
- Sodium Benzoate (E211). Another preservative powder. Look for it on Amazon in small quantities and food grade classified. (Goes by konzervans in the Balkans.)
- (Optional) Seasonings/ Aromatics. Peppercorn, bay leaf, garlic cloves, mustard seed. For best taste, use one or two at a time, conservatively.
Vegetables (mix and match):
Look for fresh, crunchy and healthy vegetables. Avoid frozen veggies, or vegetables with spots of rotting or decay.
- Carrots.
- Cauliflower. Buy whole heads, then break them apart into florets.
- Cucumbers. Look for smaller ones.
- Green or yellow tomatoes. Avoid red tomatoes.
- Red, yellow or orange bell peppers. Bull horn peppers roge, or sweet peppers babure also work, as do Italian sweet peppers.
- Cabbage.
- Celery root.
- Parsley root.
- Onions or shallots.
- (Optional) Chili peppers. Start with only a couple.
Instructions
Here are the easiest instructions to make homemade pickled vegetables at home.
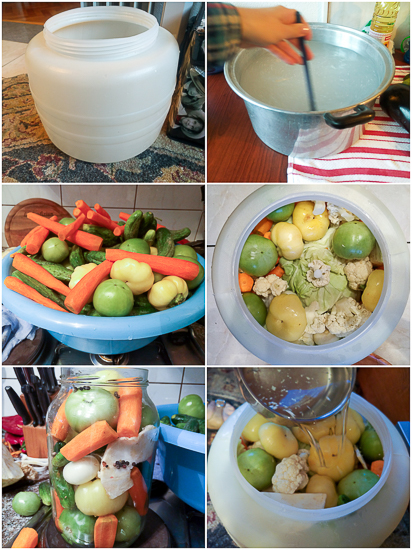
Step 1. Prepare pickling container(s) and lid(s).
Step 2. Prepare brine.
Step 3. Wash, prep and cut the veggies.
Step 4. Layer veggies into containers tightly.
Step 5. Pour the brine over the veggies until submerged.
Step 6 (not pictured). Place something heavy, seal the lid, and let rest about 20-30 days.
Handling
Here are a few tips on how to take care of your pickled veggies (turšija):
Serving. Serve picked veggies chilled, or at room temperature. They go fantastically with heavier dishes like stews and sauces, roasted or grilled meats, alongside and in sandwiches, and on meza platters.
Some prefer to eat it as an appetizer, or a standalone salad.
Storing. Keep sealed jars in a cool pantry, basement or a garage for several months. Once opened, jars should be transferred to the fridge. Use within a few weeks.
If making homemade pickled vegetables in a barrel, keep it in a cool place at about 50-53°F (10-12°C). (Think basement, garage, terrace or a cool pantry.) It can last several months this way.
When ready to eat, open the lid, remove the heavy object, and pick out as many veggies as you need. Then return the heavy object on top of the veggies and close the lid. Vegetables should always be submerged in the brine.
Keep the veggies you took out in the fridge until you're ready to consume them.
How to know when homemade pickled veggies are going bad?
- Smell. Pickled veggies have a tangy, slightly sulfuric smell to start with. However, if the batch starts to smell like rot, putridity, or decay, it's time to ditch the batch.
- Brine color. If brine turns cloudy, has patches, or moldy spots, it's gone bad.
- Vegetable Texture. Pickled veggies should be kind of crunchy and sturdy. If their texture softens, starts falling apart, or turning to mush, discard.
Expert Tips
Fresh Vegetables. Veggies you use to pickle must be completely fresh, not frozen, and not overly ripe. Cut off any rotting or suspicious spots before pickling.
Submerged. Veggies in jars and barrel need to stay submerged in brine at all times when not consumed.
Plastic Bag in Barrel. Instead of weighing the vegetables down with a heavy object, you can place a thick plastic bag inside the barrel and tie it tightly after adding the veggies and brine.
Once the vegetables have finished pickling and are ready to eat, simply remove the lid, untie the bag, take out the amount you need, and tie it again. Each time, you’ll tie the bag lower so the remaining vegetables stay fully submerged in the brine.
Label and Date. It's helpful to put a sticker with a date on your containers, especially if you're making a few batches throughout the winter.
Gifting. If planning to give pickled veggies as a gift, it's best to pickle them separately from the start. Choose jars, and sterilize them ahead of pickling.
Variations
Pickled veggies have several variations you can try.

- No Additives. For a more old school flavor, make the brine with salt, sugar and vinegar only. It'll last a shorter time, but it's a healthier alternative.
- More Sour. For a taste that's even more sour add more vinegar to the brine.
- Spicier. Adding hot peppers to the batch will make the pickled veggies spicier.
- Single Vegetable. If you prefer, make a single veggie only pickle like cauliflower-only, carrot-only, etc.
Recipe FAQs
Traditionally, peppers, green and yellow tomatoes, cucumbers, carrots, cauliflower, celery root, parsley root, and cabbage are used for Balkan homemade turšija.
Onions, garlic, and chili peppers are optional. If you decide to use them, start conservatively as they affect the taste.
Feel free to mix and match. However, stay away from pickling mushy vegetables like zucchini or eggplant. Beets and mushrooms are usually pickled separately, in a single-veggie pickling style.
Today's method is a pickling method.
In addition to vinegar, we're also using potassium metabisulfite (vinobran) and sodium benzoat (konzervans) which are preserving additives. These help out with longevity and quality.
Fermenting usually involves using salt and water only for brine, and letting the vegetables ferment at their own pace.
If located in the US, you can buy these on Amazon.
You'll only need a little, so buy in small quantities (a couple of ounces of each, in case you want to make a few batches). Make sure these are labeled "food grade."
If in Europe, you can buy these in tiny 10g and 20g bags in almost any grocery store. In Central, Eastern Europe and the Balkans they're called vinobran and konzervans, (or a variation of those words).
Yes. Veggies will be more volatile, and last a slightly shorter time, but it's absolutely fine to pickle them without potassium metabisulfite and sodium benzoat.
In this case, bring salt and sugar to a boil, and let them dissolve completely. As the brine cools, add vinegar and aromatics. Then pour over the tightly packed veggies that you previously placed in jars or barrel.
As we're using additives to conserve we don't boil brine water. Hotness can make them ineffective.
It's preferred that you do for this recipe. However, you can play with the amount of vinegar.
For less acidity and sourness, add less. Alternatively, you can make a traditional brined vegetables with salt and water only. The flavor will be milder.
Without the vinegar and additives you're effectively fermenting the vegetables. In this case, you're best off to ferment single vegetables in jar as fermentation is slightly different for each.
When stored in a cool place and kept sealed, they can last several months. Opened jars should be refrigerated.
Your vegetables were either overripe, you added too little preserving agents, or there was too much heat during storage. Discard these and start fresh.
Garlic and chili peppers greatly affect the taste of the entire batch.
Too much garlic, and it overpowers the barrel. Too many chili peppers, and now you have hot pickled veggies not everyone enjoys.
Additionally, garlic goes bad faster than other veggies and aromatics, and we like our pickled vegetables to last as long as possible.
This is why we usually skip garlic, and are careful with how many chili peppers we add. However, you're welcome to play around with the volume of each.
More Sour Recipes To 💙
Here are a few more ideas for fermentation and pickling.
Thoughts?
Lastly, if you made Homemade Pickled Vegetables (Turšija) and liked it, please consider giving it a ⭐️⭐️⭐️⭐️⭐️ (5-star) rating. This helps others find the recipe more easily!
Also, feel free to leave a comment (I read each one!), and don't forget to tag a photo #balkanlunchbox, or us @balkanlunchbox, on IG.
Prijatno, Dobar Tek, and Bon Appetit!

Homemade Pickled Vegetables (Turšija)
Equipment
- 1 plastic 5-gallon (20 liters) barell with a lid Alternatively, several glass jars of different sizes (approximated total volume should be around 5-gallons) with lids; (sterilization instructions are below).
Ingredients
Brine
- 2 gallons tap or bottled water approximation
- 8.5 cups white vinegar
- 12 ounces table salt
- 9 ounces white sugar
- (Optional) Peppercorn (3-4 tablespoons), garlic (a couple of cloves), mustard seed (2-3 tablespoons), dill (2 tablespoons) choose one or two at any one time
- 1 tablespoon Potassium Metabisulfite (E224) available on Amazon (buy in small quantities)
- 1 tablespoon Sodium Benzoate (E211) available on Amazon (buy in small quantities)
Vegetables (Volumes and Veggies are Approximate, Mix-and-March Per Taste)
- 4.5 pounds yellow tomatoes
- 2 pounds green tomatoes
- 2.5 pounds cucumbers keep small ones in tact, slice bigger ones
- 4.5 pounds cauliflower florets only, separated in chunks
- 4.5 pounds carrots peeled, whole or slice per taste
- 4.5 pounds cabbage heads sliced into large chunks; alternatively, grated
- 1-2 celery root(s) slice into chunks
- 1-2 pounds red or yellow bell peppers
- (Optional) shallots or smaller onions, 2 pounds (1kg)
- (Optional) chili peppers 2-3 whole
Instructions
- Prep the Containers. Wash the barrel and lid thoroughly with detergent, then dry completely. Set aside.If using jars, wash jars and lids well with detergent and let them dry. Place the jars (not the lids) on a baking sheet or flat metal pan and put them in the oven. Heat oven to 200°F (100°C) with jars inside, so they warm up together for about 20 minutes. Turn off the oven and open it, allowing the jars to cool slightly. When ready, carefully remove the pan with oven mitts.
- Make the Brine. In a large pan(s), combine brine ingredients. Mix well and stir patiently several minutes until all ingredients (except aromatics) are dissolved in water. Set aside.
- Prep the Veggies. Wash all vegetables thoroughly and pat them dry. Remove any damaged, overripe or undesirable parts. Cut the cabbage into quarters or shred it, break the cauliflower into florets, peel and chop the celery root, and peel and halve the carrots, or dice them. Cucumbers can stay whole or diced, no need to peel. How you cut the vegetables is up to you—large chunks work well, but you can also leave some whole, like tomatoes, or dice them if you prefer.
- Layer the Veggies. Place the vegetables into your fermenting container or jars in layers—for example, start with yellow tomatoes, then green tomatoes, cucumbers, and so on. Once the container is full, press the vegetables down firmly to remove air pockets and make room for more. The vegetables should be packed tightly together.
- Add Brine: Pour the brine over the vegetables, making sure they are fully submerged. Gently press the vegetables down to remove any air pockets.For barrels: Place a couple of clean bottles of water, a clean rock, or a few pieces of wood on top to keep everything submerged, then close the lid.(Alternatively, you can place a thick plastic bag inside the barrel and tie it tightly after adding the vegetables and brine. Once the vegetables have finished pickling and are ready to eat, remove the lid, untie the bag, take out the amount you need, and tie it again. Each time, tie the bag lower so the remaining vegetables stay fully submerged.)For jars: Use small wooden sticks or a similar tool to keep the vegetables under the brine. Close the lid tightly, and flip the jars for a couple of hours. Transfer to a dry place. If you have leftover vegetables and brine, use a smaller container or jar and repeat the process. Seal all containers tightly.
- Let it Pickle. Transfer to a dry place (basement, garage, cool terrace, pantry, etc.), and leave covered for at least 20-30 days. The days are not set in stone, and you won't go wrong adjusting a day or two up or down.After that period your vegetables will be pickled and ready for consumption. They last several weeks to months.
- Serve pickled vegetables chilled or at room temperature. They pair beautifully with meats, stews, sandwiches, meza platters, or as a simple appetizer or salad.Store jars sealed in a cool place for months; refrigerate after opening and use within a few weeks. Store barrel(s) in a cool spot (50–53°F / 10–12°C). Remove only what you need, keep the rest submerged, and refrigerate any removed vegetables.
Notes
- Volume
- Nutrition Information
- How to Tell If They’ve Gone Bad: