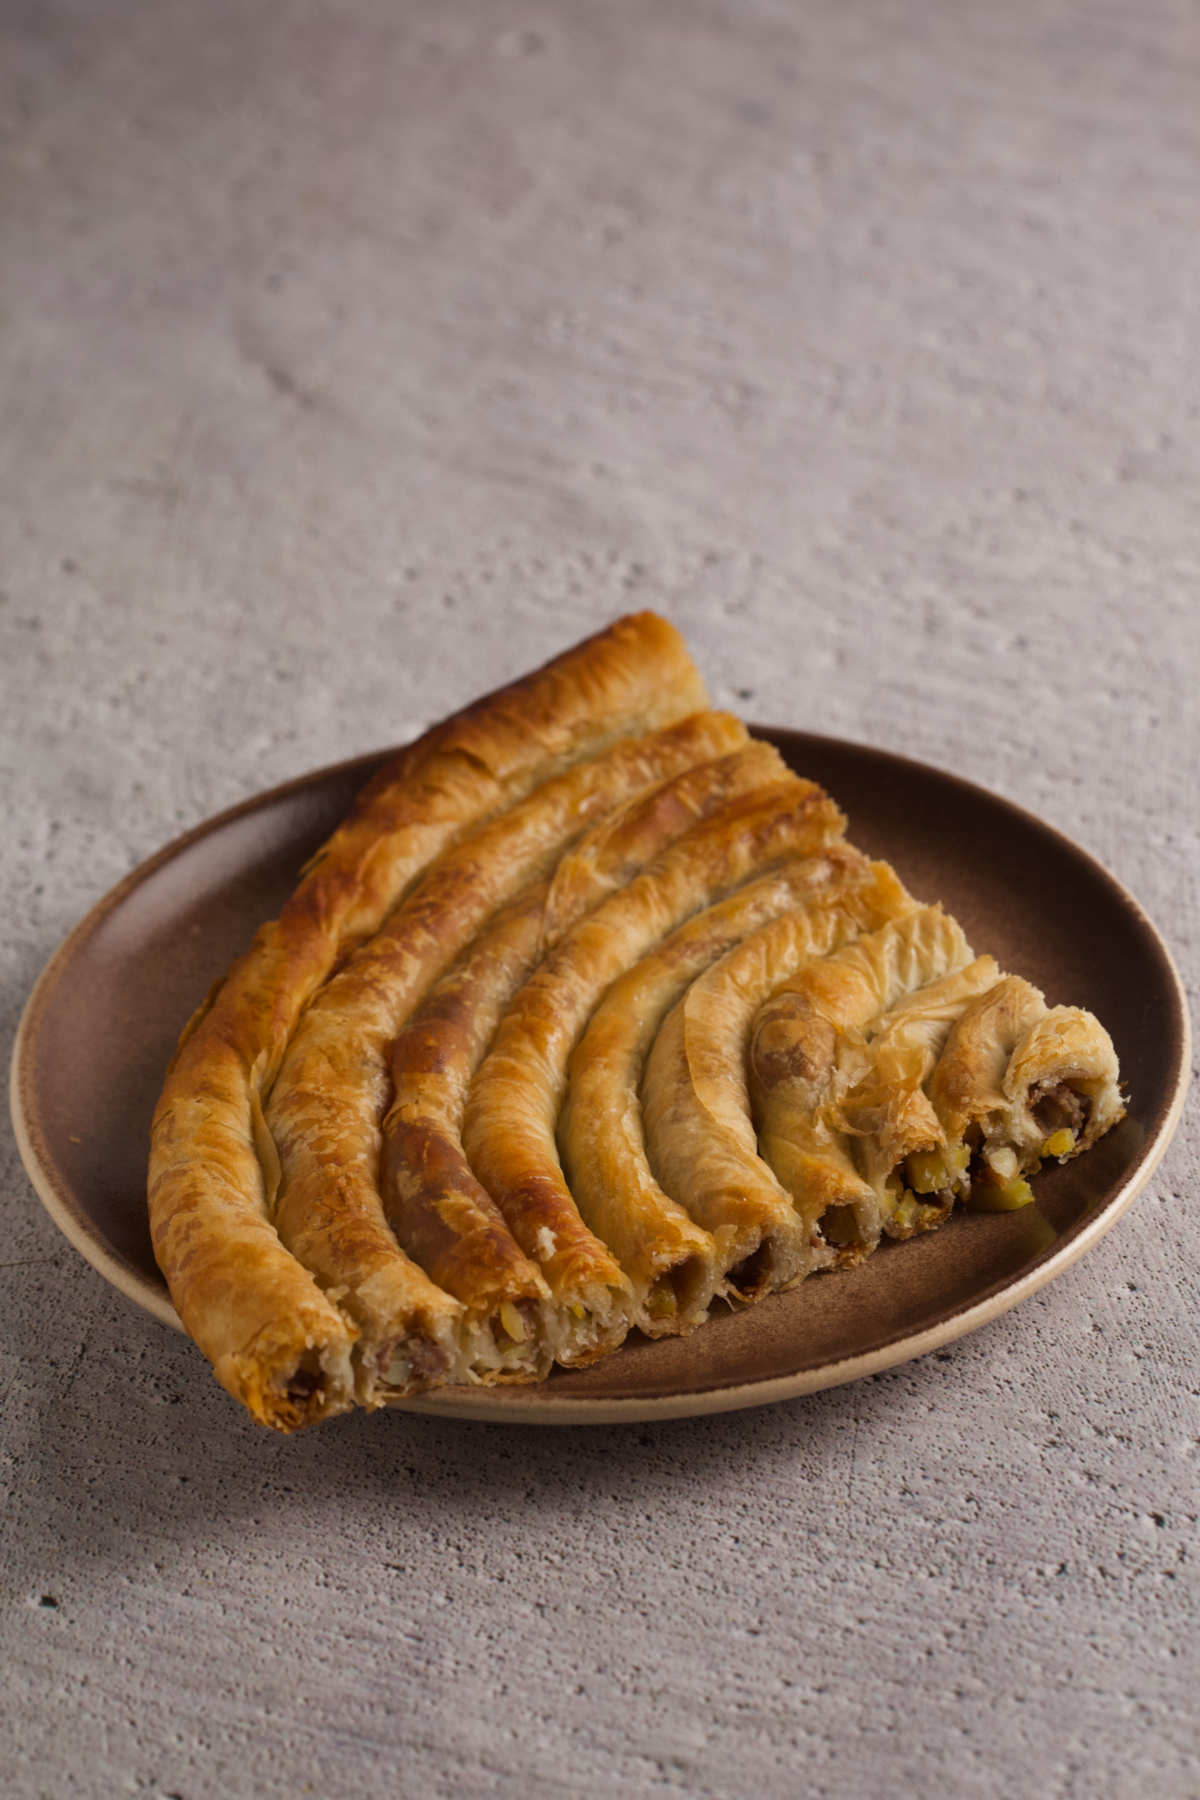
Burek is a mouth-watering Balkan phyllo dough pie with a filling. Today, we're sharing our family recipe for Bosnian burek. This amazing dish is prepared with homemade phyllo stuffed with meat and potatoes. Shall we?
Jump to:
Warning
Like the famous Balkan pepper spread ajvar, burek from scratch also takes time to learn and make.
If this is a refresher for you, jump to the recipe card! (And we'd love to hear your burek tips in the comments!)
There is no fast burek recipe if you want to make phyllo from scratch. However, if short on time, see our burek made with store filo that everyone's raving about.
To make it easy on you, in this article you'll find many great burek tips. If in doubt, read all of it.
Background
Burek, or pita, is a pie made with phyllo dough. Think layers of parchment paper-thin, flaky dough, stuffed with delicious fillings, shaped into different forms. And then baked.
Why should you learn to make burek? Because it's the tastiest Balkan food!
More importantly, learning to make burek from scratch also teaches you how to make phyllo dough from scratch. Phyllo dough is the foundation for many Balkan dishes like pies and baklava.
Additionally, it's found in many international dishes, like strudels, rolls, tarts, and more.
As challenging as making phyllo dough looks, all it really is is regular dough stretched into really thin sheets.
Doesn't look so scary now, does it?
Equipment
Here are the non-ingredient ingredients to make phyllo dough making easy.
1. Spacious Working Space. A long dining table or an island work best. Look for something that's at least 3x3 feet. And make sure you can walk all the way around it. (It's ok if you don't have it, and if you can hardly turn around in your kitchen. Plenty of grandmothers worked with minimal space; some even on the floor, on small tables called 'sinija.' Work with what you have.)
2. A Cotton Tablecloth. This tablecloth is to be used only for dough making. It should cover all of your working space. (Look for 100% cotton.) It's there to protect it and make it easier to stretch the dough. After each use, shake the tablecloth outside, and then wash, dry, iron, and store it for the next time.
3. Saran Wrap and 3-4 Clean Kitchen Towels. Once the kneading is done, the dough has to rest. You'll be wrapping it in saran wrap and then kitchen towels. (Resting allows the gluten to work its magic so you can stretch the dough easily.)
4. (Optional) Oklagija Rolling Pin. We used to religiously recommend the local thin, wooden, long rolling pin called okagija. However, if you cannot find or make oklagija, you can use the regular rolling pin. In this case, you'll be stretching more with your hands. Below are detailed instructions for both options.
5. (Optional) A Round Pan. If you can, find a round pan with a diameter of 13-15 inches (34-38 cm). These pans are fantastic for that round spiral burek shape everyone loves. If you cannot find one, rectangular pans, even sheet pans work. You'll just shape the burek differently. Tips are below.
Ingredients
Phyllo dough ingredients for burek:
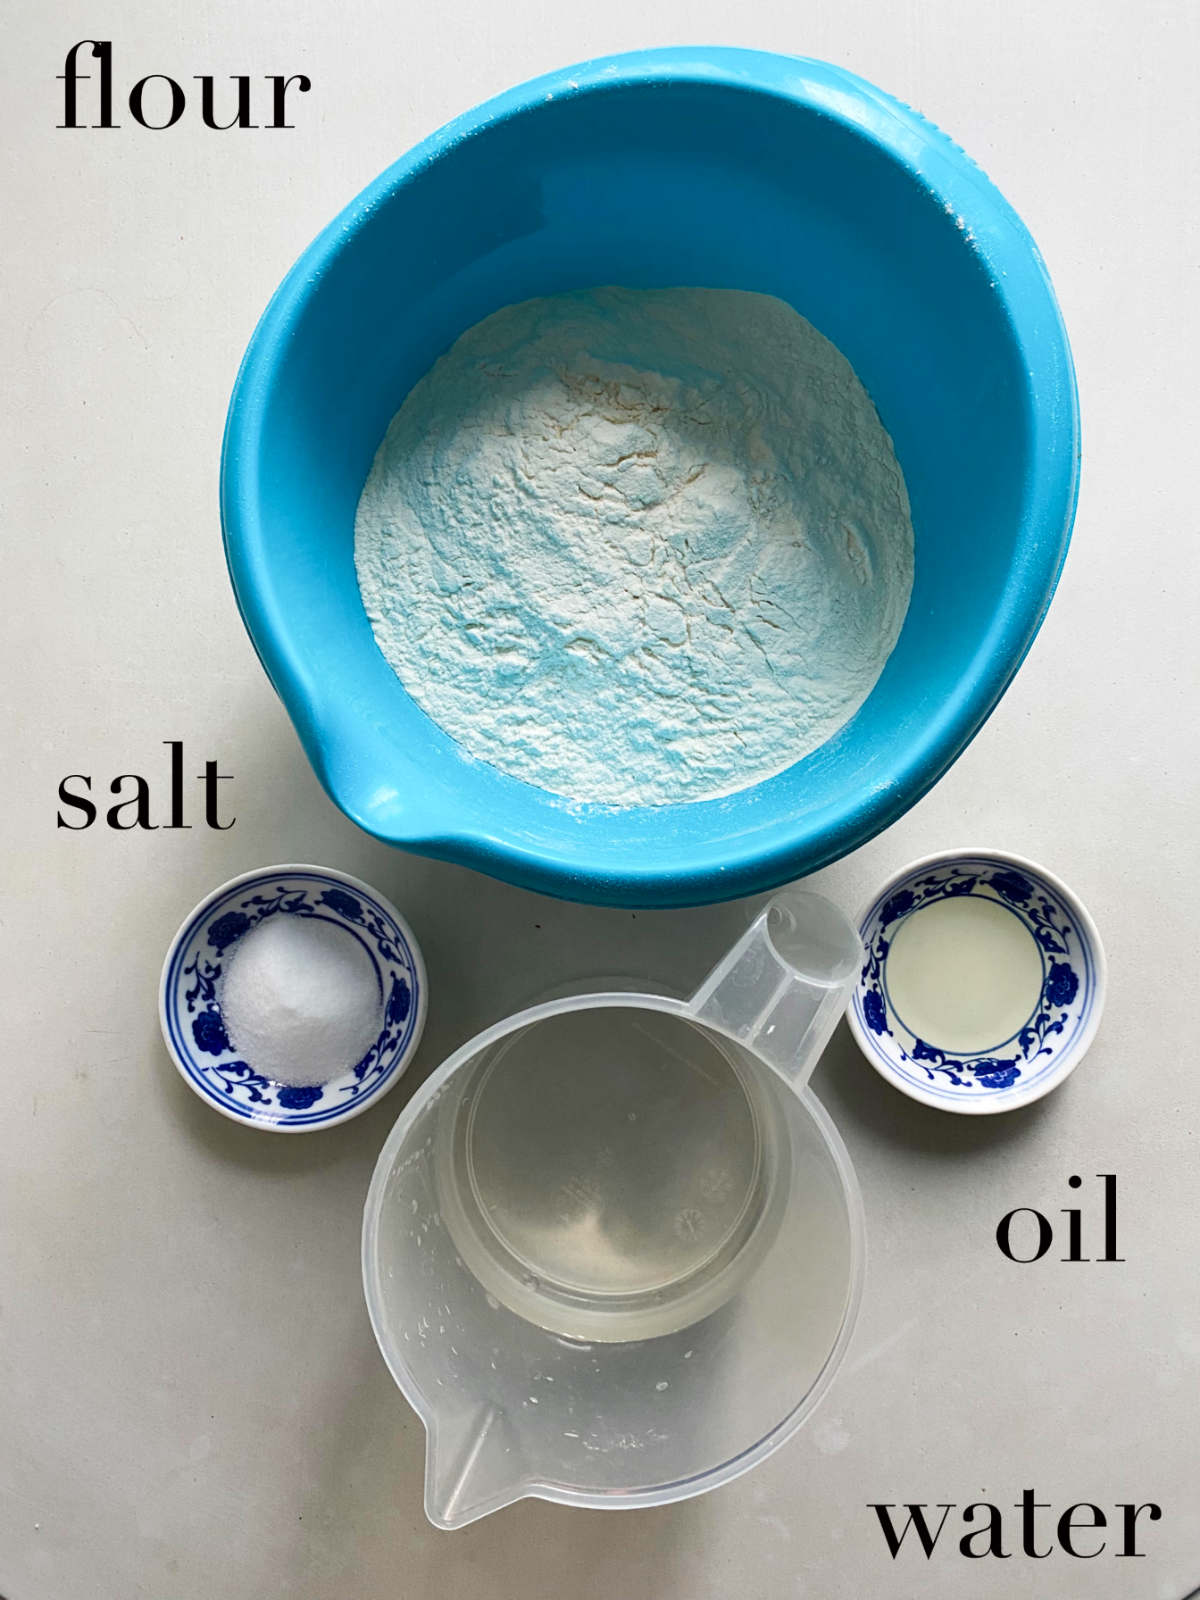
- Flour: regular white flour works best. Always open and use a brand new bag of flour when making phyllo dough! (Buy a couple of 2lbs/1kg bags.)
Avoid flour substitutions. We haven't experimented with other kinds. If you have, please let us know in the comments!
- Oil: vegetable or sunflower oil works well. (If you're opting for a healthier version like coconut oil, it should always be in a liquid state.)
- Butter: sometimes butter is mixed with oil. (Old school burek was made exclusively with butter.)
- Salt: regular salt is fine. Avoid coarse salt.
Filling ingredients for Bosnian burek:
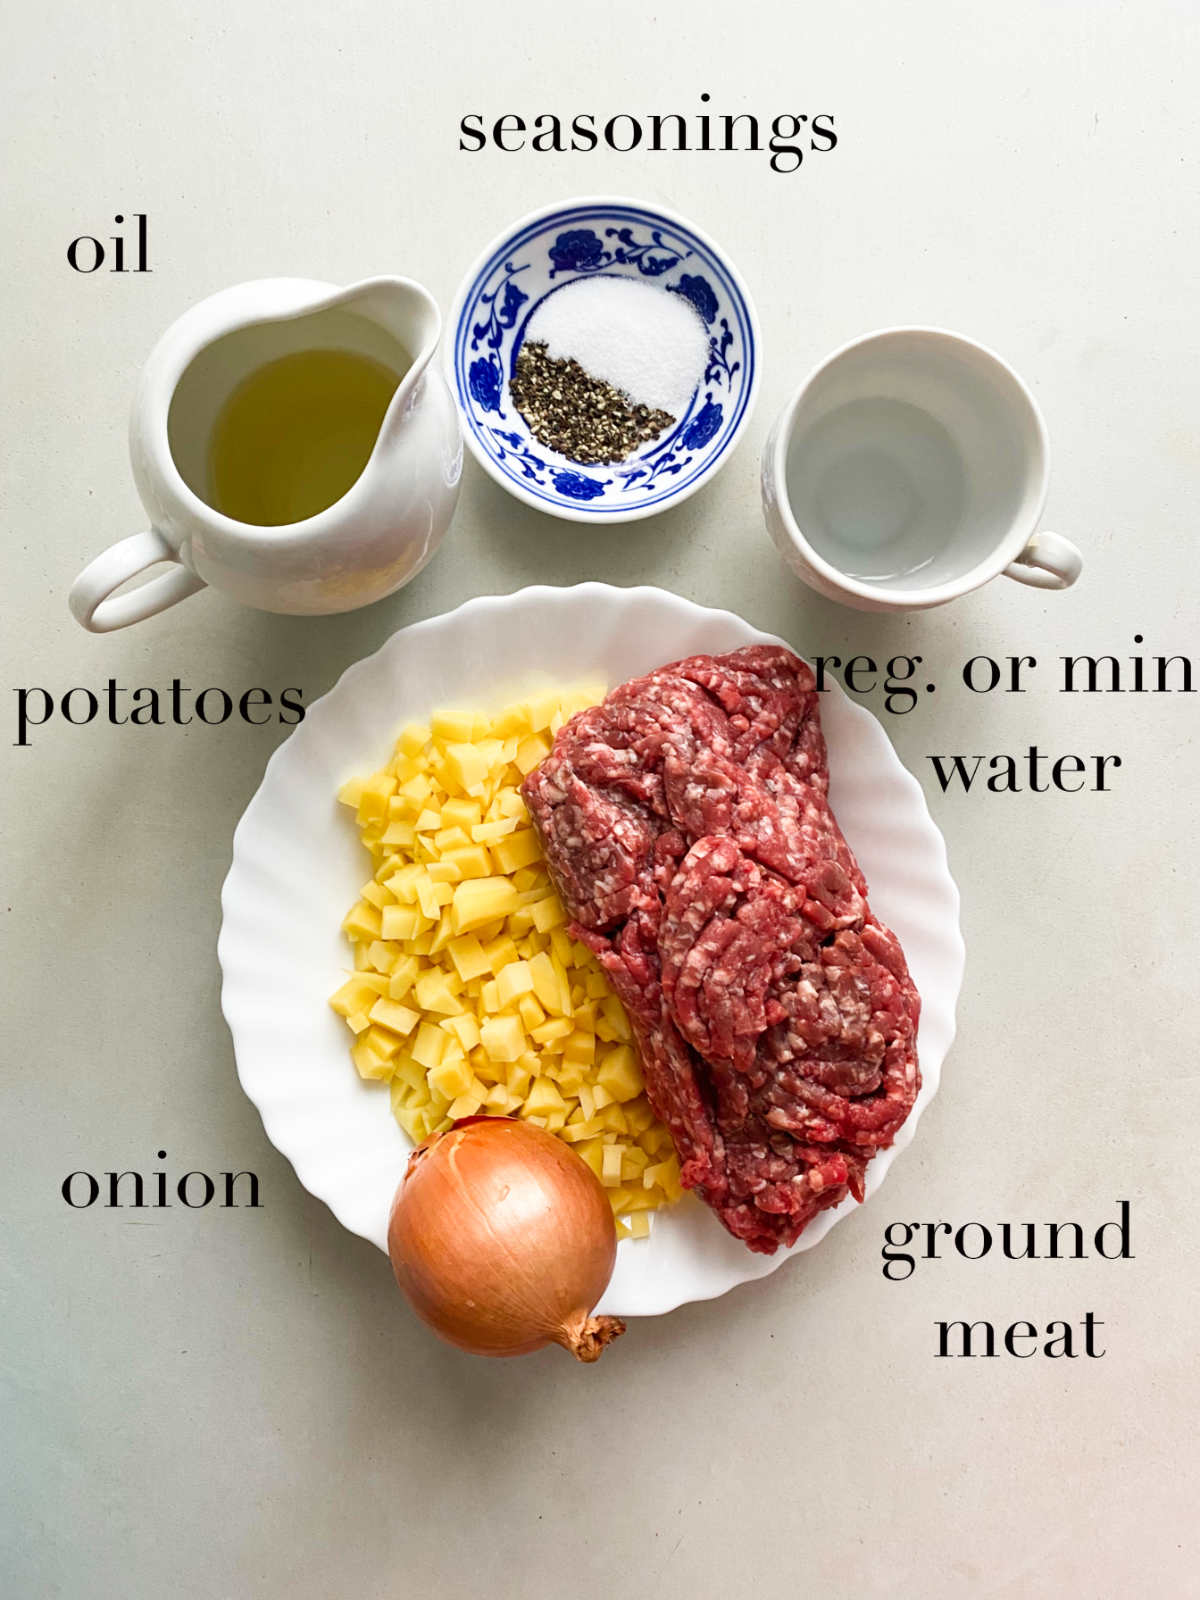
- Meat: Bosnian burek is made with either ground beef (preferably ground twice), or a lean cut of beef (think shoulder steak, rump roast, tri-tip roast, sirloin, even veal, etc). If you can choose, go for the second option, and finely dice (really important!). The pieces should be tiny.
Substitute with ground pork (not diced pork!), if you eat it. Avoid poultry. Although chicken is fine for some types of burek, Bosnian burek is primarily a beef pie.
- Potatoes: Russett or Gold Yukon are fine. In general, you can use most types of potatoes for this pie. Dice small or grate them. If you opt for grating, squeeze out extra liquid before mixing the stuffing.
- Onion: white or yellow onion, diced small or grated.
- Seasonings: while salt and pepper are foundational basics for burek, people also use Vegeta (1 tbsp), 1 bouillon cube, or stock powder (1 tbsp) often.
3. Topping and additional ingredients for Bosnian burek:
- A few tablespoons of butter (or oil), melted in water until hot.
Instructions
Below are burek making instructions, with step-by-step photographs of the entire process. (More detailed written instructions and the video are in the recipe card.)
Step 1: Kneading phyllo dough
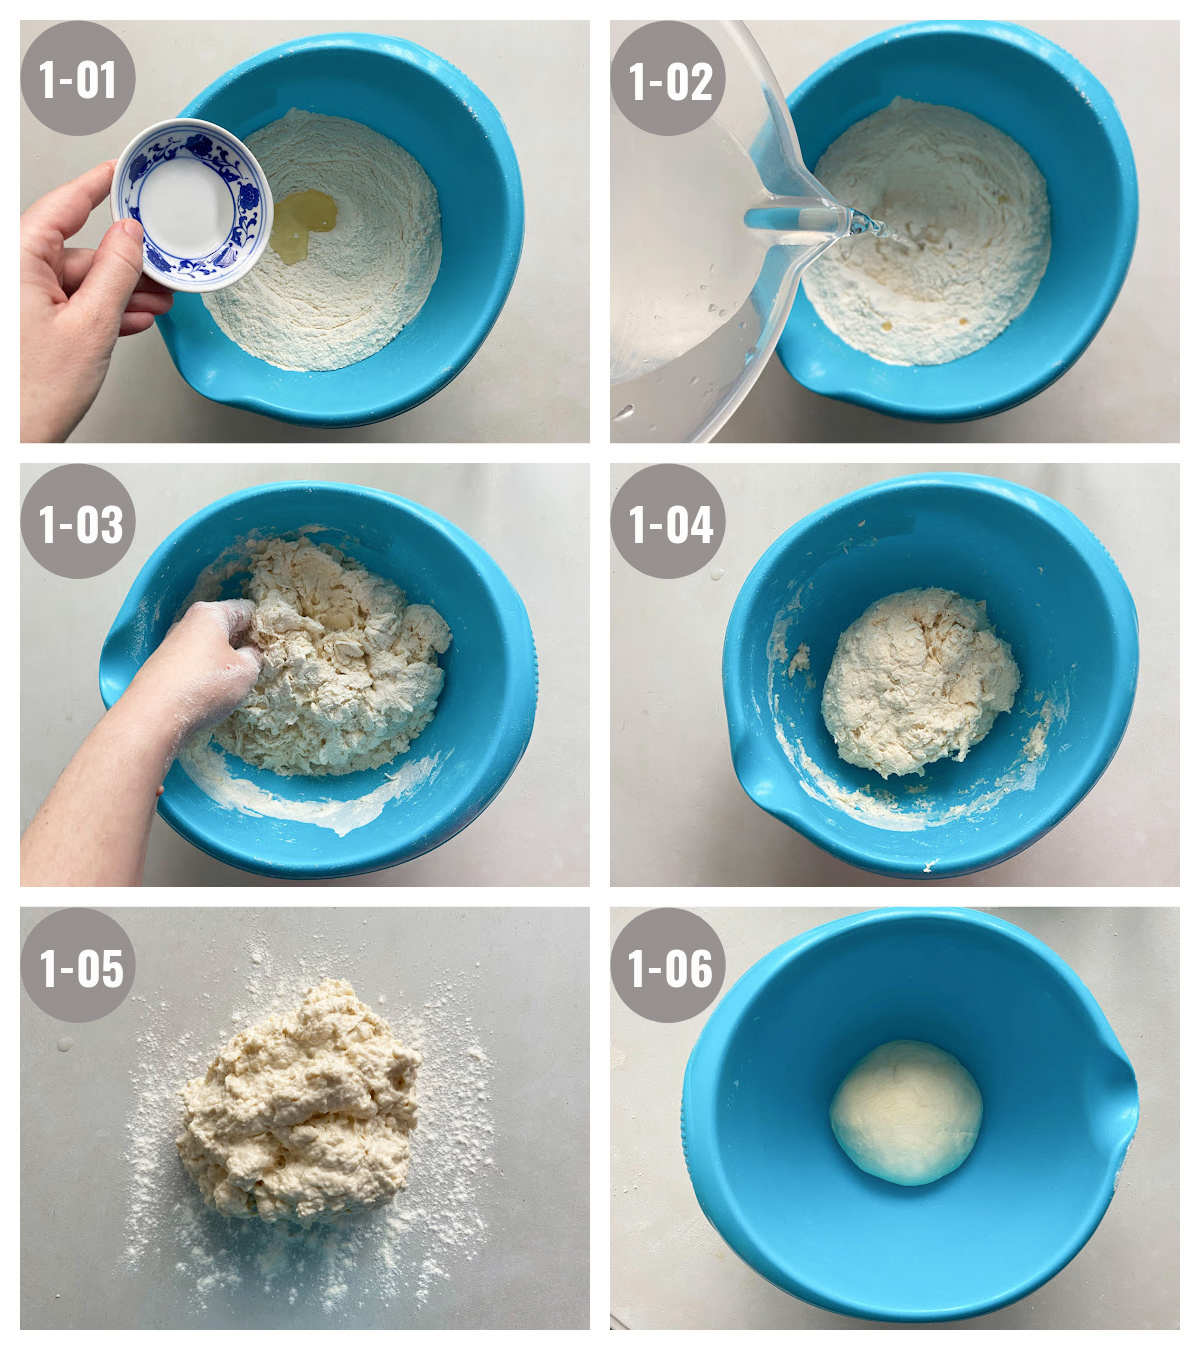
In a bowl combine flour, salt, and oil. Add water gradually, and knead ingredients into a ball for 2-3 minutes. Now knead vigorously for at least 10 more minutes (15 is even better), or until the ball is smooth with the consistency of an earlobe.
Step 2: Resting the dough the first time
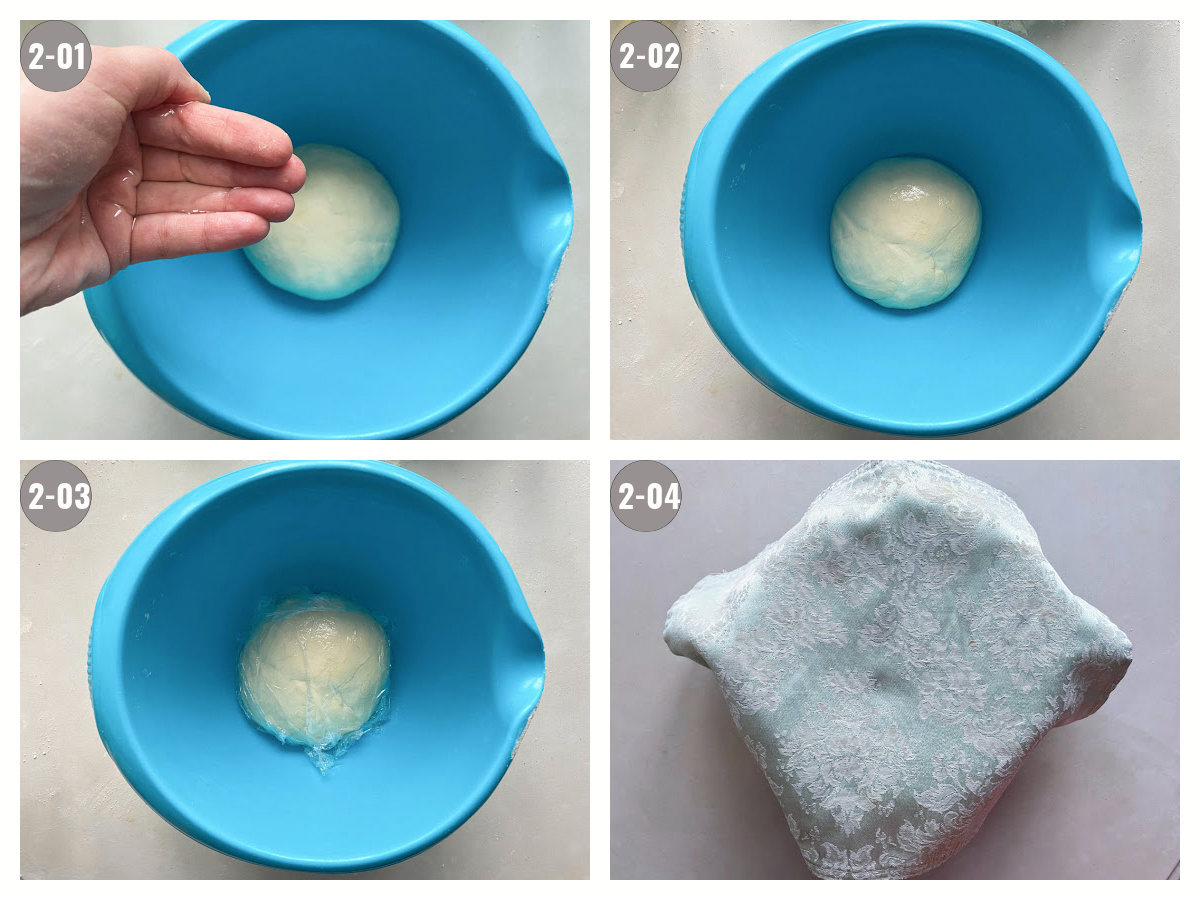
Dab dough in oil generously. Cover first with saran wrap (cling wrap), then with a kitchen towel. Leave in a warm space for 1 hour.
Step 3: Stuffing preparation
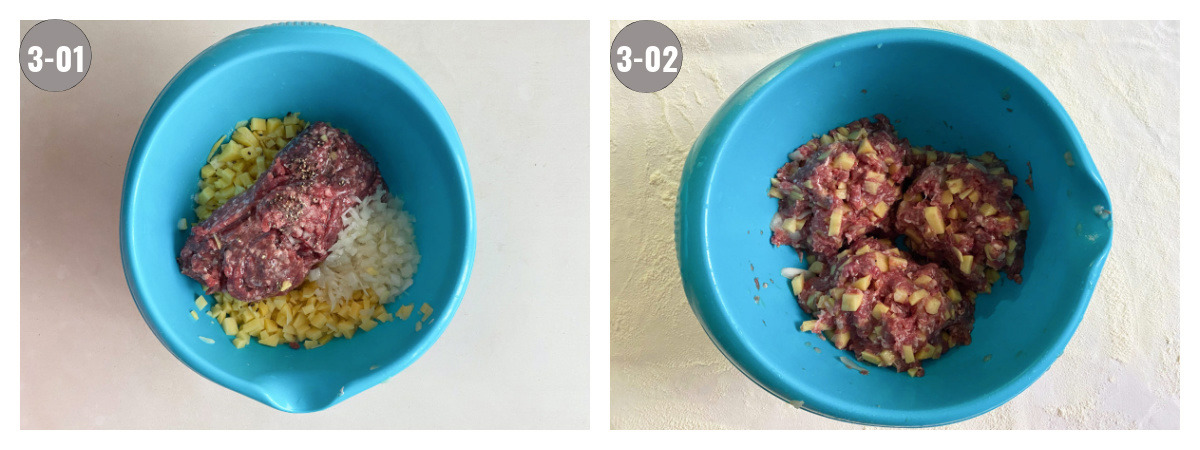
In a bowl mix all filling ingredients together. Then divide into three portions.
Step 4: Dividing and resting the dough again

Flour working space. Take the dough ball, divide it into three equal parts, and knead each for 2-3 minutes. Shape into small balls, dab with oil, and cover with saran wrap and a kitchen towel. Let rest for 15 minutes or longer.
Step 5: Rolling out and resting the dough the third time
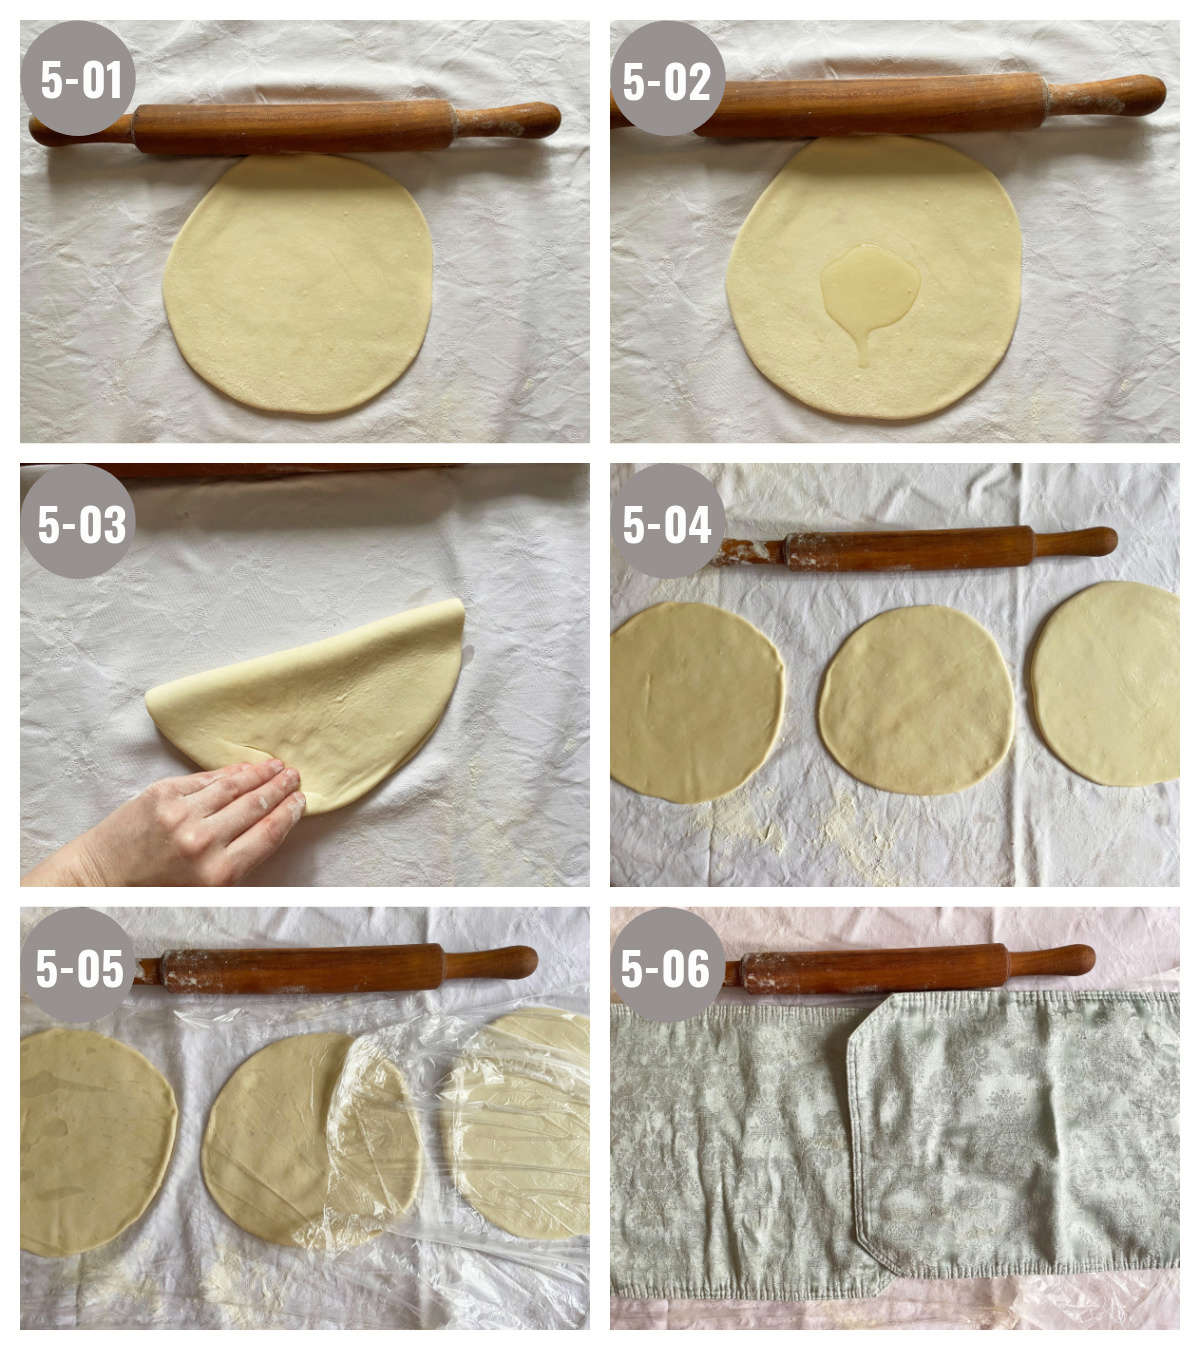
Flour working space. Take one ball and punch it gently to flatten it. Roll it out with a rolling pin until it's about 10-12 inches (25 cm) in diameter. Dab with oil on all sides, and cover with saran wrap and a kitchen towel. Repeat for the other two balls. Let rest for 15 minutes or longer.
Step 6: Choosing a stretching method
Choose whether to stretch the dough with a long thin rod rolling pin called oklagija, or your hands and a small rolling pin.
Method 1 - stretching the dough with hands
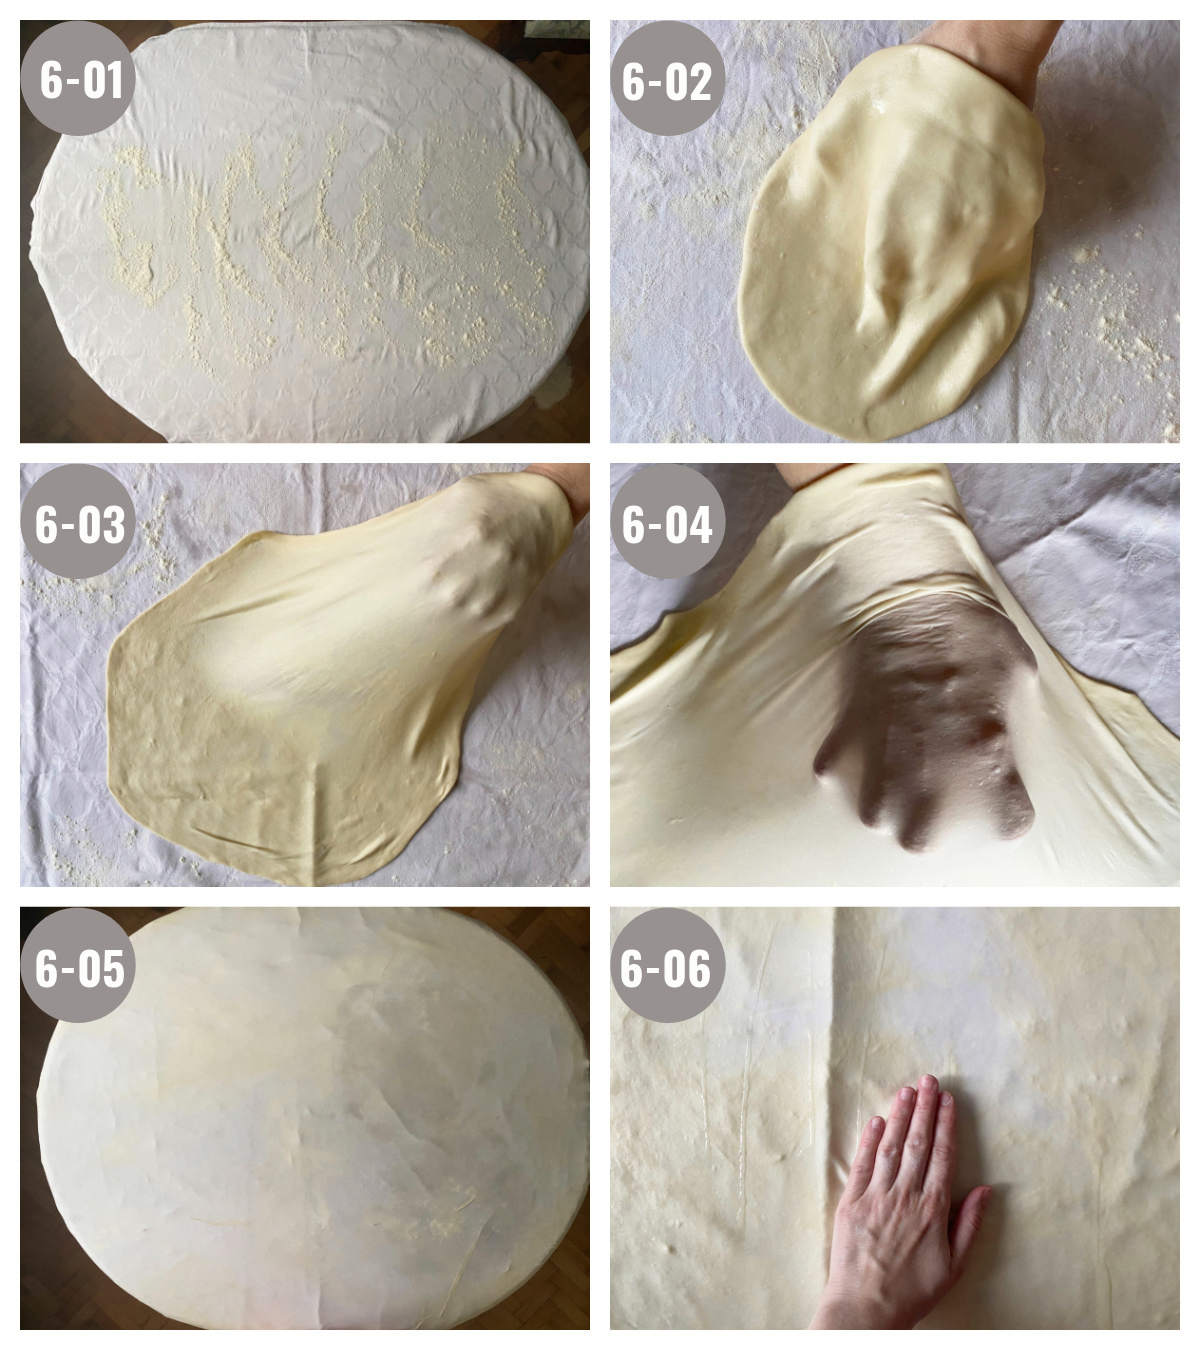
Flour working space. Lift one of the flattened dough balls and let it weigh itself down on all sides. Dab with oil. Transfer to the working space and stretch on the left and right sides.
Now start stretching with the tops of your knuckles. Gently lift the dough from underneath and pull it toward yourself, little at a time. Walk around the dough as you do this so it's equally thin everywhere. (If you've done the first steps well, the dough should be super stretchy and easy to expand.)
As you are stretching it, shape the dough into either an approximation of a rectangle or a circle (look at the stuffing methods). It is finished when it's the thinness of the cigarette paper everywhere. Avoid rips and holes as much as you can. Pinch together if it happens.
Method 2 - stretching the dough with the oklagija rolling pin (see the video!)
Flour working space. Take one flattened dough and roll it out until it's the thickness of a few stacked pennies. Dab with oil and drape over the rolling pin so it hangs evenly.
Let it weigh itself down on both sides. Turn 45 degrees on the rolling pin, and let it weigh itself down on these two sides as well.
Start stretching the dough with your knuckles as much as the dough will go. Work ends and middle equally. Try to avoid rips as much as you can. (If you've done the first steps well, the dough should be super stretchy and easy to expand.)
Gently transfer the dough to your working area and stretch it out as much as it will go. Dab oil as necessary, 2-3 tablespoons at a time. Finally, shape the dough into either an approximation of a rectangle or a circle (look at the stuffing methods).
Step 7: Handling dough edges (ends)
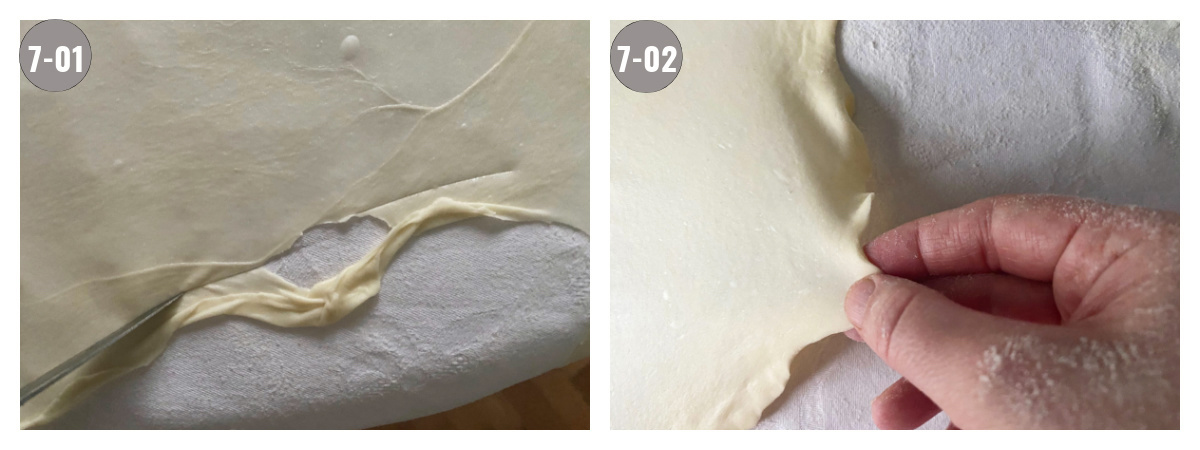
As the edges of the dough are thicker than the rest, cut them off with a knife, or further thin them out by lifting and stretching them with the tops of your fingers.
If the dough has stretched over your table and is hanging, you can gently rip the dough ends, being careful not to rip too much dough with it.
Step 8: Choosing a stuffing method
The two most common ways to stuff the dough involve what we call a circle or a rectangle (our wording). (There are many more ways!) The rectangle is a little easier, while the circle is tastier.
Method 1 - stuffing burek phyllo dough the easier way (the rectangle)
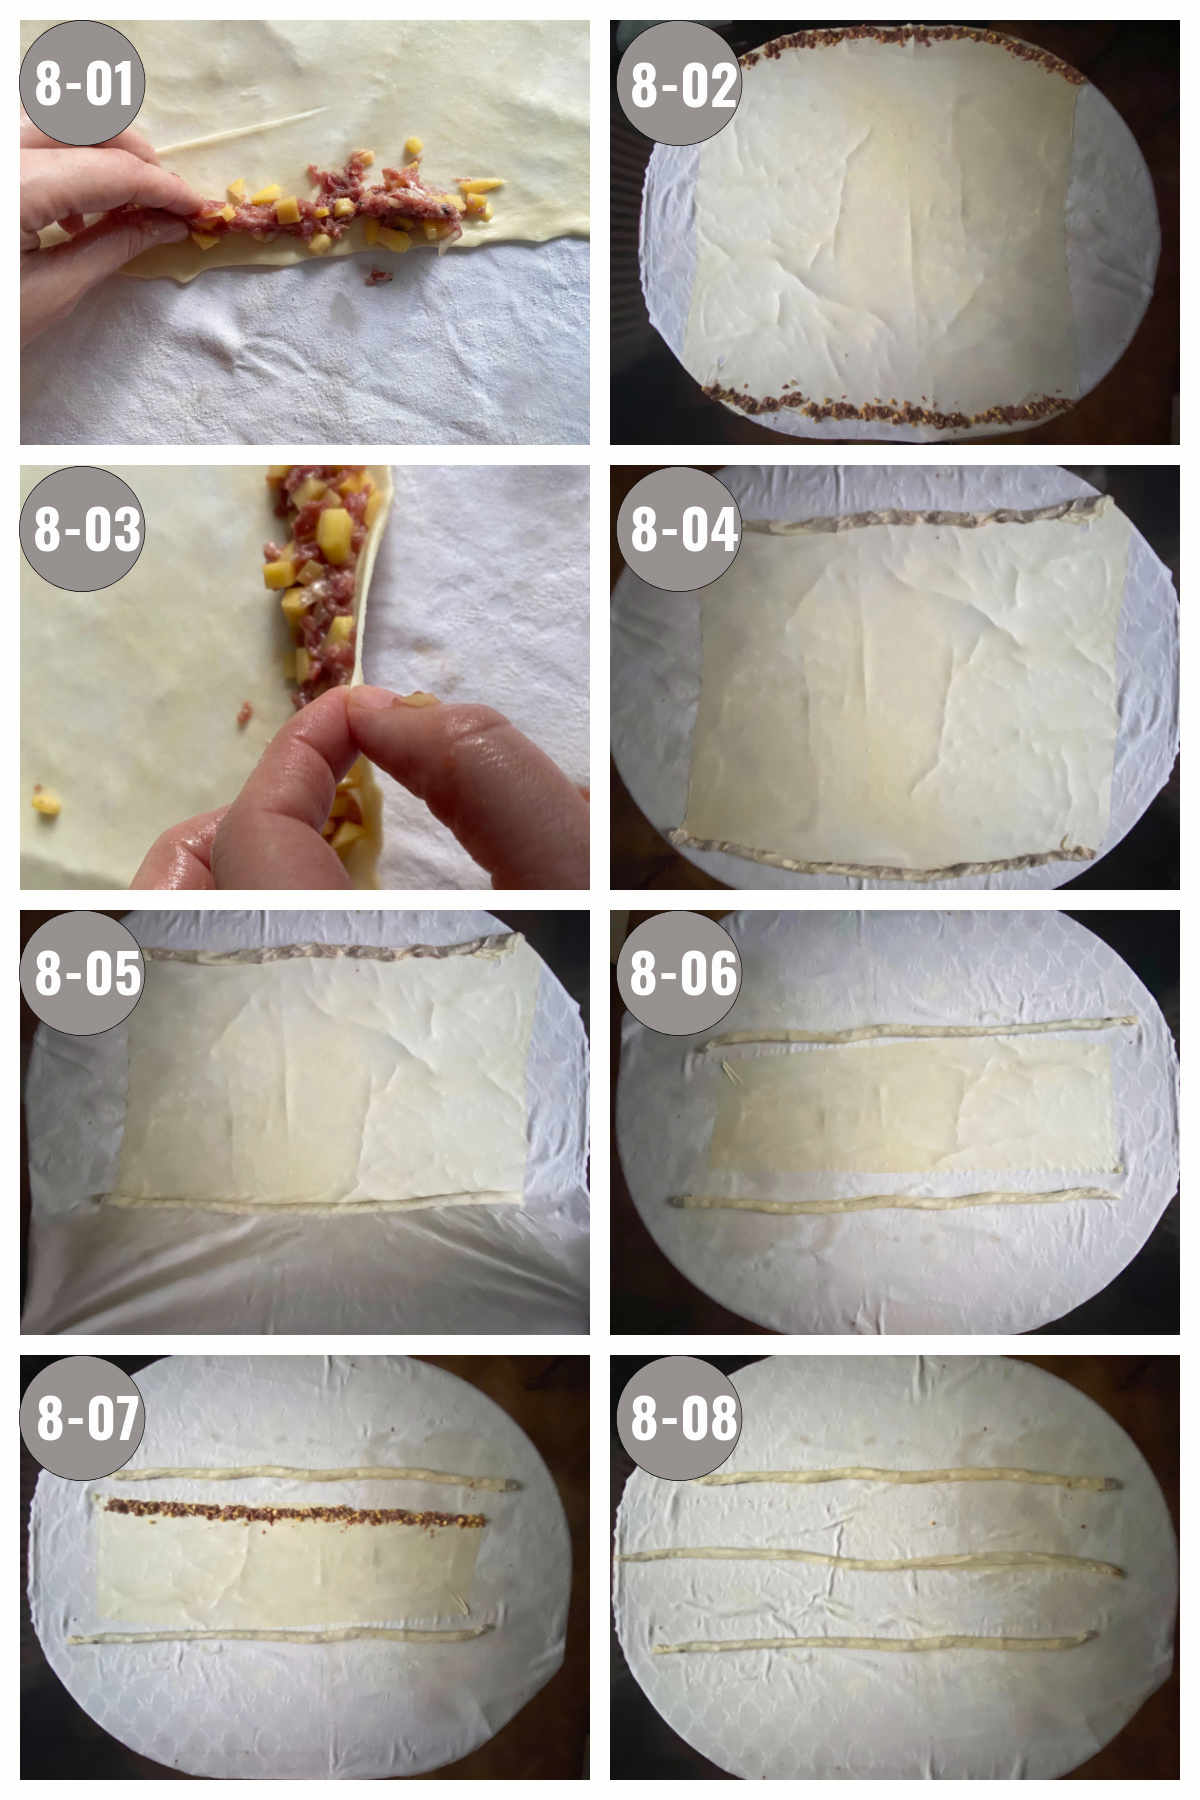
Get the filling and set it nearby. Dab the dough with 2-3 tablespoons of oil. Get batches of filling and line the two long edges of the rectangle with the filling. Stuff it evenly (about the thickness of 2-3 fingers). Use ⅓ filling for one side, and ⅓ for the other. Now cover the stuffing with dough ends.
Lift the tablecloth slightly on one end, and the dough with the stuffing will roll toward the middle. Stop at about ⅓rd of the way. Do the same with the opposite side. You should end up with two rolled-up sides, and some dough in the middle.
Cut the dough in the middle and stuff it with the remaining stuffing. You'll end up with three long stuffed dough pieces. (Some like to have the two rectangle ends meet, but we find it's too much dough. That's why we cut out that rectangle in the middle and stuff it.)
Method 2 - stuffing burek phyllo dough the tastier way (the circle)
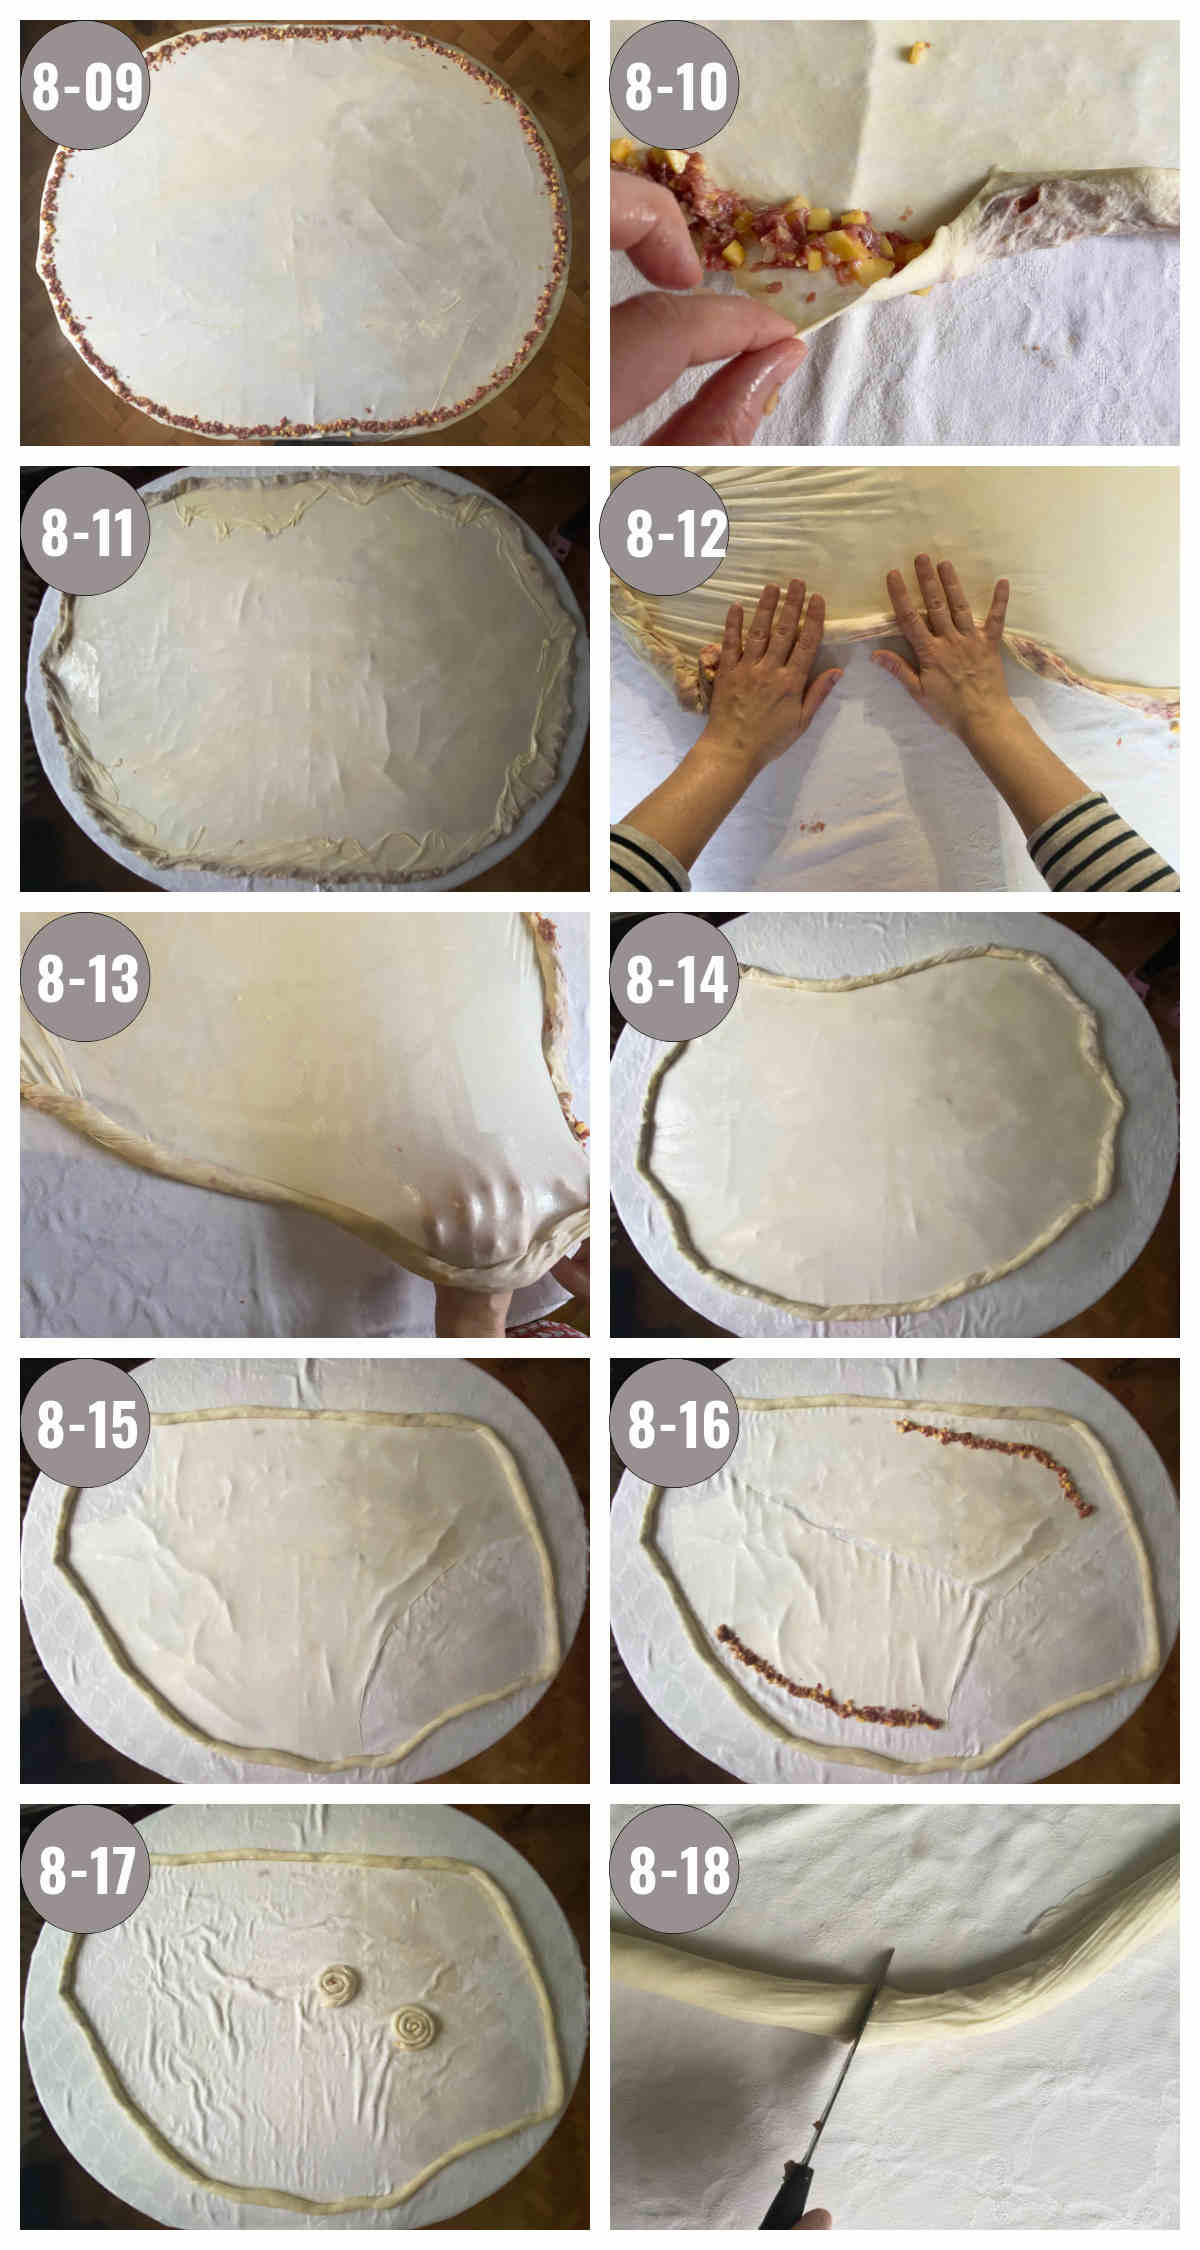
Get the filling and set it nearby. Grab batches of filling and line the dough ends with it (the thickness of about 2-3 fingers), all around the dough, about 2 inches (2-3cm) away from the ends (or more if the dough is hanging off the table).
Starting at any point lift the end of the dough and cover the filling all around the dough. If necessary, dab with oil again (2-3 tablespoons). Start rolling the stuffing into the dough.
Roll the dough with the filling away from yourself, then pull it back toward yourself with your knuckles. (The same pulling method as before.) Do this for the entire circle so that all areas are equally stuffed and rolled.
After a few "circles" the dough will tear. Keep on rolling until most of the middle is torn. (You can cut it out with a knife now, and stuff and roll the middle part as well.) You will be left with one big hula hoop-shaped stuffed dough.
Step 9: Shaping burek phyllo dough (spiral, rounds, or columns)
Preheat oven to 450°F (220°C).
Shape the burek into a spiral, small rounds, columns, or a combination. (There are many more choices, these are just a few.)
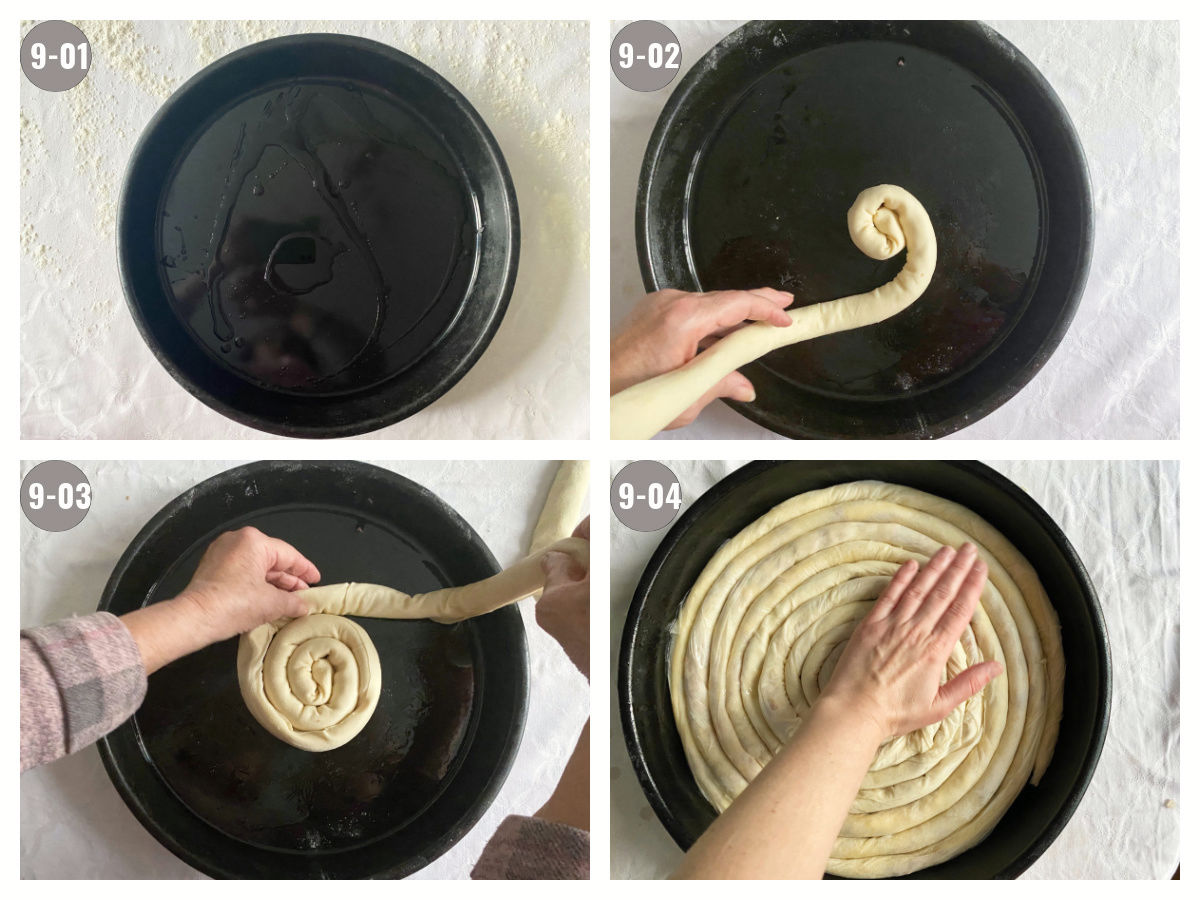
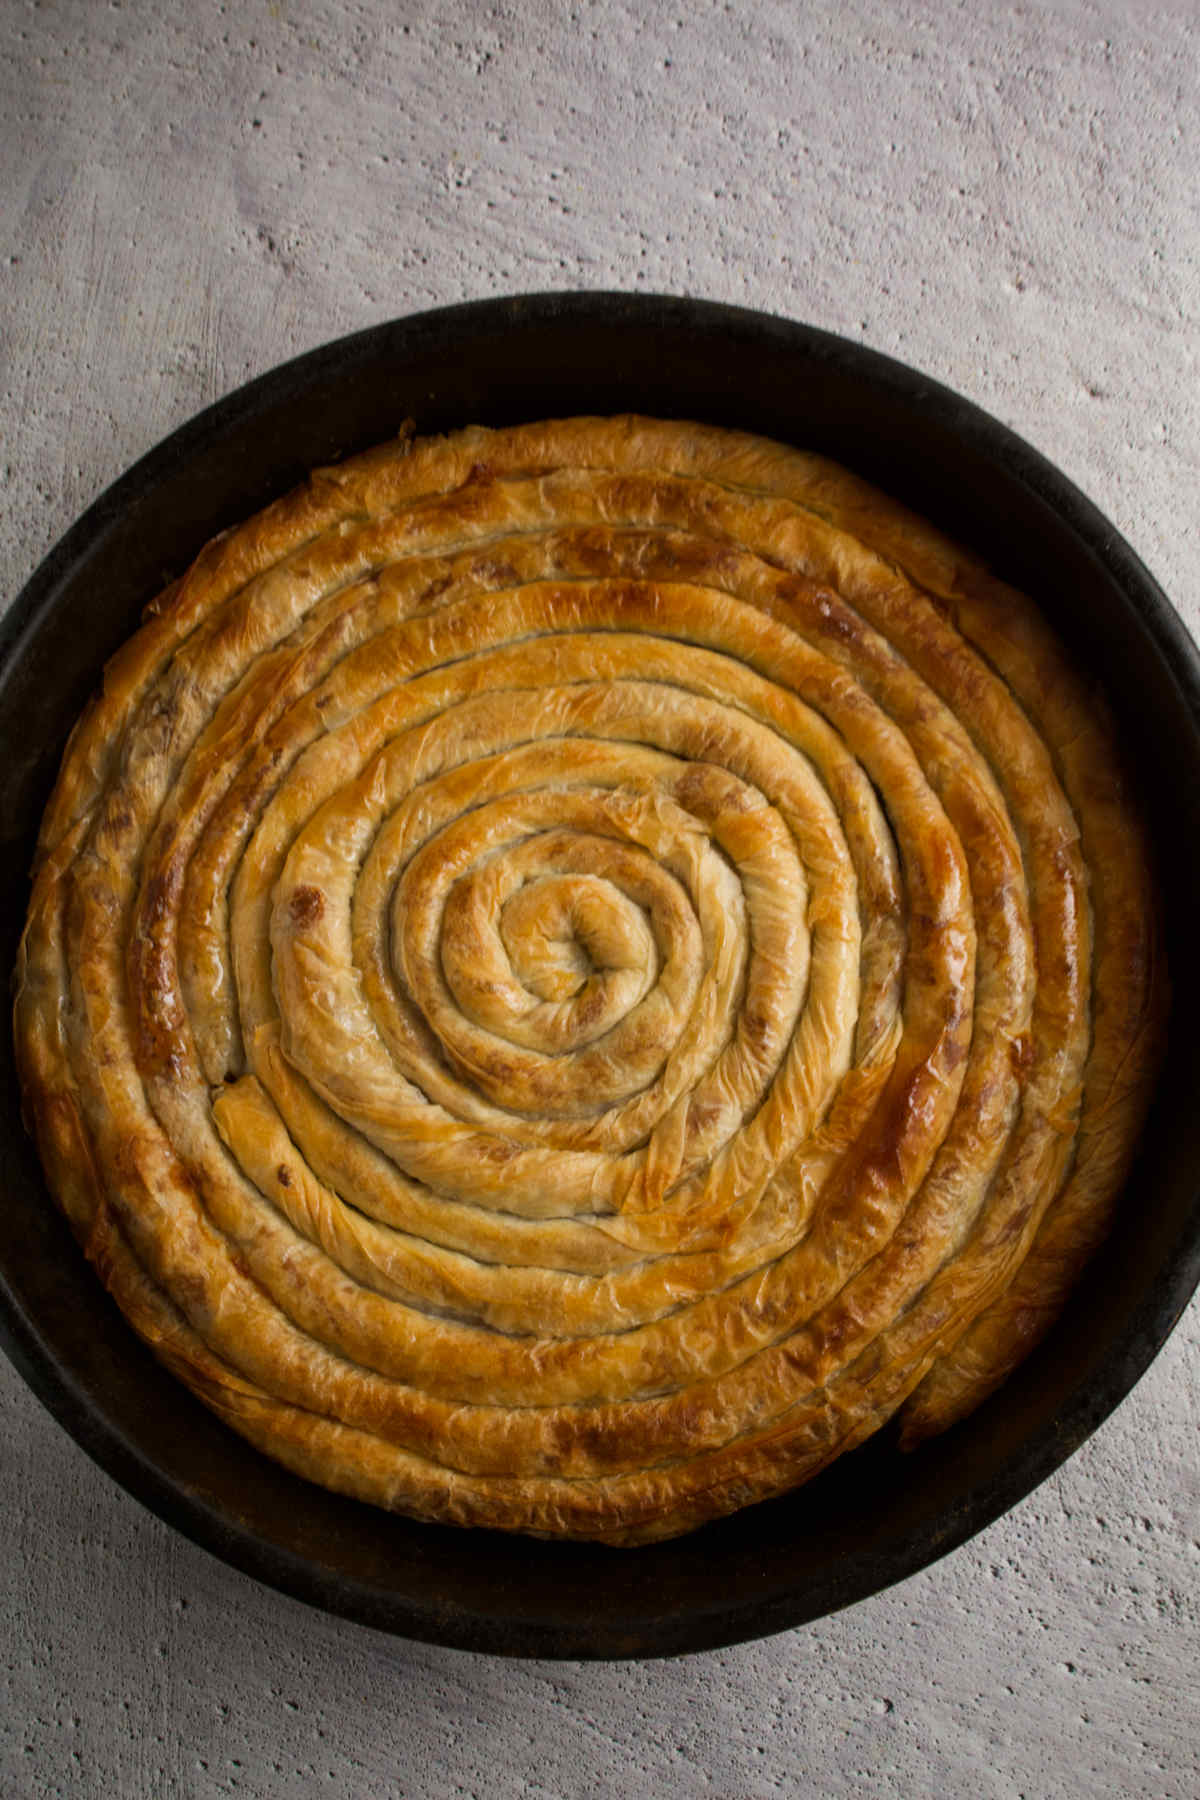
Spiral: generously grease a round baking pan. Starting in the middle, circle the burek around itself until you fill the pan up. (If you have more burek left over, make small rounds and bake them in a different pan.) Dab it with oil on top, then bake.
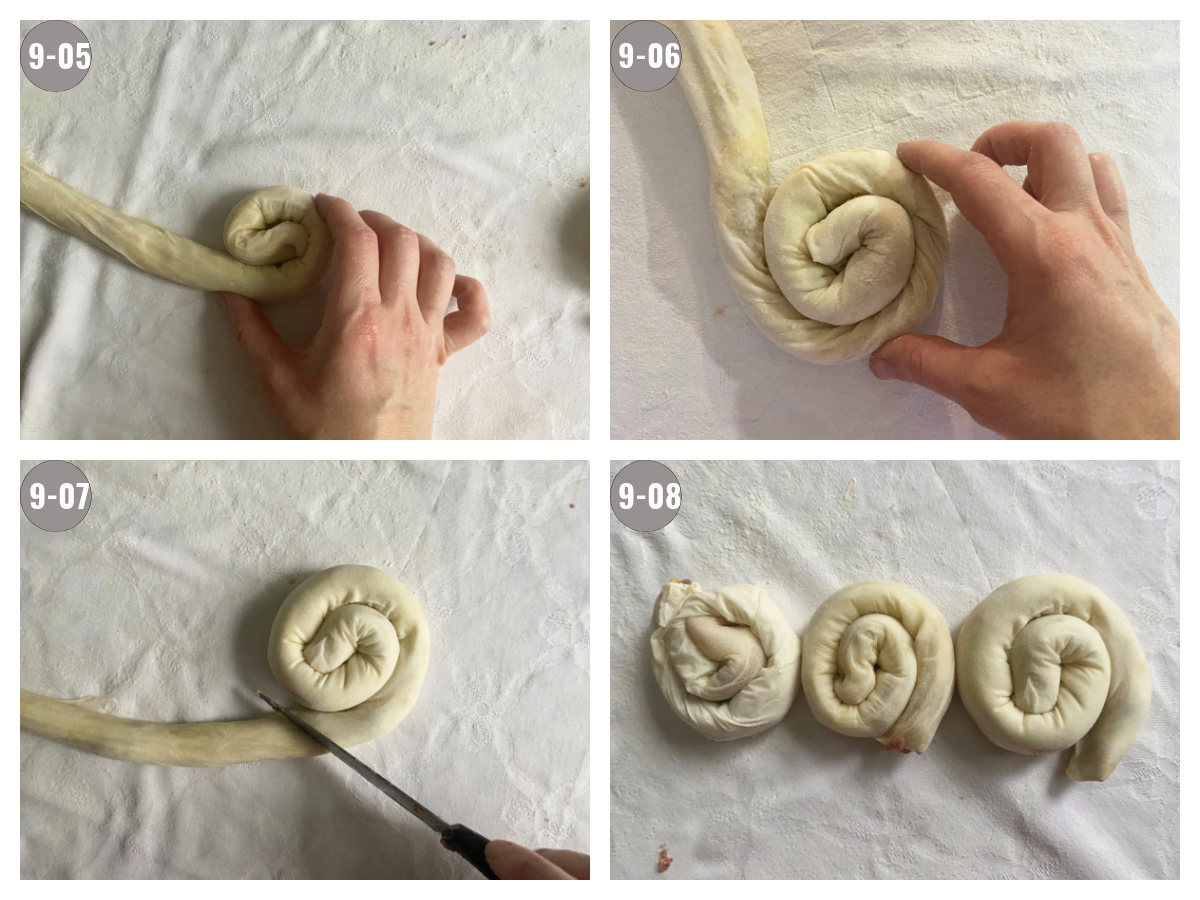
Rounds: instead of making one large spiral, make a small one (we call these "zvrk" or rounds), and cut it. Proceed to make rounds until you use up all the stuffed dough. Transfer to a generously greased pan and dab the burek with oil on top evenly.
Columns (not pictured): generously grease a rectangular pan, and using the stuffed dough, line the pan up and down, as if you're drawing parallel lines out of one big line. Dab the burek with oil on top evenly.
Repeat the previous steps for the remaining 2 dough balls
Step 10: Baking burek
(Not pictured!) For a regular burek lower temp to 400°F (200°C) and bake for 30-40 minutes.
For a more blushed burek, bake at 450°F (220°C) for 10-15 minutes, then lower the temperature to 400°F (200°C) for another 20 minutes. (More tips in the baking section below.)
Step 11: Spraying with the topping
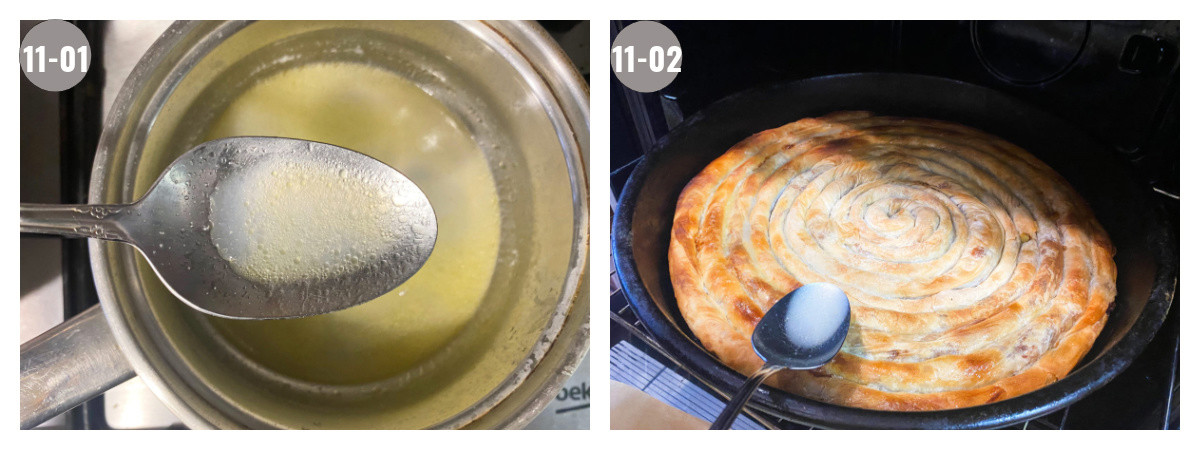
Before the burek is done, melt butter in water (or heat oil in water). When the burek is finished, spray it generously with the mixture. Cover with a kitchen towel and let rest for at least 20 minutes.
Tips for Baking Burek
Regular Oven: These are basic oven guidelines. As you gain experience you'll adjust to taste.
- Bake burek for 30-40 minutes at 400°F (200°C), or
- For the "blush" effect, bake at 450°F (220°C) for 10-15 minutes, then lower it to 400°F (200°C) for 20-25 minutes.
Tip: you may, or may not have to use foil or parchment paper to protect it from burning. If in doubt and the pie is blushing too much, cover it.
Peka or Sač: Hands down, the best tasting burek comes from baking it under the sač or peka.
Also known as "the bell," this is a specific iron (or ceramic) type of lid with a rim. This rim holds coal or hot firewood so that sač is essentially "buried" under fuel. The pan is placed underneath the sač, and is heated this way for about 30 minutes.
Consequently, food made this way is baked and cooked at the same time. As you can imagine, this preparation method makes the food incredibly flavorful.
Wood Stove: After peka, a stove heated on wood is the next best thing. There is something about that "smokey" feel to burek that makes it unbelievable!
Stone/ Brick/ Masonry Oven: This type of stove is also excellent for baking burek. If you have it, definitely give it a try, and write your experience in the comments!
Tips For Tear-Free Phyllo Dough
The biggest issues people come up against when making phyllo dough have to do with elasticity. They are:
- Tearing (ripping), and
- The inability of the dough to stretch, or roll out.
Therefore, here are a few tips to help the phyllo dough process go smoothly.
1. Use a Brand New Bag of Flour. Use a brand new bag of flour each time you make a burek. The brand is irrelevant, but flour freshness is a must. We can't scientifically explain it yet; however, phyllo dough made from flour that's been sitting in an open bag (a tin, or a box) tears easily and is nearly impossible to roll out.
2. Knead For At Least Good 10 Minutes. (The most important tip!) Once you first form your dough ball, knead it for an additional 8-10 minutes. (Time it if you must.) If you can knead it for 15 minutes, that's even better. Put your entire strength into kneading. The more you knead in the beginning, the better the flour will fuse, and the easier and more elastic will the dough be later on. Good signs that you're done: no flour on the sides of your bowl, plus a smooth dough ball.
3. Add Water to Flour Slowly. First mix the flour, salt, and oil together in the mixing bowl. Then add a little bit of water at a time as you're kneading. Continue this process until you use up all the water. Adding water gradually lets you work the ingredients better. It will also allow you to eye exactly how much water you need. (More? Less?)
4. Make a Softer, Wetter Dough. Make the phyllo dough "wetter" by adding a little more water than you would as you work the flour. At first, the dough will be stickier. As you work it, it'll firm up but stay smooth and soft. As a result, this smoothness makes it easier to stretch out later. If it's way too sticky (watery almost), dust small amounts of flour back in as you're kneading until you reach the right consistency (of an earlobe). (Remember, when adding more water, add it while the flour is still somewhat dry. It's hard to add water in when you already have a ball shaped.)
5. Find the Oil Balance. Each time the dough is ready to rest, dab it with oil generously on all sides. Also, once you start stretching the dough, you can dab oil into the dough a couple of times. But find the balance! Your burek shouldn't be swimming in grease.
6. Let the Dough Rest. (Second most important tip!) The dough needs to rest for 90 minutes at least! (Exact timing is in the recipe card.) In fact, if you can rest it longer, go for it. As an example, you'll notice that the last dough piece you're working with is the easiest to stretch, and most elastic, with minimal rips. That's because it's rested well. (Yes, you can get away with less time. In this case, however, that first kneading really needs to be 15 minutes.)
7. Free Your Hands. Take off any jewelry, bracelets, gloves, watches, and anything else that is on your hands and arms (up to your elbows). Moreover, it's best if your nails are short too (not essential though).
8. Stretch With the Top of Your Hands. Stretching the dough with the top of your hands and knuckles is better than using the tips of your fingers. That is to say, when stretching out the dough it'll seem as if you're using your fingers the least.
9. Warmer Room Temperature. Working in a slightly warmer space seems to help out with elasticity. Not a sauna, mind you, just a couple of degrees warmer.
10. Patience Time and Experience. Give yourself time to stretch. Don't try to show off. Just focus on stretching the phyllo dough and balance the sides out. In time, as you gain experience, you'll instinctively know what to do next. Once you hit this spot, the dough will stretch almost on its own.
Handling Tears and Rips
Naturally, phyllo dough will start to break at some point, or you'll have to cut it, and wrap the filling inside.
On the other hand, you're probably wondering how to handle rips while you're still stretching the dough.
- Large rips, tears, and holes:
If burek phyllo dough starts tearing and having holes at the start of the process, or is otherwise challenging to stretch, 90% of the time it's because a) the flour isn't from a fresh bag, or b) the dough hasn't rested enough.
- Flour problems? If you were able to stretch some of the dough, salvage what you can, stuff it, and bake. We won't tell!
- Otherwise, toss it in the garbage and start again. No shame in that!
- The dough hasn't rested enough? In this case, leave the following dough ball to rest for 15-30 minutes longer, then try stretching again.
- Small rips and holes
If very small, ignore them! Work around them, and be careful not to make them bigger.
Meanwhile, pinch bigger holes together or dust them with flour to prevent them from growing. Again, work around them as much as you can.
Storing, Serving, Reheating
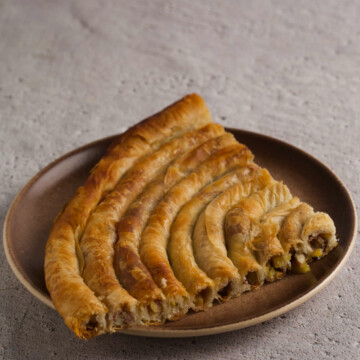
Serving: burek usually tastes best after it rests for 20 minutes when you take it out of the oven. However, how you want to serve burek is completely up to you! You can eat it hot, or cold, by itself, or alongside a salad or soup. (It goes fantastically with the Russian salad.)
Storing: store the burek in the fridge for up to 3-4 days. Wrap it well, in saran wrap or foil, or place it in Tupperware. When ready to eat, consume it cold, at room temperature, or reheat it based on your preference. (Insider tip: burek can actually stay in the (turned off!) oven overnight, but just that first night. Cover it with saran wrap or a kitchen cloth.)
Reheating: for the best, crunchy, fresh taste, reheat in the regular oven for a few minutes at 300°F/ 150°C. If you prefer the softer, chewier texture, heat it in the microwave.
Freezing, Unfreezing Burek
Freezing Burek
There are two ways to freeze burek, before and after you bake it. It's best to freeze burek rounds as they easily fit into freezer ware, and ultimately, the freezer.
If freezing raw burek, do it right after you stuff it. Similar to freezing Bosnian klepe dumplings, layer burek rounds on a tray separately, and freeze for 15 minutes first (to keep them from getting stuck together). Then dust with flour, place in freezer ware, and return to the freezer.
If freezing baked burek, (we recommend this way) let them cool down completely before placing them in freezer ware, but don't spray them with the topping before freezing.
Burek can last up to a few months this way.
Unfreezing Burek
- Raw burek rounds: take them out of the freezer, and freezer ware, and leave them at room temperature for 15-20 minutes. Separate them if they are stuck together, place them in an oiled pan, then follow the recipe card for baking instructions.
- Baked burek rounds: take them out of the freezer, and freezer ware about 2-3 hours before you plan to bake them, and leave them at room temp. When ready, heat oven to 400-450°F (200-220°C). Separate burek rounds if they are stuck together, and place them in an oiled pan. Heat them for about 15 minutes, and then follow the recipe card for topping instructions.
Burek FAQs
Originally Turkish, burek was brought over to the Balkans during the Ottoman Empire. Currently, many Balkan countries consider burek theirs. In reality, it's a shared dish with some regional differences.
Savory burek tastes best with a glass of plain cold yogurt or buttermilk and a simple tomato salad. It's versatile though! You can eat it for breakfast, lunch, and dinner, pair it with soups and (fresh or fermented) salads, or eat it by itself.
Both! Some people like to eat burek hot, just as it comes out of the oven. Others love it best the following day when it's cold. And then there are those that like it in between.
No. There is nothing about burek that says weight loss. You shouldn't even think about burek in those terms. Burek is a delicacy you make and eat, not something to punish yourself with.
Both. Burek is a phyllo dough pie with different fillings. The fillings determine whether it's sweet or savory. The exception is Bosnia and Herzegovina where only the meat phyllo pie is called burek, and the remaining pies are called based on their filling.
Wrapped well in saran wrap, foil, or Tupperware, burek can last up to 3-4 days in the fridge. The sooner you eat it, the better. If you decide to warm it up (some like it cold), you're better off with the oven than the microwave. (Oven heating gives it a crunch, while the microwave softens it.)
Phyllo dough is usually made with flour, water, oil, salt, and (sometimes) a pinch of vinegar or an egg.
Phyllo dough also goes by:
filo dough or fillo dough,
filo pastry or fillo pastry,
and finally, just filo or fillo.
In Balkan cuisine, phyllo goes by:
jufka,
kora (pl. kore),
vučeno testo (tijesto), or
tanko testo (tijesto) za pitu.
More Pies
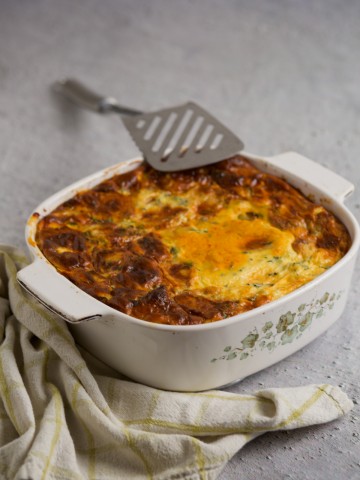
- Here's an unusual, layered ground beef pie you'll like. Similar great taste plus a quicker method!
- And also a layered spinach pie is definitely one of our favorites. Layer upon layer of spinach mixed with soft cheese, and wonderful phyllo in between.
- Not a fan of spinach? Try our cheese pie instead!
Thoughts?
If you make today's burek, and like it, please consider leaving a ⭐️⭐️⭐️⭐️⭐️ (5-star) rating. This will help others find the recipe more easily!
You can also leave a comment, I read EVERY one! Finally, if IG is more your thing, consider tagging us @balkanlunchbox.
Prijatno and bon appetit!
Burek
Equipment
- Working space (A table, island, or a space that's at least 3x3 feet (1m x 1m), with room to walk around it.)
- 100% Cotton tablecloth (Larger than your working space, to protect it, used only for dough making. Clean and ironed.)
- Rolling Pin (Long and thin if you plan to use it exclusively, or a regular baking pin if you want to use your hands more.)
- Saran wrap (Plastic or cling wrap.)
- 3-4 Kitchen towels (Clean and fresh.)
- 2 Round pans sized approximately 10-inches and 15-inches in diameter (or 27cm and 38cm). (Rectangular pans are fine too. Play around with sizes.)
- An apron
- Baking pans (Preferably a round one that's about 13-15 inches (34-38cm) in diameter, plus a rectangular one.)
Ingredients
Dough (Jufka):
- 21-22 ounces all-purpose flour, plus more for dusting regular white flour works best, use a brand new bag
- 1-1.5 teaspoons salt
- 3 tablespoons sunflower or vegetable oil or coconut oil (fluid), or butter (melted)
- 12.5-13.5 ounces warm water approximation, it may be a little more
- more oil few ounces for greasing the dough throughout
Filling (stuffing):
- 18 ounces ground beef or finely diced beef
- 20-22 ounces Russet or yellow potatoes peeled, diced or grated (juice squeezed), weighed after dicing
- 1 yellow onion medium, grated or minced
- 1 teaspoon salt
- 1 teaspoon pepper
- 1 tablespoon vegetable or sunflower oil or coconut oil (fluid)
- 1-2 ounces warm water
Topping:
- 3 tablespoons butter or oil
- 2 cups water
Instructions
Preparation
- Wash your hands and arms up to the elbows. Take off all hand jewelry (rings, bracelets, watches, etc.), and tie up your hair. Finally, get your apron on.
Kneading phyllo dough
- In a large mixing bowl combine flour, salt, and oil. Start working the flour into dough by adding a little bit of water at a time, and kneading the ingredients. Keep adding water slowly while you fold, press, knead, push and punch the mixture (just as if you were making bread or pizza) for about 2-3 minutes. It’s best if the dough is a little wetter to the touch (stickier), at first. This is achieved by adding more water into the flour at first. (Avoid making a dough ball, and then adding more water to soften it.) Once you form a cohesive, messy, wetter, dough ball with your ingredients, wash and dry your hands.
- Now continue to knead the dough ball vigorously, with all your strength, for an additional 8-10 minutes, even 15 minutes if you can. (Time it if you must!) You can knead it in the bowl, or on a working space dusted with flour. As you work it, the dough will firm up but stay smoother overall. If it’s too sticky, dust small amounts of flour back in as you knead, until you reach the right consistency.
- The ease of the remaining process depends on how well you do this first part. Well kneaded dough ball will be smooth, elastic, and have the consistency of an earlobe.
Resting the dough the first time
- Once you achieve the right consistency, dab the dough ball with oil generously, on all sides. Cover in saran wrap, and then with a kitchen towel. Leave it to rest for at least 60 minutes in a relatively warm space.
Stuffing preparation
- In a large bowl, combine the filling ingredients. Mix well with your hand until integrated. Divide the stuffing into 3 parts, one for each dough ball (the big dough ball gets divided in the next step). You can leave it in the same bowl, or in separate ones.
Dividing and resting the dough again
- Uncover and transfer the dough ball onto your working space. Cut it into three equal parts. (You can weigh them if you wish.) Lightly dust them with flour and knead each for 2-3 minutes. Shape each part into a smaller dough ball, and place it on a tray.
- Dab the balls with oil generously. Again, cover each first with saran wrap, then with a kitchen towel. Finally, leave them to rest for at least 15 minutes.
Rolling out and resting the dough the third time
- Uncover the first dough ball. Transfer it to the working space lightly dusted with flour. Punch it gently to flatten it a bit. Then take the rolling pin and roll it out until it's about 10-12 inches (25 cm) in diameter. Repeat this with the other two balls.
- You can leave the flattened dough balls on the working space or place each on a separate tray. Dab each with oil on both sides. Once more, cover with saran wrap and then a kitchen towel. Let them rest for the final 15 minutes in a warm space.
Choosing a stretching method
- This is the time to choose whether you'll stretch the dough with the long rolling pin (as demonstrated in the video below), or the short rolling pin and your hands (as demonstrated in photographs in the article). If stretching with the rolling pin, you'll need the super thin, long rod type of rolling pin called oklagija. A regular short, fat, rolling pin will not work for this method.
Method 1 - stretching the dough with hands
- Dust your working space generously. Gently lift the first flattened dough ball. Let it hang for a few seconds so that it weighs itself down and stretches. Do this for all sides by moving the dough with your fingers like a steering wheel. Now transfer it to your working space and dab it with 1-2 tablespoons of oil (or butter). (If the dough has rested well, it will immediately stretch a lot.)
- Take a hold of the dough on the left and right edges. Spread your arms gently, stretching the dough further in the process. Then do the same on the top and bottom sides. You'll now have a big circular dough shape that's thinner on the inside and a little thicker on the outside edges. You can lightly lift it, and wave the dough in a motion similar to draping the tablecloth over the table to stretch it further. Now continue to stretch it with your hands.
- Move your hands (knuckle side up) under the dough gently, and continue stretching it by pulling it toward yourself. Pull in slow movements, and walk around the table (and the dough), pulling it on all sides a little bit at a time. Stretch the dough little by little, by walking in circles several times. It should be equally thin everywhere by the time you're done. The middle of the phyllo and the sides should be equally stretched.
- Continue to stretch until the dough is of the thinness of cigarette paper. Additionally, if at some additional point(s) during stretching you feel the dough needs more oil, dab it in again, 2-3 tablespoons at a time. Finally, as you're spreading the dough, shape it into a large rectangle or a circle.
- Try to avoid rips and holes as much as you can. If they do happen, work around them, or try to patch them by lightly pinching them together. (If the dough keeps ripping in a big way, read the article. You may have to start over!)
- Note: if the dough has rested enough and you kneaded it well in the first steps, it's possible it will stretch even several inches beyond the table.
Method 2 - stretching the dough with the oklagija rolling pin
- Transfer one flattened dough ball onto the working space and roll it out with oklagija until it's (approximately) the thickness of a couple of stacked pennies, and the size of a huge pizza. Lightly dab with 2-3 teaspoons of oil (or melted butter), and drape over the middle of the rolling pin. To do this, dust the rolling pin with flour and position it in the middle of your dough (as if you were measuring its diameter). Then drape one side of the dough over the rolling pin, and lift everything up. The dough should hang equally on both sides.
- Let the dough weigh itself down on the rolling pin for several seconds. Now turn the dough around 45 degrees and let it weigh itself down on this side as well. Then, slowly and carefully start stretching the dough even further with the tops of your hands (knuckles), as far as it will go. Work ends and the middle equally, and move towards where the phyllo is thicker, so you can thin it out.
- Try to avoid rips and holes as much as you can. If they do happen, work around them, or try to patch them by lightly pinching them together. (If the dough keeps ripping in a big way, read the article. You may have to start over!)
- Gently transfer the dough to your working area and continue stretching it out as much as it'll go. The dough should now be coming close to the thinness of cigarette paper and the size of a super large circle (or an ellipse). If at some point(s) during stretching the dough needs more oil (or butter), dab it in again, 2-3 tablespoons at a time. (The dough needs to be well-oiled, but not "swimming" in oil at all times.) Finally, shape the dough into either an approximation of a rectangle or a circle (look at the stuffing methods).
- Note: if the dough has rested enough and you kneaded it well in the first steps, it's possible it will stretch even several inches beyond the table.
Handling dough edges (ends)
- As the dough edges are thicker than the rest of the dough you'll have to take care of this. One way to get rid of the ends is cutting them off with a knife. Only cut about 1 inch or 2 cm all around the dough. (Discard the ends, or combine them with the next dough ball.)
- Another option is to stretch the ends. Lift the ends as you walk around the dough, and stretch them carefully, with your fingers.
- If the dough has stretched over your table and is hanging, you can gently rip the dough ends, being careful not to rip too much dough with it.
Choosing a stuffing method
- While there are many ways to stuff a burek, the most commonly used ones are what we call the rectangle, and the circle. (This is our wording.) The rectangle involves filling up two sides across from each other, and then lifting the tablecloth to let the dough with the filling roll inside. It is easier, but the burek is thicker, and slightly less tasty this way.
- The circle method involves stuffing dough ends all around, and rolling the filling inside as you, again, walk around the dough in a circle. The phyllo ends up being even thinner and tastier. It takes a little more effort, but it's worth it.
Method 1 - stuffing burek phyllo dough the easier way (the rectangle)
- Dab the dough with 2-3 tablespoons of oil.
- Get the filling and set it nearby. Grab batches of this filling with your hands and line the edge of one long side of the rectangle with the filling, about 2 inches (2-3 cm) away from the dough's end. Stuff it evenly. (The filling should be the thickness of about 3-4 fingers.) You should use ⅓ of the filling for this side. Now, starting at the end of any of these two rectangle sides lift the end of the dough and cover the filling completely.
- At this point, slightly lift the tablecloth, and the dough will roll with the stuffing inside. (Give it a little assistance with your hands, if needed.) Once it reaches ⅓ of the way, go to the other side and repeat. You should have two rolls of dough with a dough rectangle in between them.
- Cut the dough rectangle in the middle and stuff and roll it with the remaining stuffing. You'll end up with three long stuffed dough pieces. (Some like to have the two rectangle ends meet, but we find it's too much dough. That's why we cut out that rectangle in the middle and stuff it.)
- Now form the stuffed dough into the shape of choice. (See below!)
Method 2 - stuffing burek phyllo dough the tastier way (the circle)
- Dab the dough with 2-3 tablespoons of oil.
- Get the filling and set it nearby. Now grab batches of this filling with your hands and walk around the dough lining the dough ends with the filling. Stuff it evenly, about 2 inches/ 3cm (or more if the dough is hanging off the table) away from the dough edges. (The filling should be the thickness of about 2-3 fingers.) Starting at any point, lift the end of the dough and cover the filling completely. Do this for the entire dough circle, covering all the filling.
- Start rolling the filling and the dough together. Essentially, you're rolling the dough with the filling toward the middle of the circle for a few inches and then pulling it back toward yourself carefully. (For best results use the same method as before, pulling with the tops of your hands.) Do this at the same pace all around the circle, so that all areas are equally stuffed and rolled. (What you don't want is to roll one side completely, and the other one not having enough dough so the filling is exposed.)
- After a few rounds of rolling the entire dough, it will tear in the middle, or it will have several rips and tears. Keep on rolling the dough until most of the middle is torn. (Alternatively, you can cut it with a knife.) When you decide that all the circle's ends have had about the same amount of dough you can cut the remaining middle dough part out. (You can stuff this part, discard it, or roll it in on a thinner end of your burek.) You should now be left with a large hula hoop-shaped dough stuffed with filling.
- Now form the stuffed dough into the shape of choice. Start by making a cut anywhere. (See below!)
Shaping burek phyllo dough (spiral, rounds, or columns)
- Preheat oven to 450°F (220°C).
- Shapes most often used for burek are a big spiral, small spirals or rounds, and columns. You can also do a combo.
- Spiral: generously grease a round baking pan. Starting in the middle, circle the burek around itself until you fill the pan up. (If you have more burek left over, make small rounds and bake them in a different pan.) Dab it with oil on top, then bake.
- Rounds: instead of making one large spiral, make a small one (we call these "zvrk" or rounds), and cut it. Proceed to make rounds until you use up all the stuffed dough. Transfer to a generously greased pan and dab the burek with oil on top evenly.
- Columns: generously grease a rectangular pan, and using the stuffed dough, line the pan up and down, as if you're drawing parallel lines out of one big line. Dab the burek with oil on top evenly.
Repeat the previous steps for the remaining 2 dough balls
Baking burek
- If wanting to play it safe, lower the temperature to 400°F (200°C) and bake the burek for 30-40 minutes. (Turn the pan 180° about halfway through baking.) If it starts to blush too much on top, cover the burek with baking paper for the remainder of the baking.
- If you prefer a burek that's more "blushed," continue baking at 450°F (220°C) for 10-15 minutes, then lower the temperature to 400°F (200°C) for the remainder of the baking. (You can turn the pan about 180° at this point.) If it starts to blush too much, cover the burek with baking paper for the remainder of the baking.
- As each oven is different, always rely on your experience. If it's blushing too much, cover the burek with parchment paper and lower the temp. If it's not baking fast enough, up the temperature.
Adding the topping
- A few minutes before the burek is done baking, in a small pot heat up butter and water together. (Butter should melt in hot/ boiling water!) Once the burek is finished, sprinkle it very generously with the water and butter mixture. Then, cover it with a kitchen cloth, and leave it to rest for about 20 minutes.
Serving, storing, reheating, freezing
- See notes for detailed information.
Video
Notes
- Recipe Notes:
- Video:
- Burek Volume Information:
- Stuffing and Stretching:
- Can I divide or double the ingredients?
- Nutrition Information:
- Ingredients:
- Tops of fingers or hands?
- Tear-Free Phyllo Dough Tips:
- Knead for at least 10 minutes;
- Let the dough rest in between steps
- Use a brand new bag of flour each time;
- Add water slowly as you knead/ make dough 'wetter;'
- Stretch with the top of your hands; and
- Free hands of jewelry, watches, long nails, etc.
- Handling Rips and Tears:
- Serving/ Storing/ Reheating/ Freezing:
Mel says
Bless your heart. My heritage is Cypriot one side, Bulgarian the other. I had a similar experience with stuffed grape leaves, one boy mocked them calling them goat poop. What are you going to do..these look delicious and the dough looks so well done. I don’t know if I have the skill to make them so thin but I will try one of these days for my grandma’s memory sake.
Aida says
Thanks for sharing your story. Food brings us together, even under funny circumstances. Also, feel free to use filo from the store. Pie is pie 🙂 (https://balkanlunchbox.com/ground-beef-phyllo-pie/)
Carrie says
Can you explain how to use regular phyllo for this? ☺️
Aida says
Carrie,
Sure!
Here are some versions with filo from the store. You can decide which filling to use. Good luck!
https://balkanlunchbox.com/phyllo-cheese-pie-slagana-sirnica-recipe/
https://balkanlunchbox.com/ground-beef-phyllo-pie/
Esma says
Hi Aida,
Great recipe. What would you recommend as a recipe for cheese filling in this pie, instead of meat and potatoes?
Aida says
Thanks Esma. Where do you live? If you're in the Balkans then you can make the filling using young cow cheese mixed with Feta and sour cream plus several eggs. If you're in the States (or most other countries) a good equivalent is a mix of cottage, Ricotta and Feta cheeses with sour cream (plus eggs). Here's our cheese pita with store filo recipe to give you an idea https://balkanlunchbox.com/phyllo-cheese-pie-slagana-sirnica-recipe/
Esma says
Hi again Aida,
Actually I'm from Australia but I'll easily be able to find the ingredients. Thanks for the recommendations, will definitely try it out soon 🙂
Aida says
Perfect! Happy cooking.
Vanja says
It looks good, tastes even better! Mama's gonna make this one soon for my boys! 🙂 And Aida, you rock! Thanks for keeping the taste of home going strong.
Aida says
Vanjic,
Thank you! I'm glad if you find them helpful. If you think of another one you might like, let me know.
Meanwhile, congratulations on Sage Abbey! I hope it'll be a smashing success.
<3
Erika Jackson (nee Bozin) says
My pastry was tough and dry after cooking. What did I do wrong? My mum taught me but it's always tough and hard not crunchy and flaky like hers.
Aida says
Erica,
Did your mom give you any tips how she makes hers flaky? It could be several things, including the type of flour she used. Always use a brand new bag of flour for the pie.
It could be that it needs a little bit more oil, and it should probably be stretched out a little bit more. And also, don't forget to top it with water and oil or milk and oil at the end.
Good luck!
Amela says
Hi Aida!
I am from Bosnia (living in San Francisco) and I never understood why people from other parts of the Balkans called other pitas "burek" until now 😉 But to me burek will always be meat pita! Thanks for sharing your wonderful recipes!
Aida says
Hi Amela!
Glad you're finding the recipes helpful.
Enjoy the wonderful SF & happy holidays!
Silvana says
Aida, what a good story and recipe. I am so happy I found your blog/recipes. Finally, I'll be able to recreate some of good old traditional dishes my family used to serve when I was growing up in Sarajevo (Aneks, Ilidza, Drvenija and of course Bascarsija). I remember burek's smell so well like yesterday. And all the other smells as well. But burek meant weekend, specifically Saturday; mother and father at home, and burek had to be made becauuse other pies don't have meat, and as you know, guys from Bosnia love their meat. I personally loved spinach, but pumpkin or squash (tikvenica) was my favorite. Once again, keep up with your blog because you have some followers who really appreciate it.
U zdravlje!
Aida says
Silvana,
Welcome to the blog! Glad the recipes are useful.
It's lovely to receive comments like yours - blogging is often one-sided, it's rewarding to get to know people on the other end.
Loved your story about Saturdays and pita making, and the home smelling of it. It's such a part of our narrative, isn't it?
Looks like you lived all over Sarajevo, I hope you still come and visit.
We'll be filming tikvenica this fall so be on the lookout. If there is another recipe you'd like let us know and we'll put it in rotation.
U zdravlje!
Kate @ Babaganosh says
I loved reading the story and learning more about these delicious meat pies! I learned about them when we were on vacation in Croatia a few years ago, and I came across your blog through a tailwind tribe that I am in and was immediately intrigued by the recipes and your blog name. I am so glad I found this blog! I'll be following along to see what you cook up.
And by the way, I am from Ukraine (my family moved to the US when I was a kid), so while it's a totally different cuisine, there are a lot of similarities between some ingredients, flavors, and traditions!
Aida says
Hi Kate! Welcome to the blog. Glad that you had a chance to visit Croatia and try some of the Balkan food. I have a few Ukrainian friends, and must say I like the cuisine very much. I agree with you about ingredients, flavors and traditions being similar. It’s all about good comfort food. Let me know if I can help you find a specific recipe that you remember, and you’re welcome to browse around the recipe index as well https://balkanlunchbox.com/recipe-index-english/
Melissa says
Thank you so much!!! I'm American, but lived in Bosnia for a year back in 2004, while my husband worked on base. The family we rented from taught me how to make cabbage pie, their specialty. I wanted to try burek, but didn't know how to prepare the meat. This is the first recipe that comes close to how we made the dough for the pie. We always rolled it on the floor with a special cloth and what looked like a broom handle. I don't know how special the cloth was, but every family seemed to have a beautiful white one. When we left I was given one to take home and it is now very special to me. Oh- And now I'm going to try cheese pie. I was never sure what a good substitute was because we used to run to the neighbor and her cow to get fresh cheese for pie. A very different way of life that I often miss.
Aida says
Melissa,
It seems like you had a great experience living in Bosnia. Hope this recipe comes close to what you had at the place you were renting. Yes, the cheese can be a problem, but there are a few options that come close. Not completely the same, but close enough to give you that feeling you're on the right track. If you go to the recipe index you can also find a quick, store phyllo version of the pie as well. If you have any questions let me know. And if you make the pie with this recipe I'm curious to hear your thoughts.
Best,
Aida
Sarah Amena says
Aida- this is my goal- to make Burek for my husband! Im not even going to attempt this now but making Burek will be a way to show an immense amount of love for my Bosnian husband - in August it will be our 15 year wedding anniversary and hopefully I can make it for him then!
Also- that ignorant girl that spat on her fries- she was ignorant and probably had a lot of other issues going on in her life - and humans tend to negate what they don’t understand- it was her loss - I was raised by my Moroccan grandmother and I remember feeling ashamed about Pita bread- now look at the world - the most sophisticated eat pita bread and Hummus -
Aida says
Sarah Amena,
Happy almost wedding anniversary! It's lovely to hear about someone's love story going strong.
Your grandmother sounds like ours - but we never asked her for her recipes on time. We hope you have your grandmother's recipes somewhere - it's so important to do that.
And pita - yes, a divine bread for sure.
P.S. Morocco is one of the places on our list to visit.
Sarah Amena says
Aida - I can’t find the thread about Rumi and Shams - but I just found this in Bosnian and it’s a Rumi poem sung for the Srebenicia memorial -
https://youtu.be/88MeBG4UiIQ
Aida says
Thank you Sarah.
Mary says
Hi - do I cook the meat before stuffing? Thanks!
Aida says
No.
Donna says
This is a perfect burek recipe. I just have a regular rolling pin and it works beautiful-I roll the dough- brush with oil - rest and then stretch it. I am thrilled that a couple of grandkids get so excited when gramma makes burek. I use the same dough and method for making apple strudel or cheese burek.
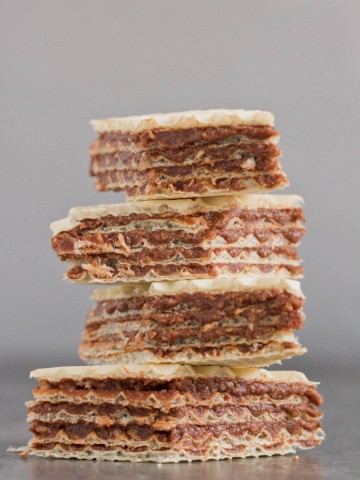
I am going to make your oblatne recipe very soon. Thank you for posting these wonderful recipes that speak to my Slovenian heart. Husband was Croatian so the children grew up eating our ethnic food.
Aida says
Donna,
So glad to hear from you. We bet your grandkids are happiest eating gramma's food!
Let us know how you like oblatne from the site.
xx
Dawn says
You don't know how much I appreciate seeing this receipe. I grew up eating Bureks but we called them meat pies. This was always a family affair. My mother and her sisters would come my mom's house and make these. It took them all day. They were always the small round pinwheels and they would freeze many of them. I have very fond memories of those times. The recipe was lost and and no one I spoke to knew what meat pies were so I was very happy to come across this receipe. Are these Bureks in neighboring countries? I often wondered since my mothers side is slavic, Slovakian, Hungarian, we are told and I did not know anyone outside of our family that ate these.
Aida says
Hi Dawn!
So glad you found us! Yes, these meat pies are prepared and eaten all over the region. They came by way of the Ottoman Empire and are widespread in the Balkans and Eastern Europe.
It's very possible it's the same thing your mom and aunts made.
If you are short on time, another recipe might be of interest to you: https://balkanlunchbox.com/ground-beef-and-potato-pie-phyllo-recipe-slagani-sareni-burek/
It's similar, but with store phyllo, so easier to make.
Best!
Donna Kozic says
The very best burek recipe ever! Thank you so much for posting this - mine is in the oven now- have made it numerous times - a family favourite. I make my own dough - everything about this recipe is just perfect. I am Slovenian with extended family in Croatia. I appreciate all your recipes -making waffle torte for grandkids next time they come to town.
Aida says
Donna,
We're so glad to hear that the recipes are useful!
And kudos to you for taking the time to make burek from scratch for the family, we know how much effort it is.
We'll be adding more Slovenian recipes in 2024 so be on the lookout.
Have a lovely weekend!
elisa Stuart says
Made it once per the recipe and it turned out a amazing!!! Love love love!
Fyi: I did try making it agian with a gluten free flour and it did not work out. The dough just crumbles and falls apart. If I did it agian I think it just make it in like a layered way instead of rolled. So bakers beware..
Aida says
Elisa,
yes, it'll be hard to make burek with gluten-free flour. One of the reasons the dough rests in between stretching is for gluten to do its magic. The more it activates, the more elastic the dough becomes.
However, we do get that a lot of our followers have a gluten problem. We'll continue to search for a burek gluten-free solution.
Michelle says
I am so grateful to you for sharing such a detailed post on burek. I have tried and failed a few times over the years, but your tips about the new bag of flour and resting were the ticket! I have also been using king authurs unbleached bread flour, and I think it helps. 10 minutes into kneading - I knew I had good dough. I kept going though at your suggestion! My sisters and I have such fond memories of our grandma’s burek. It means so much to be able to make this to share with them. It’s not grandma’s burek but I’m getting there!
Aida says
Michelle,
We're so glad to become a part of your family tradition. Burek takes time, just keep going. Each one will be better and better.
Happy Holidays!
Laura says
Thank you, thank you for this wonderful and detailed recipe! My husband and I lived in Bosnia for a few years— during that time I had a gluten allergy but recently it has been healed and I am able to eat it. One of the first things I wanted to make was burek. We made the burek following your recipe last weekend with a bunch of friends and had a grand time. And it was absolutely delicious. We don’t have kefir here but did our best with a drinking yogurt and šopska salata on the side. Thank you! This is the first recipe I’ve made of yours and am looking forward to trying more.
Aida says
Laura,
we are delighted that our recipe helped you bring back a little bit of Bosnia back into your lives!
And kudos to you for healing your gluten allergy. Let us know if you try other recipes.
Kind regards
Vladimir Konyarov says
Great recipe, now I know how to roll out the dough, thanks for the right tips!!!
Aida says
Vladimir,
Thanks for the comment! We're happy that the recipe helped you.