• Skip to primary navigation
  • Skip to main content
  • Skip to primary sidebar
  • Balkan Recipes
  • About BLB
  • Nav Social Menu

    • Facebook
    • Instagram
    • Pinterest
    • RSS
menu icon
go to homepage
subscribe
search icon
Homepage link
  • Recipe Index
  • About
    • Facebook
    • Instagram
    • Pinterest
    • RSS
    • YouTube
  • ×
    Balkan Lunch Box > Blog

    Pan Fried Chicken Liver and Onions [How to Cook Liver]

    Mar 30, 2021 · 5 Comments

    Livers in ladle.

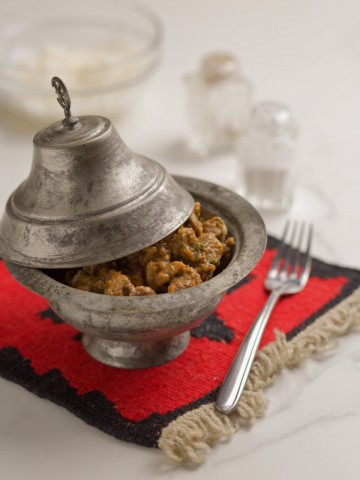
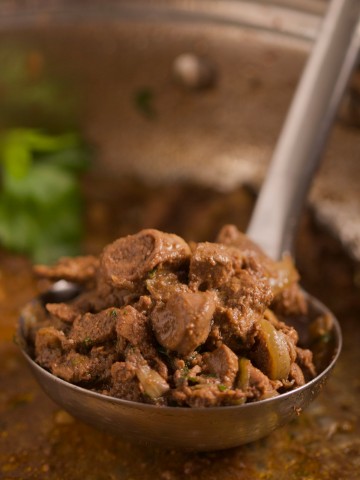
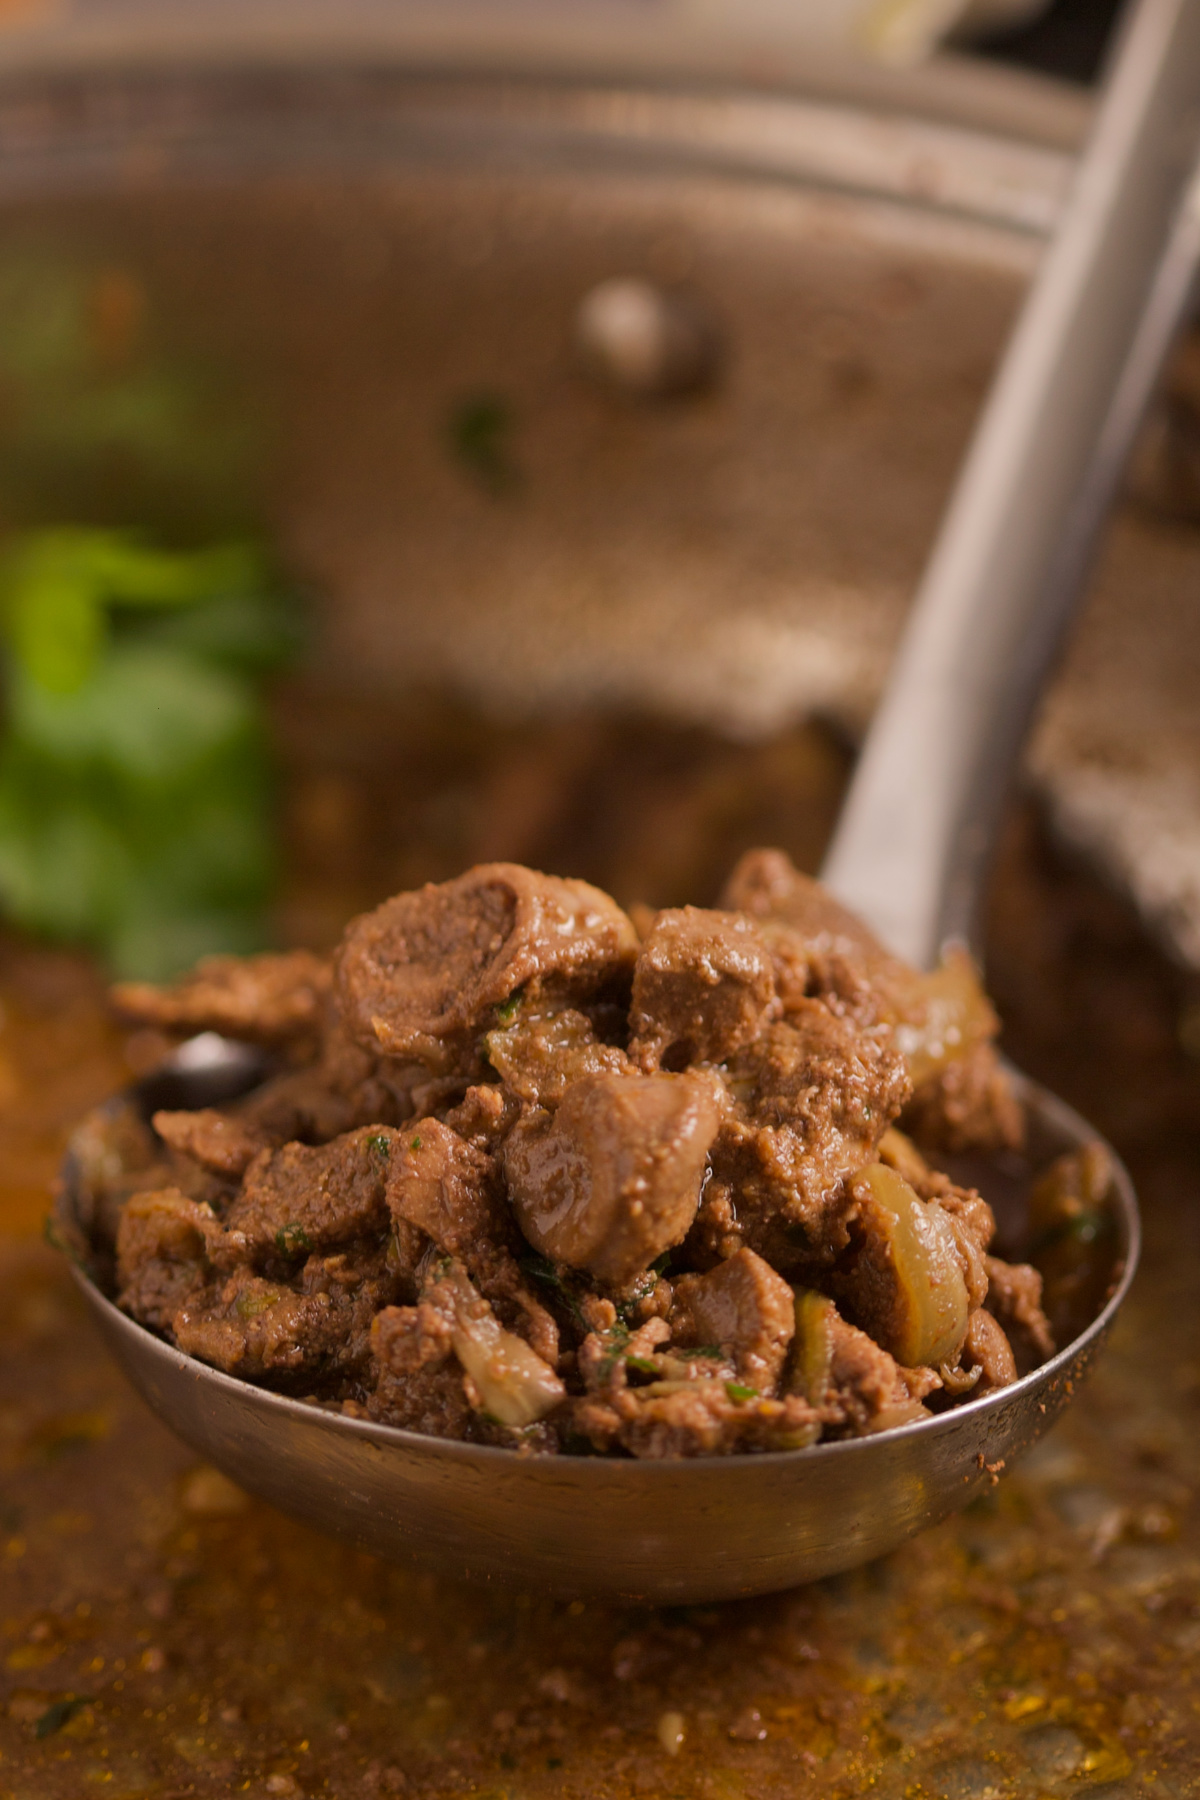
    Liver and onions is the perfect recipe for learning how to cook liver. Rich and flavorful, chicken liver is the best way to dip your toes in the land of organ meats. Shall we?

    Livers in ladle.
    [feast_advanced_jump_to]

    Background

    Chicken liver and organ meats are just now becoming mainstream in American cooking. Worldwide they've been a staple of Balkan, French, Indian, Japanese, and Russian cuisines for years.

    Moreover, there are many reasons why you should learn how to cook chicken livers!

    The liver is a nutritious superfood. It's chockful of vitamins and minerals, especially iron! In fact, many women learn how to cook liver during pregnancy.

    You're probably wondering what chicken liver tastes like.

    Chicken livers are the mildest of all organ meats. Incredibly flavorful and rich, they're meaty, tender yet dense. Finally, like game meat, they have a sweet note and go great with many sides.

    What's more, it only takes one good dish to turn you on to this meat forever. If you're curious about how to cook chicken livers, our liver and onion sauce is just the recipe for you!

    Ingredients

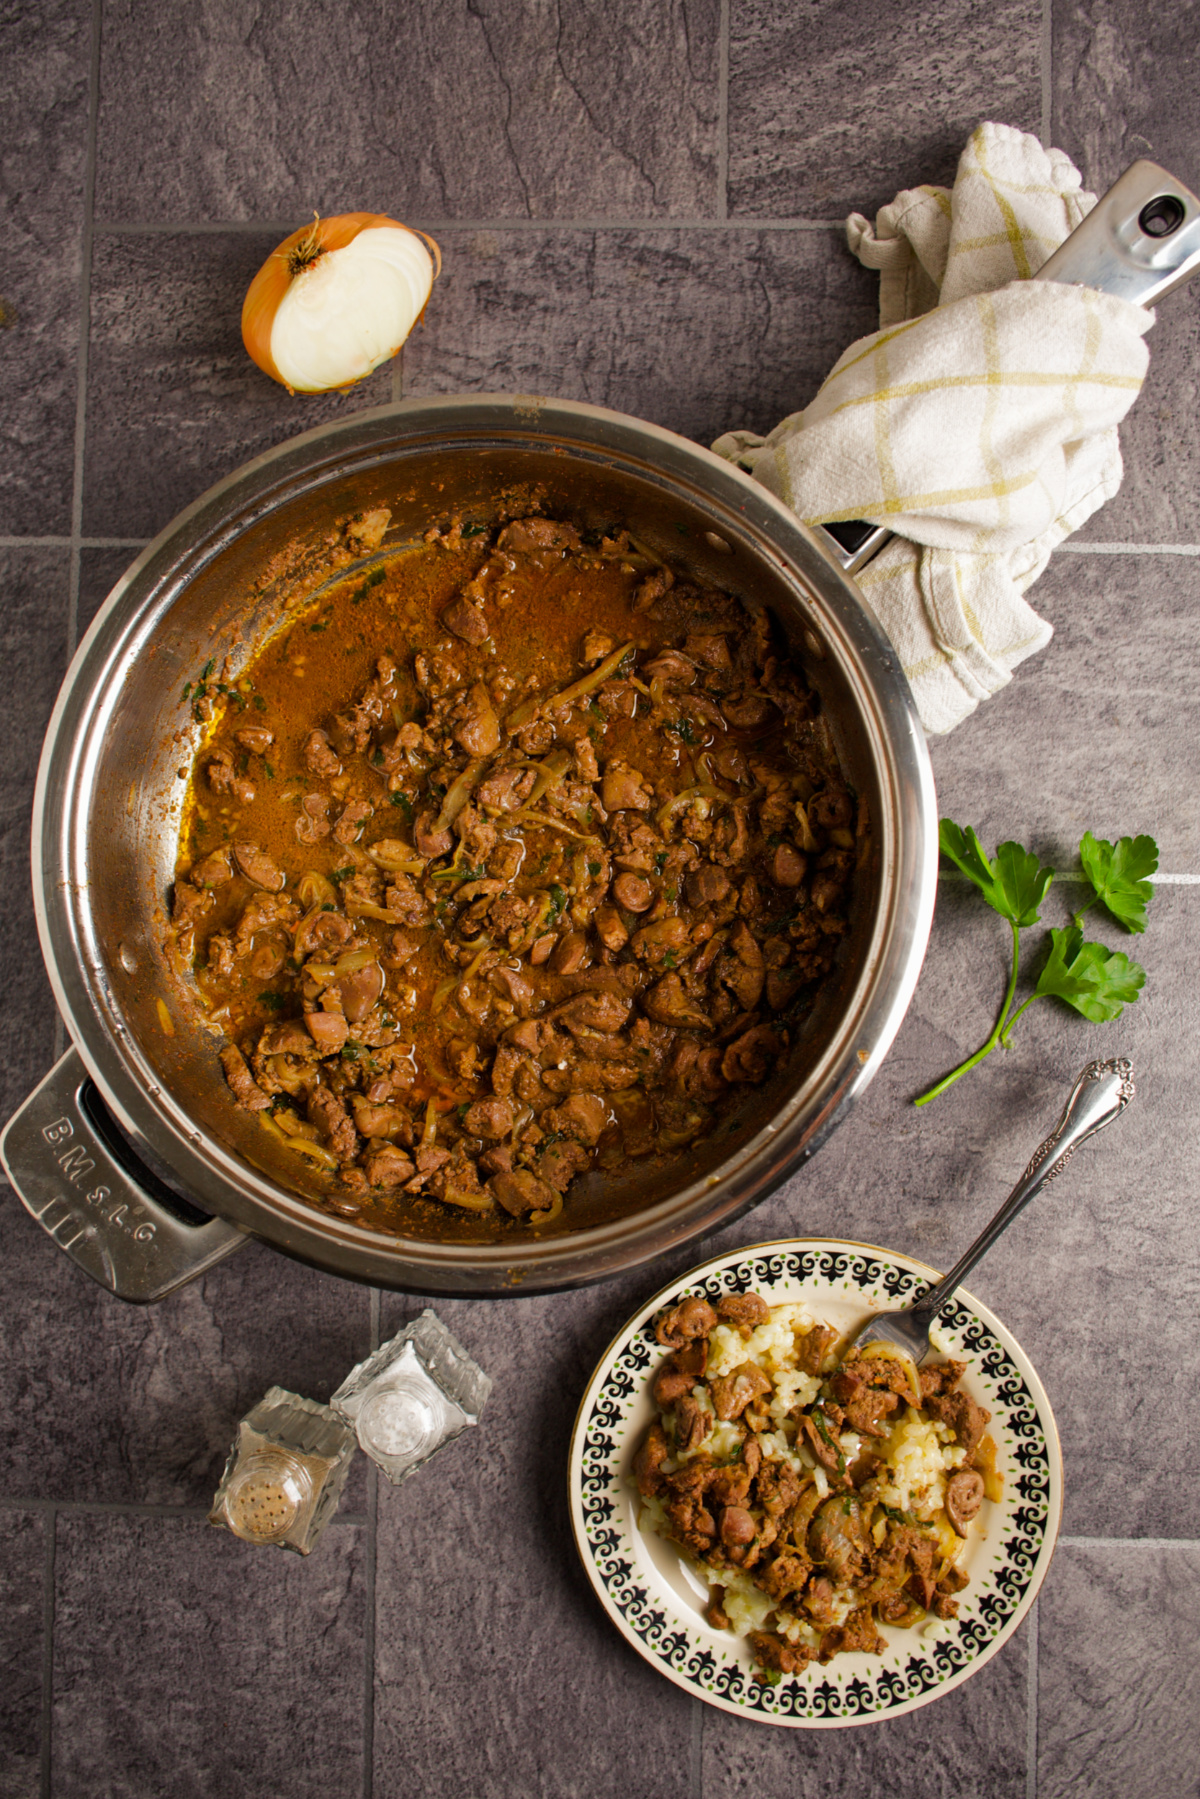
    Below are the ingredients for our liver and onions sauce.

    Ingredients for the recipe.
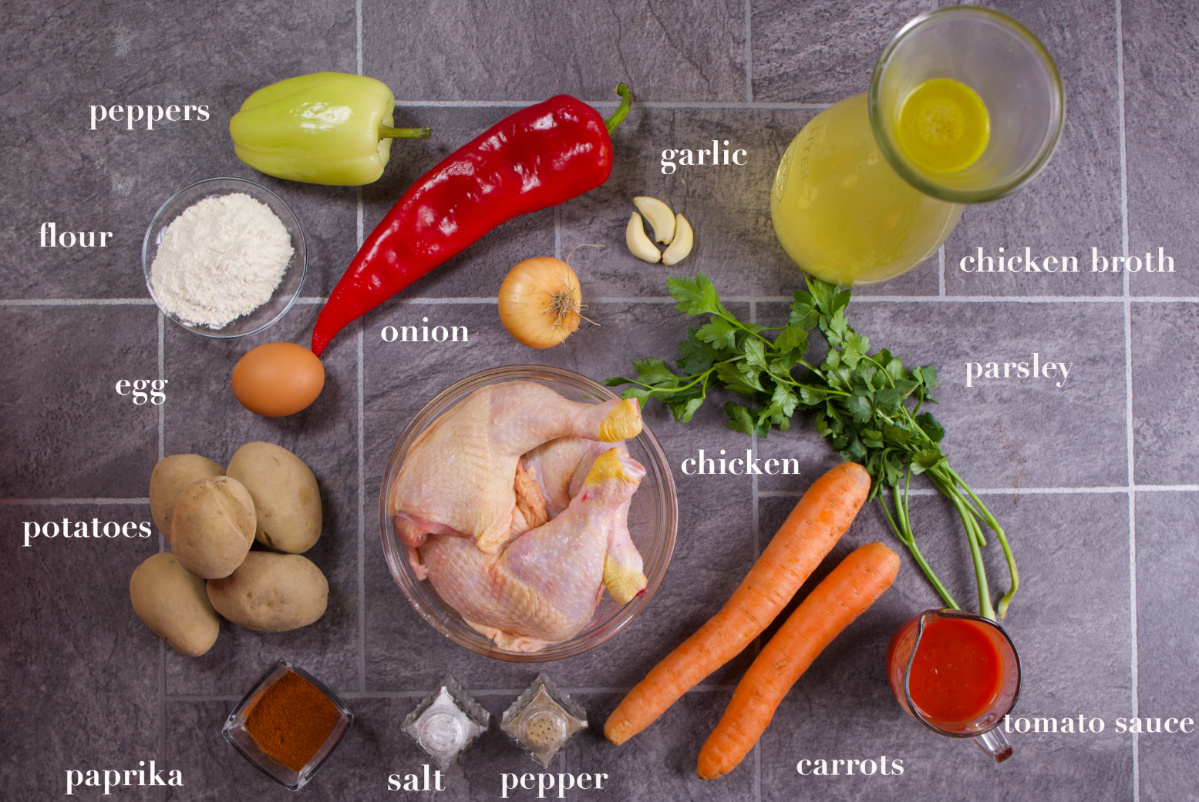
    • Chicken livers: Look for maroon-colored, fresh chicken livers.
    • Vegetables: Starting the dish with onions and garlic is the best way to bring out the flavor. Later you can add carrots and peppers also. 
      - Onions: White onions are best for this liver and onions sauce as they provide just the right amount of juice.
    • Herbs: Parsley brings freshness to this dish. Sub with an Italian herb mix, or herbs lighter on the flavor spectrum (celery, coriander, etc.). 
    • Seasonings: Substitute with smoked or hot paprika. (Salt and pepper can be subbed with Vegeta.)
    • Fats: Sub oil with lard for a stronger flavor.
    • Liquids: Add chicken stock instead of water. For a smokey taste add a pinch of whiskey or white wine. However, make sure the liquids are lukewarm.  

    Instructions

    With our quick instructions, you'll learn how to cook liver in no time. (More detailed information for our pan-fried liver and onions is in the recipe card below.)

    Photos of all recipe steps.
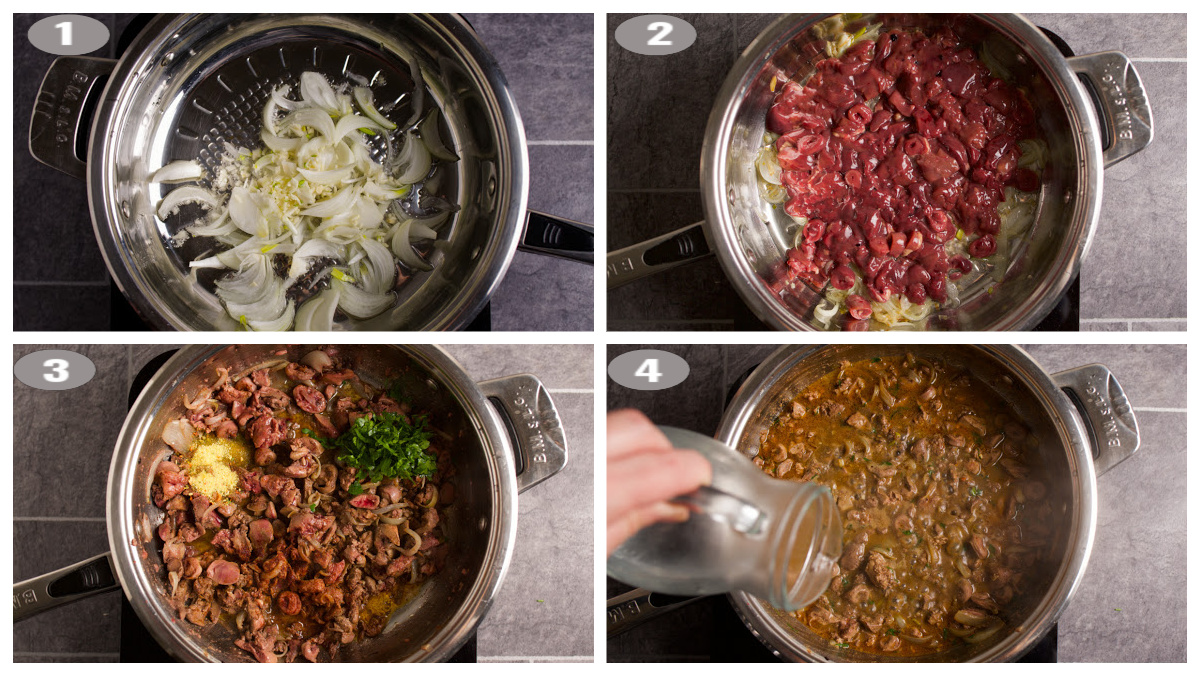
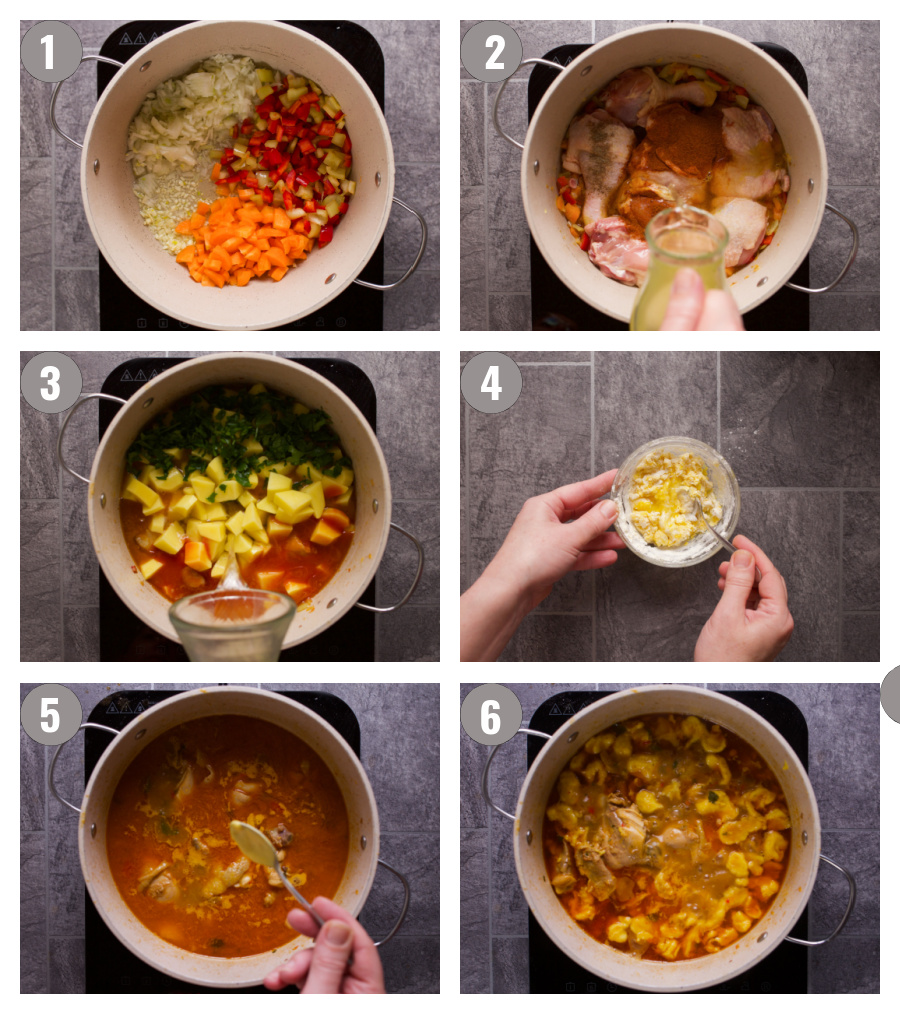
    1. Cook garlic and onion.
    2. Add liver to the skillet.
    3. Add seasonings.
    4. Add water. Cook some more.

    Expert Tips

    • Overcooking: Don’t fry chicken liver longer than necessary as the meat will become chalky. In addition, it'll harden as well.
    • Reheating: although it is safe to reheat liver and onions, the texture, taste, and quality of the meat deteriorates. So, eat what you can, and dispose of the rest. 
    • Adding herbs and spices: For the best flavor, and to prevent the meat from hardening, don’t add them to the meat before you start cooking it. Furthermore, the right moment to add herbs and spices is after the meat simmers with garlic and onion first.
    • Checking for doneness: Don’t cut it with the knife to see if it’s done while frying it because the juices will escape. 
    • Adding liquids: Only add warm or lukewarm liquids (such as wine, water, or broth) to fried chicken liver. Otherwise, the meat will harden. 

    How to handle organ meat (chicken livers)?

    Most people don't learn how to cook liver because they're unsure of how to handle organ meat. Below are a few tips that will make this process a breeze!

    Overhead chicken livers in pan.

    Cleaning: Wash the fresh liver under running water. Let drain in a colander. Remove connective tissue, and proceed to cook following this, or another, liver and onions recipe.

    Storing: As organ meat spoils faster than muscle meat, ideally you should know what you'll do with chicken liver before you buy it. After you bring it home, keep chicken liver in the fridge and consume it within 24 hours.

    Freezing: Freeze chicken liver immediately after bringing it home from the store. It can stay frozen for up to 3 months. When ready to make, thaw it by transferring it to the fridge the night before. Alternatively, immerse it in lukewarm water for at least an hour, and up to 3 hours.

    Reheating: Nope! What's more, organ meat is meant to be consumed soon after preparation. Although it won't go bad with reheating, the quality of the dish will deteriorate. It's simply not very conducive to repeated heating.

    Recipe FAQs

    What's chicken liver nutrition?

    Chicken liver is an excellent source of vitamins (A, B, D, E, and K), and minerals (copper, magnesium, phosphorus, and zinc).

    Additionally, organ meat and particularly chicken liver is a fantastic source of iron.

    Why do Americans not eat organ meat?

    Historically in the US, organ meats were associated with the poor.

    It had a slight revival during WWI and WWII. During the wars, the government promoted organ meats to the stateside population so that muscle meat could be sent to the soldiers abroad. After the wars, however, organ meats were once more associated with the downtrodden.

    Today, with the rise of paleo, keto, and carnivore diets, variety meats are back in mainstream American cooking. And in a funny twist of fate, the upper classes now pay big money to eat organ meats at posh restaurants around the US.

    So why not learn how to cook liver with our super easy and majorly delicious liver and onions recipe?

    Do I need to soak chicken livers in milk?

    There is no need to soak chicken liver in milk because it's one of the mildest organ meats.

    However, you should marinate veal and pork livers in milk as they can taste slightly metallic.

    What does chicken liver taste like?

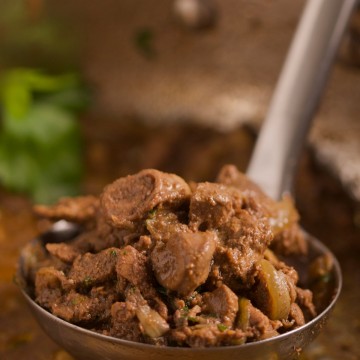
    Chicken livers have the mildest taste out of all the organ meat.

    They have a tart, rich, slightly grainy, earthy texture, and a slight sweetness. (Overcooking chicken livers makes them dry and grainier, so it's important to know when to stop.) The taste also depends on the way they're prepared and the seasonings used.

    When prepared well, chicken livers resemble rich, tasty muscle meat. The kind of taste that's easy to love pretty quickly.

    Is chicken liver full of toxins?

    No.

    As the liver filters an organism's blood, there is a worry that it holds on to those toxins. However, the liver doesn't actually store the toxins but sends them on their way once the process is done.

    What to look for when buying chicken livers?

    Chicken liver has a smooth and shiny texture.

    It's light (in weight), soft, and slick (not slimy!). When you handle it, it will almost slip away from your fingers. When raw its tones range from tan to burgundy. This is what to look (out) for:

    - Tan, pale shades indicate iodine deficiency. Don't eat this type!
    - Green liver shades indicate bile infestation. Don't eat this type either!
    - Yellow-ish shades indicate more fat content and some cooks prefer it.
    - However, when you’re just starting out go for the usual maroon or dark purple kind. 
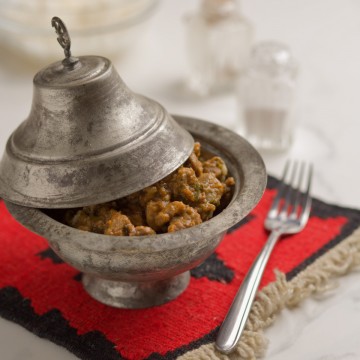
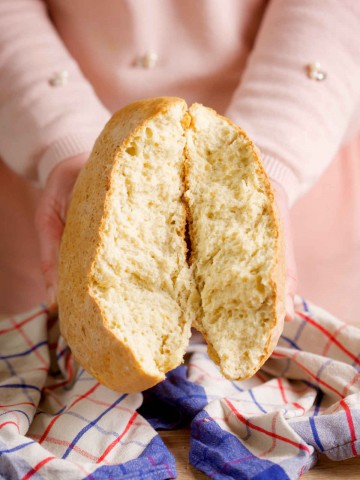
    Serve With 

    • Bread
    • Eggs
    • Rice
    • Pasta
    • Polenta
    • Potatoes (mashed, baked, fried, hash browns)
    • Ramen

    More Recipes

    • Chicken Bump Pie 
    • Veal Shank Roast 
    • Veal Roast 
    • Okra Sauce

    Thoughts?

    If you made our chicken liver and onions sauce, learned how to cook liver, and liked it, please consider giving it a ⭐️⭐️⭐️⭐️⭐️ (5-star) rating. This helps others find the recipe more easily!

    Also, feel free to leave a comment (I read each one!), and don't forget to tag a photo #balkanlunchbox, or us @balkanlunchbox, on IG.

    Prijatno and bon appetit!

    Livers in ladle.

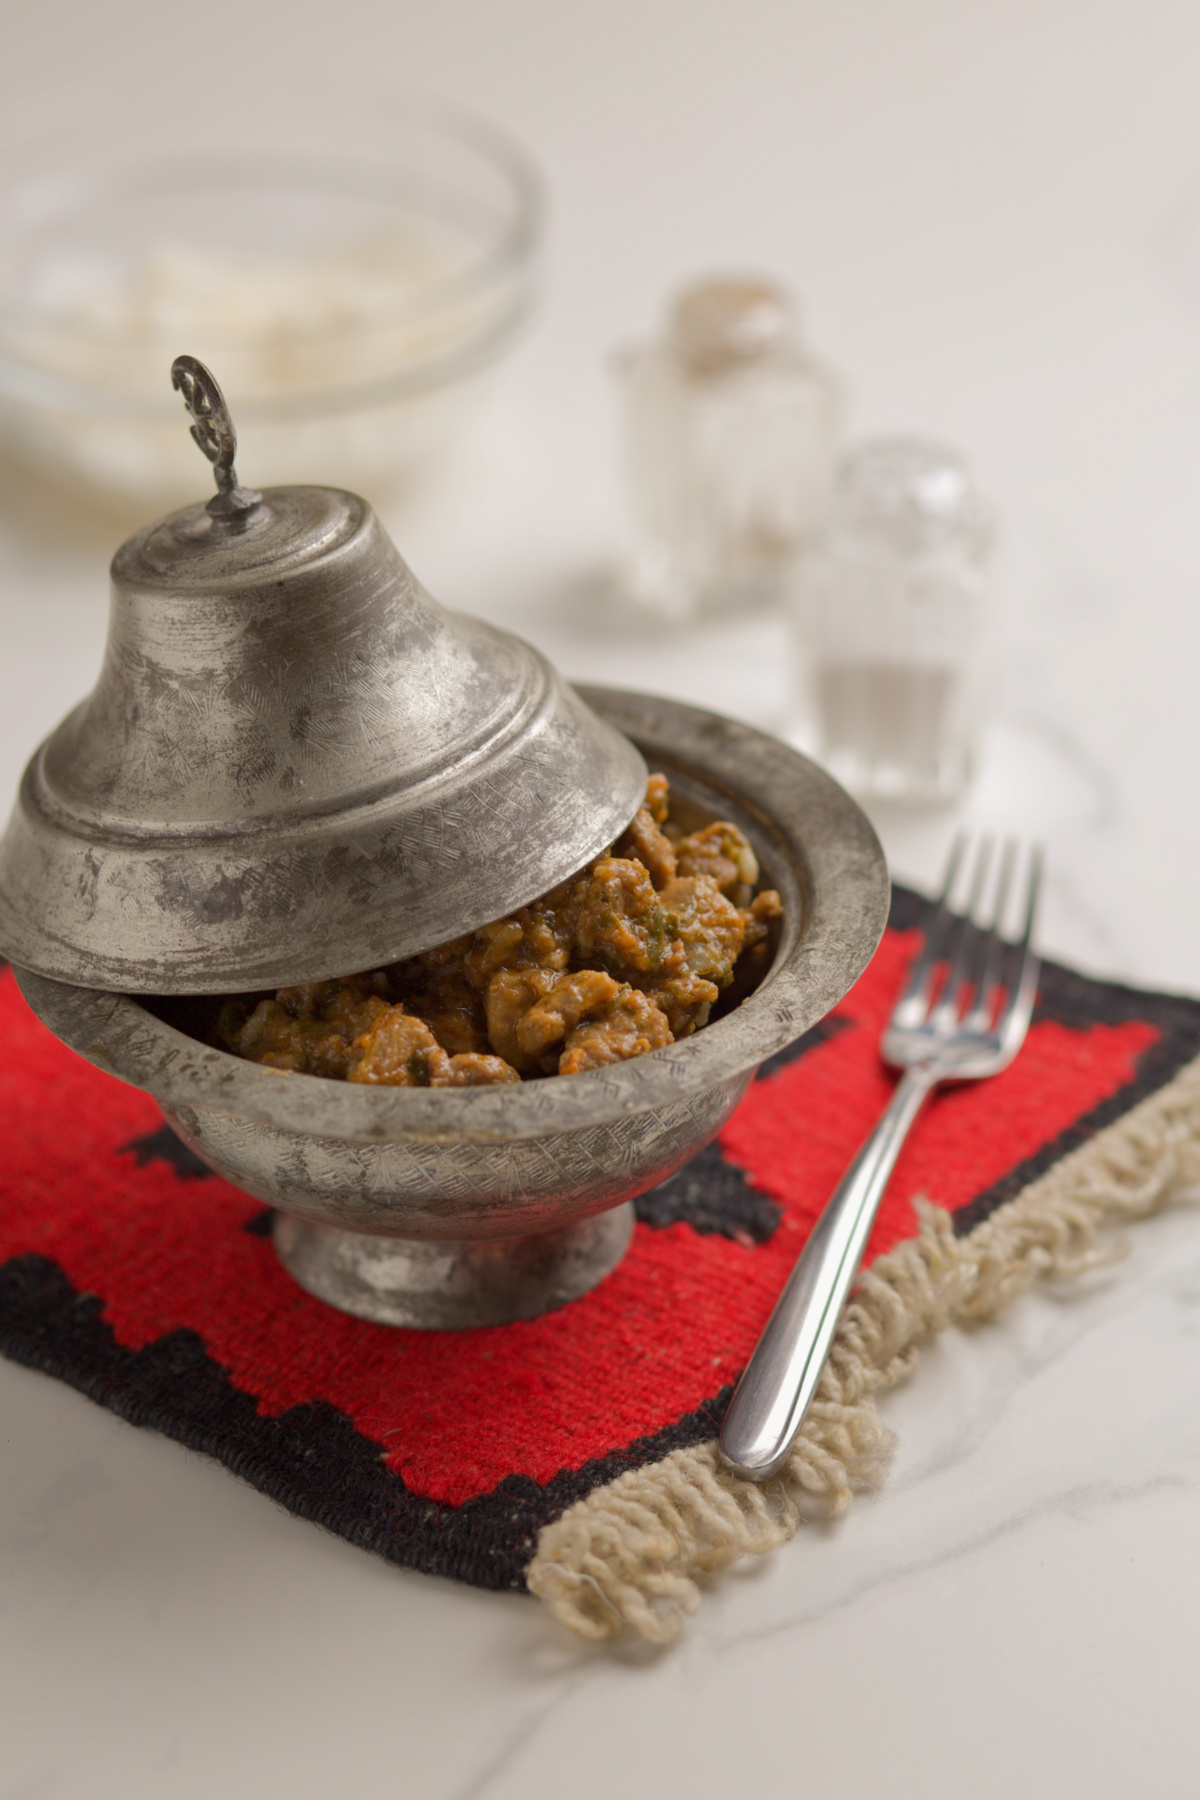
    Pan Fried Liver and Onions (Chicken Liver)
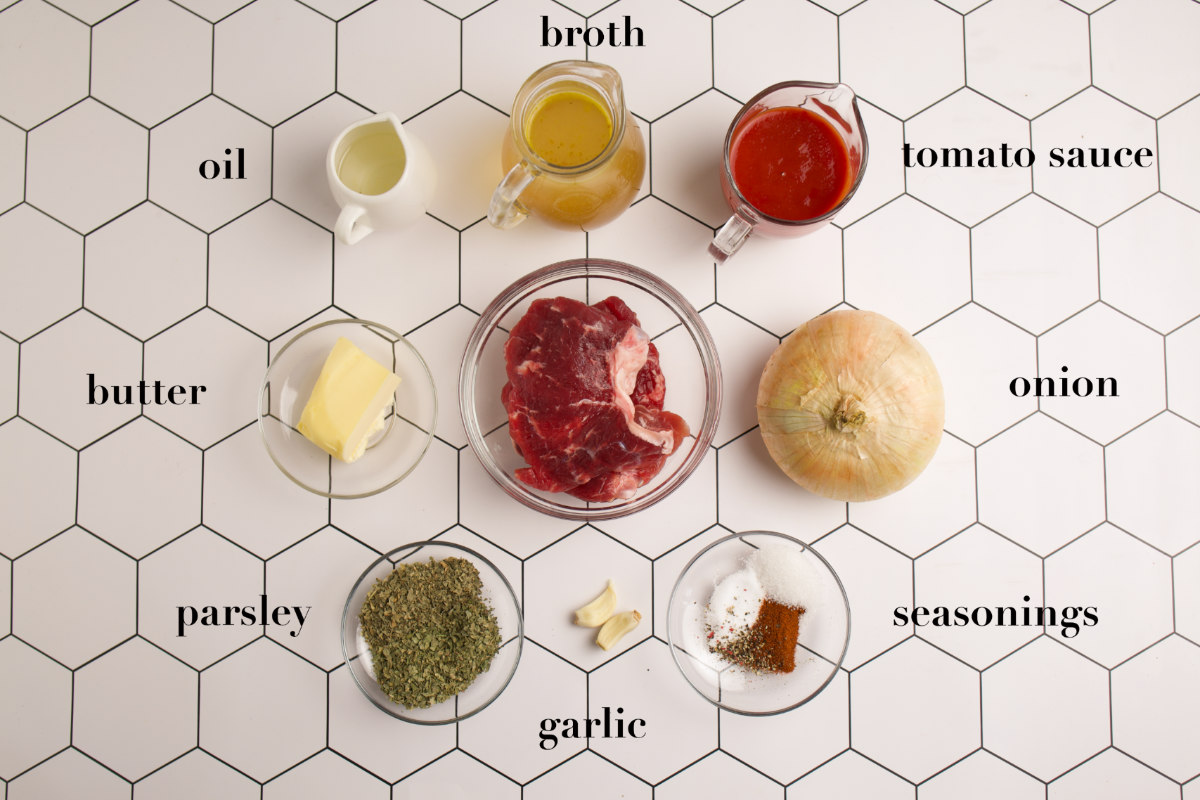
    Aida
    This is an way to learn how to cook liver in a delicious liver and onions sauce.
    5 from 4 votes
    Print Recipe Pin Recipe
    Prep Time 10 minutes mins
    Cook Time 25 minutes mins
    Total Time 30 minutes mins
    Course Main Course
    Cuisine Bosnian, Croatian, Serbian
    Servings 4
    Calories 221 kcal

    Ingredients


    • 2 garlic cloves
    • 2 yellow onions medium, diced coarsley
    • 1 pound chicken liver washed thoroughly, connective tissue removed, diced
    • 1 tablespoon parsley minced
    • 1 teaspoon seasoned salt or 1 teaspoon chicken powder
    • ½ teaspoon salt
    • 2-3 tablespoons vegetable, coconut, avocado oil, or lard

    Instructions
     

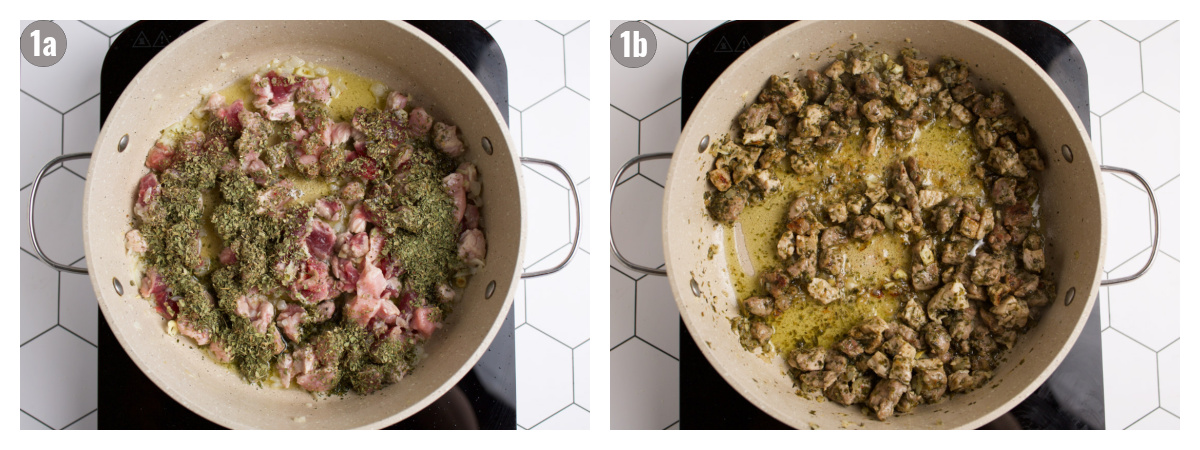
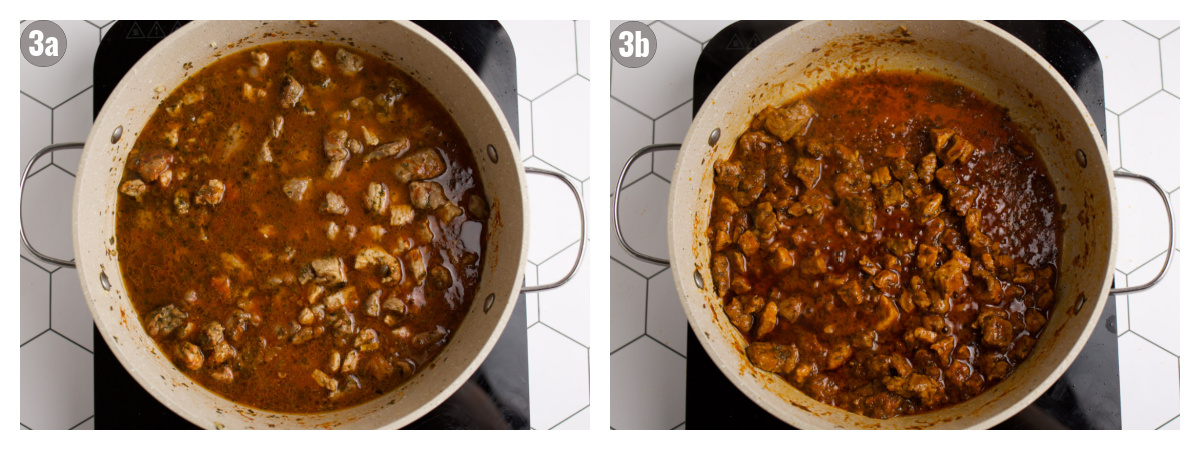
    • Add oil to a larger skillet and heat it up on high for 2-3 minutes. Add onion and garlic and cook until translucent (about 5-7 minutes).
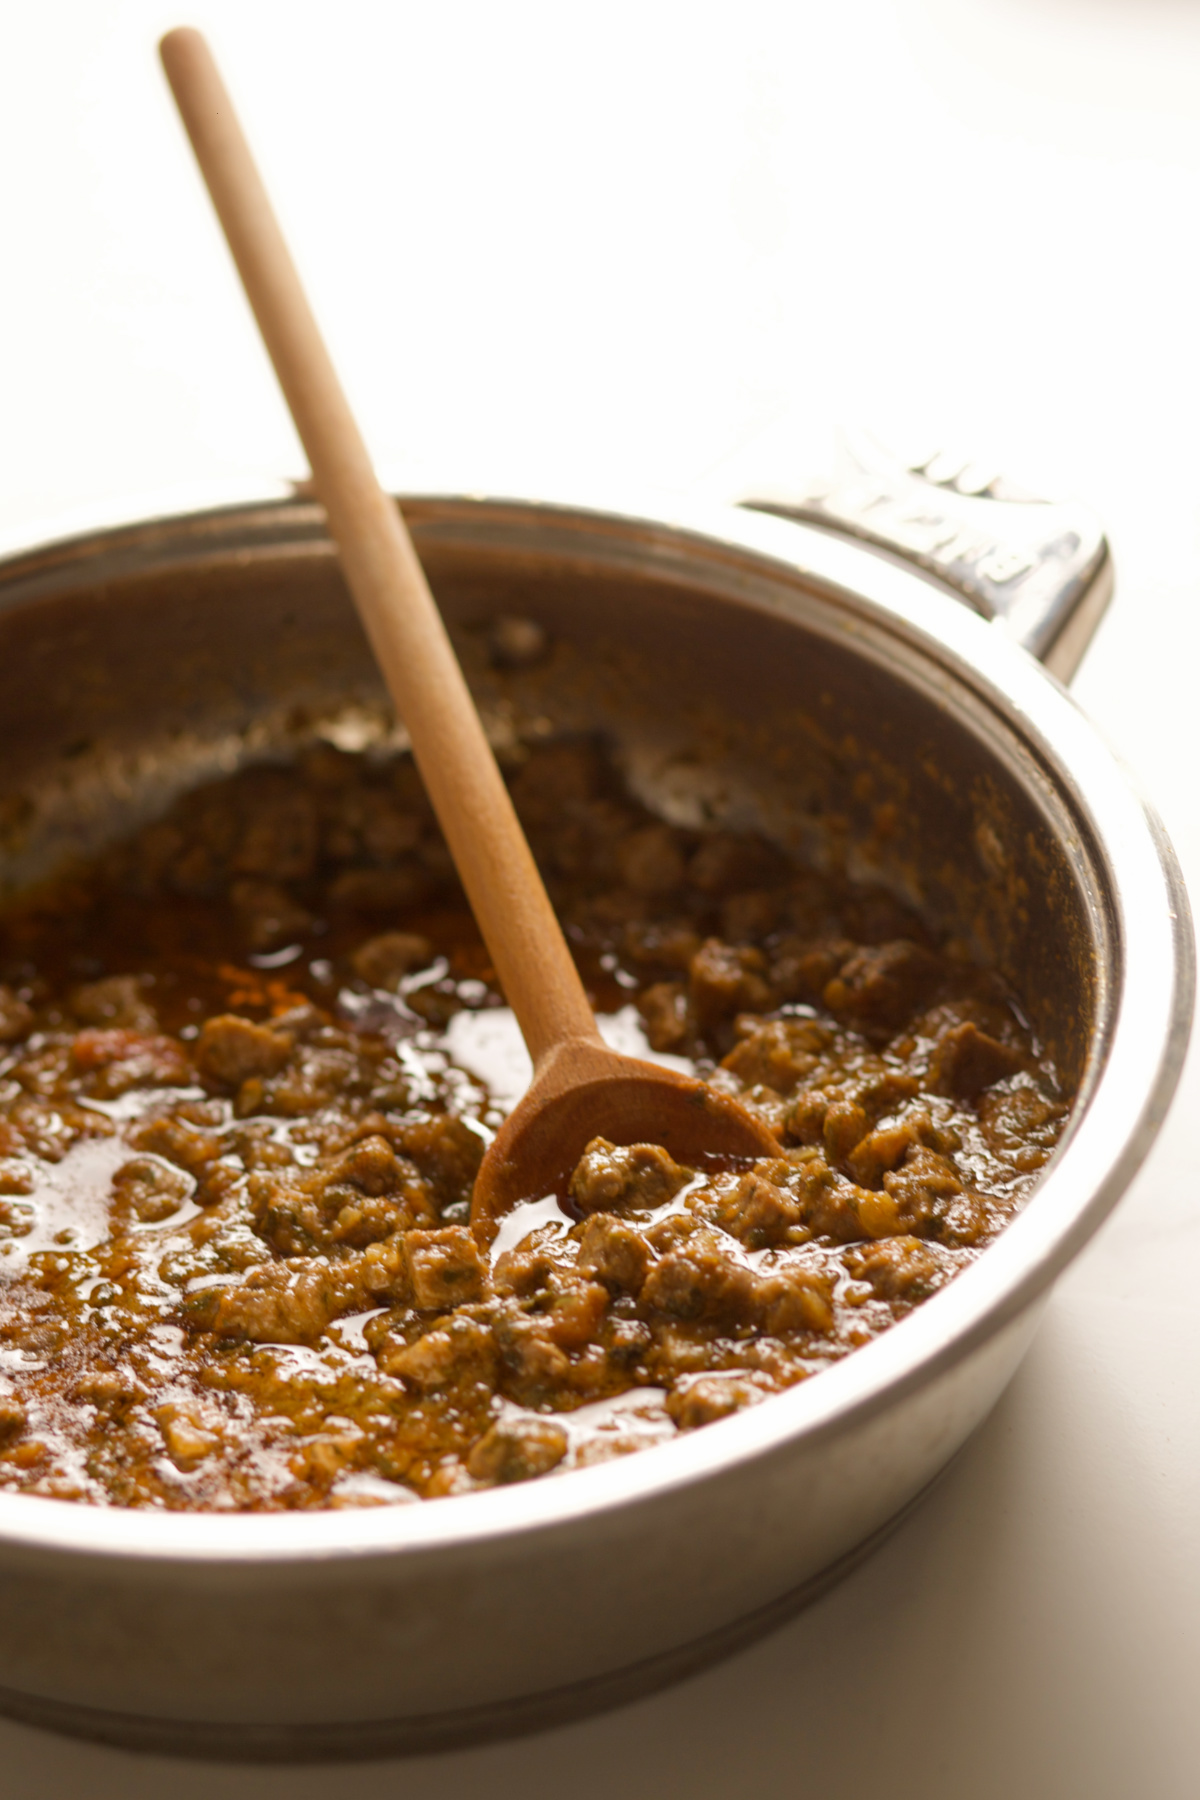
    • Add chicken liver. Stir well, and lower the temperature down to medium. Cook for about 7-8 minutes, occasionally stirring.
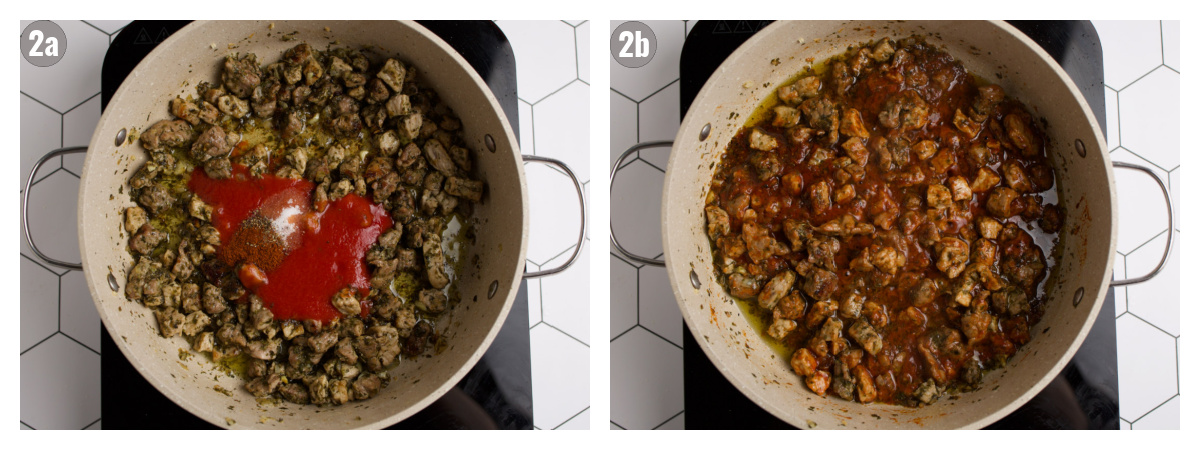
    • Add herbs, seasonings, and ½ cup of warm water. Stir, and continue cooking for another 3-5 minutes.
    • Serve alone or with a side. Consume soon after making, and don't store in the fridge. Discard what you don't eat. Don't reheat! Read notes for freezing raw liver; never freeze cooked liver.

    Video

    Notes

    • Ingredient Notes
    Look for the chicken liver that's maroon or dark purple in color. (It'll turn brown with cooking.) 
    • Instruction Notes
    Don't fry chicken liver for too long, as otherwise the meat will harden and become chalky and grainy. Also, don't cut during cooking to see if the meat is done as the juices will escape.
    • Storing raw liver
    As organ meat spoils faster than muscle meat, ideally you should know what you'll do with chicken liver before you buy it. After you bring it home, keep chicken liver in the fridge and consume it within 24 hours.
    • Freezing raw liver
    Freeze chicken liver immediately after bringing it home from the store. It can stay frozen for up to 3 months. When ready to make, thaw it by transferring it to the fridge the night before. Alternatively, immerse it in lukewarm water for at least an hour, and up to 3 hours.

    Nutrition

    Serving: 1of 4Calories: 221kcalCarbohydrates: 7gProtein: 20gFat: 13gSaturated Fat: 2gPolyunsaturated Fat: 3gMonounsaturated Fat: 6gTrans Fat: 1gCholesterol: 391mgSodium: 956mgPotassium: 353mgFiber: 1gSugar: 2gVitamin A: 12648IUVitamin C: 26mgCalcium: 26mgIron: 10mg
    Tried this recipe?Let us know how it was!

    More Recipes to 💙

    • Overhead photo of a meat and cheese wooden tray platter on a gray background.
      Balkan Meza: Tapas-Style Appetizer Platter [Meat and Cheese Tray, Charcuterie Board]
    • Quarter of a burek pie on a plate on gray background.
      Burek
    • ajvar, chutney, pepper chutney, eggplant chutney, balkan spread, balkan dip ajvar, red pepper and eggplant dip, pepper dip | balkanlunchbox.com
      Ajvar
    • Bowl with soup, spoon, two cups of juice, bread and a kitchen towel on a dark background.
      Instant Pot Bean Soup with Sausage (Pasulj or Grah) [No Soak]

    EASY Meat Sauce Recipe: Bosnian Mini Ćevap

    Mar 23, 2021 · 10 Comments

    Meat dish served in a traditional bowl sahan.

    Easy meat sauce recipe coming to us from Bosnia. Also known as mini ćevap (not to be confused with traditional ćevap sausages) this diced beef sauce is perfect for pasta, polenta and more. Major bonus? It’s quick!

    Meat dish served in a traditional bowl sahan.
    [feast_advanced_jump_to]

    What Is It

    If you’re familiar with Bosnian cuisine you may have thought this would be a recipe for ćevapi, a well-known grilled minced meat dish. Well, you’re in for a surprise! 

    But first, let’s clear up the confusion!

    Term ćevapi isn’t specific only to that one famous grilled delicacy! In fact, there are several different ćevapi dishes! BUT because it is the most popular, most people assume those are the only ćevapi that exist. 

    How do you know which one is which? 

    If the name of the dish is ćevap only, it’s the grilled sausages. But if it has an adjective in front of it, it’s another ćevap dish. In this case, it’s usually some type of beef sauce. 

    (Want another example? Jump over to the Boss sauce, aka ‘hajj ćevap.’)

    Today’s mini ćevap (sitni ćevap) refers to the beef that’s diced small.  It’s a tender beef sauce achieved by simmering beef with onion until they sweat out the goodness. Think of it as a versatile, goulash-type meal.

    Unlike regular goulash, however, fluid content is halved.  As a result, you get a sauce with meat that greatly depends on its own juices for flavor.  

    Ingredients

    Nine ingredients placed on a table.

    Ingredient Notes 

    • Oil and butter: Oil serves to prevent butter from burning. You can use less.
    • Garlic: If using granulated garlic use ¼ teaspoon as a substitute for one clove. For garlic powder the substitution is ⅛ for each clove.
    • Onion: No subs here! I support using granulated or powdered onion for most homemade sauces. But this dish’s flavor depends greatly on meat and onion simmering together for a while. Original recipe calls for sliced onion, however I dice mine.
    • Parsley and celery: Fresh is best. If using dried exchange each tablespoon of fresh herbs with one teaspoon of dried herbs.  
    • Pepper: Using peppercorn is recommended. Otherwise add ground black pepper to taste.
    • Beef: If at all possible use fattier cuts such as T-bone or rib eye. In the absence use the chuck.
    • Crushed Tomatoes: Substitute with tomato sauce, or 2 teaspoons of vinegar.
    • Other Veggies: In some regions, carrots and peppers are added.

    Lightning-fast Instructions

    (Our lightning-fast instructions are here to give you an idea of how to make this dish. For more detailed information look at the recipe card below!)

    Two photographs of meat browned in the pan.
    1. Simmer all ingredients (except paprika and tomato sauce) together (20 min). 
    Two photographs of meat in pan, one with seasonings, one finished.

    2. Add tomato sauce, paprika to the sauce and simmer some more (20 min).

    Two photographs of meat in pan being cooked.

    3. Add water (or broth), bring to a boil, simmer (5 min), and serve.

    Meat Notes

    This is a red meat dish with a sauce similar to goulash, with one key difference.

    Both dishes are forgiving of old cuts of meat. (No need to use veal, though I won’t stop you!) However, the best Bosnian meat sauce is made with fattier off-the-bone cuts like T-bone or rib eye.

    I know what you’re thinking: “Aida, you crazy! I’m not wasting T-bone on a sauce!”

    Yet it won’t be a waste!  It’ll be the most delicious, finger-licking sauce with the meat you’ve had in your life.

    If you are still hesitant, you can get away with stew chuck. The dish won’t be fantastic, but it will still be great.

    Sauce in the pan.

    Mini Ćevap Sides 

    In Bosnia mini ćevap is popular during Ramadan fast breaks. (Ramadan is the Muslim fasting month.) However, you can find it in most local food restaurants all year.  It’s often served in traditional tin or copper dishes called ’sahan’ (see the first photo).  

    Back in the day, it was served as a stew with a side of bread. But I like it best with sides. Here are some side ideas: 

    • Rice
    • Pasta
    • Baked Potatoes 
    • Mashed potatoes 
    • Polenta

    Recipe FAQs

    What to do with leftover meat?

    Freeze it. Refrigerate it and use it in a sandwich or as a dipping sauce later. Alternatively, you can eat leftover meat the next day with a different side.

    How can I add flavor to meat sauce?

    If using larger chunks, marinate meat for a couple of hours before preparing your sauce. You can also use different seasonings and wine to add flavor to a meat sauce. Finally, the longer you cook it, the more flavorful a meat sauce is.

    More Delicious Meat Recipes 

    • Okra sauce 
    • Veal medallions in creamy mushroom sauce
    • Meatballs in tomato sauce
    • Mushroom Goulash

    Would You Do Me a Favor?

    If you make today's Easy Meat Sauce Recipe and like it, please consider leaving a ⭐️⭐️⭐️⭐️⭐️ (5-star) rating. This will help others find the recipe more easily!

    You can also leave a comment, I read EVERY one! Finally, if IG is more your thing, consider tagging us @balkanlunchbox.

    Prijatno and bon appetit!

    Meat dish served in a traditional bowl sahan.

    EASY Meat Sauce Recipe: Bosnian Mini Ćevap

    Aida
    Easy and quick meat sauce recipe coming to us from Bosnia. Also known as mini ćevap this diced beef sauce is perfect for pasta, polenta and more. 
    5 from 2 votes
    Print Recipe Pin Recipe
    Prep Time 10 minutes mins
    Cook Time 45 minutes mins
    Total Time 55 minutes mins
    Course Meats/ Sauces
    Cuisine Bosnian
    Servings 4
    Calories 711 kcal

    Ingredients


    • 1.5 ounces oil
    • 3.5 ounces butter
    • 1 yellow onion large, peeled, sliced
    • 1-2 garlic cloves minced
    • 3-4 tablespoons fresh parsley minced, or 3-4 teaspoons dried
    • 3-4 tablespoons fresh celery leaf minced, or 3-4 teaspoons dried
    • Salt to taste
    • A few peppercorns
    • 1.5 pounds beef cubed, preferably T-bone or rib eye
    • ½ teaspoon paprika
    • 4 ounces crushed tomatoes or tomato sauce or 2 teaspoons vinegar
    • 1.5-2 cups water lukewarm, or beef broth

    Instructions
     

    • In a deep pan combine oil, butter, onion, garlic, parsley, celery, salt, pepper, and meat. Stir well and simmer over medium for 20 minutes or until water expeled by the meat and veggies almost evaporates. 
    • Add tomato sauce, paprika and sugar. Stir and simmer another 20 minutes or until sauce juices thicken. 
    • Add water (or broth), bring everything to a boil and simmer another 3-5 minutes. Serve over a side of your choice. 

    Video

    Notes

    Original recipe calls for a sliced onion, however I diced it for the video.
    Substitute (if you must) with the chuck.  
    Recipe adapted from: Lakišić, A. (2015). Bosanski kuhar. Svjetlost.

    Nutrition

    Calories: 711kcalCarbohydrates: 5.8gProtein: 41.2gFat: 57.5gSaturated Fat: 22.2gCholesterol: 179mgSodium: 505mgFiber: 1.8gSugar: 2.8g
    Tried this recipe?Let us know how it was!
    • Woman holding halved pogacha.
      Pogacha (Pogača): Traditional Balkan Bread Without Yeast
    • ajvar, chutney, pepper chutney, eggplant chutney, balkan spread, balkan dip ajvar, red pepper and eggplant dip, pepper dip | balkanlunchbox.com
      Ajvar
    • Balkan Homemade Cornbread From Scratch (Kukuruza, Proja)
    • Bread on a blue background.
      Tepsijaš - Bosnian Homemade Pan Bread

    Authentic Chicken and Potato Paprikash with Dumplings

    Mar 16, 2021 · 12 Comments

    Paprikash in a ladle.

    Here’s a recipe for an authentic chicken and potato paprikash with dumplings as it’s usually done in Serbia, Bosnia and Croatia. Originally Hungarian, this amazing stew came to the Balkans a while ago where it’s now a dinner favorite. In three short words, it’s easy, delicious & healthy!

    Paprikash in a ladle.
    [feast_advanced_jump_to]

    What Is It 

    Our aauthentic chicken paprikash is a mouthwatering stew infused with paprika spice, vegetables and chicken.  Even the name is derived from paprika: a red, deep, smokey and sometimes hot spice made from different peppers.  

    Today, most of this spice is produced in Hungary, so it’s not surprising that original chicken paprikash (or paprika chicken) originated there.  

    However, you can find this dish in many different countries. In fact, you may have already had some Polish, German, even Ukrainian paprikash.

    The one we’re making today is of the Balkan variety. While similar in preparation to Hungarian dish, Balkan paprikash is usually made without sour cream and with less (and milder) paprika. 

    Ingredients

    Recipe ingredients on the table..

    Ingredient Notes for Authentic Chicken Paprikash

    • Chicken broth: For a richer flavor, substitute with chicken stock.
    • Dumplings: Don’t feel like making them? Use tagliatelle. Or no dumplings at all. (If you skip dumplings look at thickening notes below.)
    • Paprika: For a spicier taste use hot paprika. 
    • Peppers: Instead of hot paprika you can also use hot peppers to spice the stew up more.  For a sweeter taste roast the peppers ahead of time, and remove the skin before adding to the stew. 
    • Potatoes: Old fashioned recipes often skip potatoes. If you skip them too, make more noodles.
    • Sour cream: This recipe is dairy-free, bit feel free to add a dollop of sour cream at serving. 

    Lightning-fast Instructions

    Photo with chicken paprikash steps.
    1. Simmer veggies (except potato) in hot oil. 
    2. Add chicken, spices, some broth, and continue simmering. 
    3. Make dumplings.
    4. Add potatoes, tomato sauce, remaining broth, and cook.
    5. Add dumplings.   
    6. Cook stew a little longer. 

    Best Chicken for Paprikash

    I won’t stop you from using skinless chicken parts (like chicken breast, etc.) to make this dish.

    But, you wouldn’t make traditional chicken noodle with skinless chicken now, would you?

    There is a reason why drumsticks or thighs with skin are the norm for this type of stew. Skin (combined with deep, rich paprika) helps create that “wow” factor.

    (No one says you have to eat the skin though. If you don’t like it, just remove it before serving.) 

    How To Make Authentic Chicken Paprikash Dumplings

    There are a few ways to make paprikash dumplings. Here are 3 of them: 

    ONE: Our recipe calls for simple egg and flour noodles. Egg and flour are mixed and noodles are dropped into the hot stew one by one. This results in thick, sturdy noodles that perfectly complement this dish.

    They almost act like a thickening agent. You can play around with their size.

    TWO: Other recipes call for farina dumplings. (You can find the directions to make them in our chicken soup with semolina noodles.) These type of noodles are fluffy and light. Also, extremely tasty.

    THREE: Finally, there are versions that combine the two. They use farina and flour for medium soft dumplings.

    For these dumplings mix 2 eggs, 2 tablespoons oil, 1 tablespoon water, 2 tablespoons farina flour, and 2 tablespoons flour, and a pinch of salt. Leave to rest for 10 minutes, and then drop in the hot stew with a teaspoon, one by one.

    Dish from the side.

    Expert Tips

    This stew is on the light side. Here are four expert tips to thicken it. 

    1. Add dumplings to the stew. (What we're doing in this recipe!)
    2. Flour the chicken before adding it in. 
    3. Make a sour cream and flour roux. 
    4. Make a traditional flour and butter roux.  

    Recipe FAQs

    How is Balkan paprikash different from Hungarian?

    Serbian and Bosnian include sweet peppers and potatoes. Croatian paprikash doesn’t use potatoes, but is otherwise the same. All versions often have dumplings. However, like most Balkan things, these are generalizations based on what I’ve seen done in the region.

    What does chicken paprikash taste like?

    Paprikash tastes like a lighter stew with tender, falling of the bone chicken. Ingredients are saturated in chicken juices combined with deep paprika, while dumplings add a perfect final touch.

    Can you freeze chicken paprikash?

    It's best not to. While paprikash broth is fantastic while fresh, ingredients lose their consistency when frozen.

    More Stews To Try

    • Savoy cabbage stew 
    • Kielbasa bean stew 
    • Dive bar veal stew
    • Romano bean stew

    Would You Do Me a Favor?

    If you make today's Chicken Paprikash and like it, please consider leaving a ⭐️⭐️⭐️⭐️⭐️ (5-star) rating. This will help others find the recipe more easily!

    You can also leave a comment, I read EVERY one! Finally, if IG is more your thing, consider tagging us @balkanlunchbox.

    Prijatno and bon appetit!

    Paprikash in a ladle.

    Authentic Chicken and Potato Paprikash with Dumplings

    Aida
    Originally Hungarian, this finger-licking-good stew came to the Balkans a while ago where it’s now a dinner favorite. Here's how we do it!
    5 from 2 votes
    Print Recipe Pin Recipe
    Prep Time 10 minutes mins
    Cook Time 1 hour hr 8 minutes mins
    Total Time 1 hour hr 20 minutes mins
    Course Main Course
    Cuisine Bosnian, Croatian, Serbian
    Servings 4
    Calories 604 kcal

    Ingredients


    Paprikash:

    • 1 yellow onion medium, peeled and minced
    • 2 garlic cloves minced
    • 2 carrots medium, peeled and minced
    • 1 red bell pepper medium, cored and minced
    • 1 yellow bell pepper medium, cored and minced
    • 4-6 chicken thighs or legs with skin
    • 1 tablespoon paprika
    • Salt and pepper to taste
    • 5 Russet or yellow potatoes medium, peeled, diced
    • 3.5 ounces tomato sauce
    • ½ bunch fresh parsley about 3-4 tablespoons, minced
    • 6 cups chicken broth

    Dumplings:

    • 2 tablespoons flour
    • 1 egg

    Instructions
     

    • In a deeper pot, heat oil over high. Add onion, garlic, and carrots. Stir and simmer 1-2 minutes. Add peppers. Lower temperature to medium and continue simmering for 8-10 minutes.
    • Add chicken, seasonings and one cup of chicken broth to the pot. Simmer for 15-20 minutes, occasionally stirring.
    • (If making dumplings) Whisk egg and flour together until integrated and set aside (you can leave it in the fridge if you like).
    • Add potatoes, tomato sauce and parsley, and the remaining chicken broth. Raise the temperature and bring stew to a boil, then lower to medium and continue cooking for 20-30 minutes.
    • Add dumplings by taking a little bit of the mixture with a teaspoon and lightly flicking it into the stew. (Dip the empty spoon into the stew after every fourth or fifth dumpling to keep it hot and prevent from sticking.)
    • Cook for 3-5 additional minutes.

    Video

    Notes

    Adding both potatoes and dumplings is a choice. If you want a thinner stew use one or the other.
    Dumplings can be made in several different ways (look at the text above). The ones chosen for the recipe are easiest to make and super tasty.

    Nutrition

    Serving: 1of 4Calories: 604kcalCarbohydrates: 59.6gProtein: 45.7gFat: 20.1gSaturated Fat: 5.5gCholesterol: 146mgSodium: 3168mgFiber: 9.9gSugar: 11.1g
    Tried this recipe?Let us know how it was!

    Veal Medallions in Creamy Mushroom Sauce

    Feb 16, 2021 · 2 Comments

    Sauce being poured over medallions

    Veal Medallions in Creamy Mushroom Sauce: if you love the coupling of a tender cut of meat and a rich sauce, this is the dish for you! The flavor is a combination of juicy, pan-seared veal, and soft mushrooms sealed together with the cream of mushroom inspired gravy. Let’s do this!

    Sauce being poured over medallions

    [feast_advanced_jump_to]

    What Is It

    I’ll tell you a secret. I have years of cooking experience, but I don’t cook well under pressure. Bottom line, I used to stress out every time my husband and I had someone over for dinner.

    To solve this I’ve collected a few simple but sophisticated dishes that come out great time after time. Today’s recipe for veal medallions is one of them. There is something very special in combining this tender meat with soft and earthy mushrooms. 

    (If you’re curious about other recipes in my collection, I often make chicken soup with farina noodles, and also the chocolate and pudding dessert cups.) 

    Trust me, easy yet tasty meals like these will get rid of your performance anxiety for good.

    Ingredients

    Ingredients: spices, mustard, mushrooms, veal, baguette, oil and cream of mushroom mix

    Ingredient Notes

    • Marinade: Most combos of acid, fat and spices work well. We used mustard, oil and Vegeta.
    • Veal: Top round is best but cutlets also work.
    • Button Mushrooms: Sub with cremini, portobellos or shiitake.
    • Broth: For a slightly less “mushroom taste” sub mushroom broth with heavy cream for your creamy mushroom sauce. On the other hand, for a slightly more “mushroom taste,” choose a cream of mushroom mix with different type of mushrooms than the ones you are using. 
    • Baguette: Sub with homemade bread but cut the slices in half.

    Lightning-fast Instructions

    (Our lightning-fast instructions are here to give you an idea of how to make this dish. For more detailed information look at the recipe card below!)

    step by step photographs to make the medallions
    1. Marinate veal ahead of time.
    2. Sear the meat and take it out.
    3. Cook mushrooms.
    4. Add cream of mushroom broth.
    5. Return meat to pan.
    6. Top with baguette slices.

    Veal Background

    Veal holds an important place in Balkan cuisine. In fact, veal dishes are considered a delicacy in this region. Whether from a butcher shop or a restaurant, it is among the most expensive and coveted meats.

    Surprisingly, many people still wonder what type of meat veal is. First of all, it falls under the red meat category.  

    It comes from a calf, which is a young domesticated cow or a bull. (As a point of reference, beef comes from older cattle.) These calves are between 3 weeks and 6 months old and weigh between 55 - 275lbs (25-125kg).

    In most countries, these calves are the bi-product of the dairy industry. As they can’t lactate and aren’t used for breeding, male calves comprise most of the meat sold for consumption.

    In color, this type of meat ranges from light to reddish pink. It’s smooth on touch, a tiny bit sour in taste, and has very little fat.

    Lighter-colored meat is considered tastier and it comes form milk-fed calves. Meanwhile, the darker meat comes from grain-fed calves.

    There is some controversy concerning milk-fed calves as some farms feed the animals iron-deprived milk to achieve the lightest pink.

    Veal Tips

    You may wonder which part of the veal to look for.

    It doesn’t help that cattle are cut differently from country to country.

    In some places, veal medallions refer to the size and shape of the cut of the meat. In other places, however, medallions refer to a specific part of the calf. 

    Don’t worry because here’s what to do for today’s recipe:

    • If you’re getting your meat from a butcher shop ask for top round.
    • If you’re picking it up at a grocery store get the pre-packaged cutlets, they work well.
    Close up of mushrooms on top of meat

    More Tips

    Pan searing (or searing) is a technique that helps seal meat juices inside. The meat is first cooked at medium to high temperatures until a brown crust forms, and then finished off in the oven, or added to a sauce.

    Button mushrooms, cremini, and portobellos are all one and the same mushroom. However, each is picked at a different growing stage.

    What’s in a name? Button mushrooms are also called champignons, table mushrooms, as well as cultivated or common mushrooms.

    Veal Recipes You'll Like

    • Cutlets in Red Wine 
    • Paté 
    • Bamija: Veal and Okra Sauce 
    • Shank Roast 

    Would You Do Me a Favor?

    If you make today's Veal Medallions in Creamy Mushroom Sauce and like them, please consider leaving a ⭐️⭐️⭐️⭐️⭐️ (5-star) rating. This will help others find the recipe more easily!

    You can also leave a comment, I read EVERY one! Finally, if IG is more your thing, consider tagging us @balkanlunchbox.  

    Prijatno and bon appetit!

    Sauce being poured over medallions

    Veal Medallions in Creamy Mushroom Sauce

    Aida
    These Veal Medallions in Creamy Mushrooms Sauce look and taste like a sophisticated restaurant dish. Luckily for us, this dish is super easy to make!
    5 from 1 vote
    Print Recipe Pin Recipe
    Prep Time 10 minutes mins
    Cook Time 27 minutes mins
    Resting Time 3 hours hrs
    Total Time 3 hours hrs 37 minutes mins
    Course Main Course
    Servings 4
    Calories 741 kcal

    Ingredients


    Marinade:

    • 3 tablespoons mustard
    • 1.5-2 ounces oil
    • ½ beef bouillon cube crushed, or your own seasonings

    Medallions:

    • 3.5-5 ounces oil
    • 21-22 ounces veal cutlets top round, cut into thin, smaller medallions
    • 12 ounces button mushrooms thinly sliced
    • Seasonings to taste salt, pepper, optionally ½ bouillon cube, or your own seasonings
    • 1 ounce cream of mushroom soup mix about ½ bag, dissolved in 3.5 ounces water
    • 1 baguette smaller, thinly sliced
    • (Optional) Parsley (minced, for garnish)
    • (Optional) 1 tablespoon butter

    Instructions
     

    • Marinade: On a medium size plate place veal medallions and generously dab in marinade on all sides. Cover plate with foil and leave in the fridge at least 2-3 hours, preferably overnight.
    • Medallions: In a medium sized pan heat oil over high temperature. Add veal medallions, and fry on medium high to igh temperature about 6-7 minutes on each side (12-14 minutes total) until they achieve a slight brown crust. (If they start burning up, lower the temperature, or take the medallions out earlier.)
    • Transfer meat to a medium sized plate and cover.
    • Scrape the remaining fats in the pan, and add the mushrooms directly onto it. Stir well so that the fats and mushrooms completely integrate. (If necessary add a little bit more oil or butter). Fry mushrooms about 4-5 minutes, until they release their own juices.
    • Lower temperature, add spices, cream of mushroom soup mixed in water, and an additional 1 cup of water. Stir well until the fluids integrate. Bring to a boil (about 2-3 minutes).
    • Return medallions to pan and spread them evenly.
    • ‘Cover’ medallions with baguette slices, then cover the pan. Let the bread steam up, about 3-5 minutes. (Optional) Garnish with parsley.

    Notes

    Spices-wise use Vegeta or seasoning C. If you don’t use these seasonings you can use ½ bouillon cube crushed, rosemary, basil and/or parsley or seasoning medley to taste.
    Depending on pan size you may have to fry medallions in two batches. Fry the second batch a shorter time (about 10-12 minutes total).
    Serve while warm as the gravy thickens quickly. When serving first place baguette slices on the plate, top them with medallions, and finally pour the gravy with mushrooms over it.
    Serve with rice, polenta, couscous, or pasta.

    Nutrition

    Serving: 1/4 panCalories: 741kcalCarbohydrates: 18.7gProtein: 54.6gFat: 49.9gSaturated Fat: 10gCholesterol: 178mgSodium: 384mgFiber: 2.7gSugar: 4.6g
    Tried this recipe?Let us know how it was!

    Potica (Povitica) Poppy Seed Roll

    Feb 2, 2021 · 17 Comments

    Closeup of a poppy seed slice.

    Poppy seed roll potica (or povitica) is the world’s greatest strudel. This perfectly stuffed pastry will imprint on your memory faster than Cinnabon did the first time you smelled it in an airport! Do I have your attention now? 

    Four pieces of poppy seed roll and a knife.
    [feast_advanced_jump_to]

    Potica, Povitica or Poppy Seed Roll?

    (Please note potica, povitica, and poppy seed roll will be used interchangeably in the text.)

    Potica is a fantastic pastry usually stuffed with either poppy seed or walnut filling. Today we're gonna stuff it with a filling made with ground poppy seeds, sugar, semolina, and milk. Potica tastes tart, gritty, and sweet at once.

    Potica goes by different names in the Balkans.

    • In Slovenia it goes by makova potica
    • In Croatia by povitica or povetica s makom,
    • In Serbia and Montenegro this is štrudla s makom, and
    • In Bosnia and Herzegovina they call it makovnjača.

    There are probably more names, and even the shapes can differ slightly. (For example, Slovenian makova potica is often made with thinner dough that has more layers. It's also usually baked in a bundt cake pan.)

    Regardless of whether you call it potica, povitica, or poppy seed strudel, each stands for the same rich pastry overflowing with succulent poppy seed filling.

    Ingredients

    Overhead photograph of ingredients for poppy seed roll.

    Ingredient and Method Notes

    Dough:

    Many pastry doughs are milk-based. It gives the final product perfect soft doughiness. However, these pastries are rock hard after a short period of time.

    For this reason, we make potica dough with water, with a method for making dough similar to pita. You let the dough rest and breathe for a while, and then you can stretch it to the stars. Or leave it in the fridge until you're ready to work it.

    For best results don't make any dough substitutions in the recipe.

    Filling:

    Potica filling is made with milk, poppy seed, semolina, sugar, and vanilla extract. If you're no fan of vanilla you can skip it. Oh, and, poppy seeds need to be finely ground!

    The trick for a great poppy seed filling is not to over-fill or under-fill the roll. Potica tastes best when there is a nice ratio between dough and filling.

    A good poppy seed roll requires perfect grit with perfect sweet.

    How Do You Use Poppy Seeds?

    • Grind them! This releases their oil and intensifies the flavor. If you don't, your potica will be too gritty and bitter, regardless of how much sugar you add. Use a coffee bean or spice grinder, and grind in small batches. (Food processors and blenders aren't your friends with seeds so small.)
    • 4:1 Ratio! If you insist on more grit in your potica, then, if you must, mix ground and non-ground seeds at a 4:1 ratio.
    • Unusual Filling Ingredient! In addition to poppy seeds, milk, sugar and vanilla, there is an ingredient you won't find in every poppy seed roll recipe. That's semolina! It helps the filling puff up and soften at the same time. (You probably remember our noodles where it did the same.)

    Lightning-fast Instructions

    (Our lightning-fast instructions are here to give you an idea of how to make potica. For more detailed information look at the recipe card below!)

    Four photographs with ingredients.

    1. Make the dough. Activate the baker’s yeast, and add it to flour together with oil and baking powder. Add water and knead until you get a soft ball of dough and let rise for at least an hour.

    Four photographs with a pot and ingredients in it.

    2. Make the filling. Boil milk and add sugar, vanilla extract, and poppy seeds. Finally, add semolina. Let rest and later divide it into two parts.

    Four photographs of potica roll with the filling.

    3. Combine dough and filling. Divide the dough into two parts.  Roll out the first part, fill it up with one half of the filling and roll the long side up. Repeat with the remaining ingredients. Place rolls in a pan, brush with water and butter, then bake.

    Two photos of the roll before and after baking.

    4. Cool down. After baking potica let it cool down and dust with confectioner’s sugar.

    Expert Tips

    • Nursing? Skip potica and make a walnut roll instead. There is a component in poppy seeds that causes colic (cramps) in babies.
    • Drug tested? Don't eat poppy seeds around testing time. Remember Elaine? They may contain extracts of morphine and opium as those are made from unripe poppy seed capsules.

    Serving, Storing and Freezing

    • Serving: Although a dessert, potica can easily become your entire dinner. It’s hard to stop eating it. Best if you double the recipe from start. It goes great with a warm mint tea, coffee, or a glass of milk.
    • Storing: If by some crazy chance you don't eat the entire strudel right away, fold it in saran wrap and leave in cupboard or bread box overnight. Reheat in oven. Potica lasts 3-4 days.
    • Freezing: Nope!
    Closeup of a poppy seed slice.

    Recipe FAQs

    What's the origin of the poppy seed roll (povitica/ potica)?

    Poppy dough roll (potica, povitica, makovnjača) probably made its way into the Balkans during the Austria-Hungary years. Yet, according to some Austrian sources, the roll may actually be a Turkish sweet. It may have even been considered to be baklava’s younger sister.  

    Does potica (povitica) need to be refrigerated?

    No. You can keep it in a dry place like a cupboard or a bread box for up to 3 days. Wrap in saran wrap first.

    What is potica made of?

    Potica roll is made from dough stuffed with a filling made by either a) walnuts, or b) poppy seeds. The dough is stretched, filled, then baked. The final result is a scrumptious thick roll(s) filled with a moist, fantastic filling.

    More Sweet Recipes

    • Mama’s Chocolate and Walnut Cake
    • Walnut Marzipan Squares
    • Choco Hazelnut Cake
    • Jam Rolls
    • No Bake Wafer Cake
    • Jam Crescents
    • No Bake Walnut Pralines aka Bajadera
    • Balkan Homemade Cornbread From Scratch 

    Would You Do Me a Favor?

    If you make today's Potica (Povitica) Poppy Seed Roll and like it, please consider leaving a ⭐️⭐️⭐️⭐️⭐️ (5-star) rating. This will help others find the recipe more easily!

    You can also leave a comment, I read EVERY one! Finally, if IG is more your thing, consider tagging us @balkanlunchbox.  

    Prijatno and bon appetit!

    Closeup of a poppy seed slice.

    Potica (Povitica) Poppy Seed Roll

    Aida
    Easy poppy seed roll (potica, povitica) from the Balkans. This strudel boasts several names, and the same moist, sweet, succulent taste. It will have you reconsider chocolate!
    5 from 7 votes
    Print Recipe Pin Recipe
    Prep Time 30 minutes mins
    Cook Time 40 minutes mins
    Resting Time 1 hour hr
    Total Time 2 hours hrs 10 minutes mins
    Course Dessert
    Cuisine Bosnian, Croatian, Macedonian, Montenegrin, Serbian, Slovenian
    Servings 10
    Calories 551 kcal

    Ingredients


    Dough:

    • 1-2 tablespoons water
    • 1 teaspoon baker's yeast
    • 2 tablespoons sugar
    • 17-18 ounces all purpose flour plus a more for dusting
    • Pinch of salt
    • 1.5 teaspoons baking powder
    • 4 ounces oil
    • 8.5 ounces lukewarm water
    • 2 tablespoons water to grease the dough
    • 1 tablespoon melted butter to grease the dough
    • 4-6 tablespoon confectioner's sugar after baking

    Filling:

    • 15 ounces milk
    • 8.5 ounces poppy seeds very finely ground
    • 4.5 ounces sugar
    • 2 ounces semolina
    • 2 teaspoons vanilla extract

    Instructions
     

    • Dough: In a small bowl combine 1-2 tablespoons water, baker's yeast and sugar. Mix and leave to bubble up (10-15 minutes).
    • In a medium sized bowl add flour, salt, baking powder and mix everything. Make an indentation and add the yeast mixture, oil and water. Knead ingredients several minutes until you get a soft ball of dough. Leave dough to rise for an hour.
    • Filling: (Make while dough is rising) In a medium sized pot add milk and bring to a boil on medium. Bring temperature down to low, add sugar, vanilla extract and ground poppy seeds. Mix well until integrated.
    • While continuously stirring, add semolina. Continue stirring and cooking another 1-2 minutes. Turn the stove off and let the filling rest. When the filling cools down divide it into two equal parts.
    • Assembly: Heat oven to 355°F (180°C) and dust working area with flour if needed. (Sometimes the dough is greasy enough where this isn't necessary. Your call.) The dough should be doubled now, so cut it into two equal parts.
    • Take one dough half and roll it out into an (approximately) 8 by 16 inches rectangle. Then take one half of the filling and spread evenly over the dough rectangle almost all the way to the sides. Roll up the long side and place in a pan (sized approximately 12 by 17 inches) lined with parchment paper. Repeat with the other halves.
    • Mix water and butter then brush poppy seed rolls with it.
    • Bake for 10-15 minutes, then turn the pan around and cover the roll with parchment paper. Bake an additional 25 minutes. (Total baking time is 40 minutes.)
    • Take the pan out of the oven, and let it cool down. You can cover it with a clean, dry kitchen towel. Dust with confectioner's sugar before serving.
    • The roll keeps up to 3 days. Keep wrapped in saran wrap in bread box. Eat leftover potica cold or reheated.

    Video

    Notes

    Longer rising time is even better. The sweet spot is between 1.5 and 2 hours. Also, if you can wait and let the roll rise between filling and baking, this will also add to volume and taste.
    You can brush with water/butter immediately after baking instead of before.
    The sugar amount for the filling is only a recommendation. Our potica runs on a less sweet side. For a sweeter taste add a few more ounces.  
    Poppy seeds should be very finely ground (think flour). If you are mixing it with non-ground seeds use a 4:1 ratio (ground to non-ground).
    Serving size is approximated based on the serving of 2 roll slices per person.

    Nutrition

    Serving: 2slicesCalories: 551kcalCarbohydrates: 69.8gProtein: 11.3gFat: 26.4gSaturated Fat: 5.1gCholesterol: 11mgSodium: 60mgFiber: 4gSugar: 27.1g
    Tried this recipe?Let us know how it was!

    Croatian Food Scene and Top Croatian Chefs

    Nov 3, 2020 · Leave a Comment

    Back in June I contributed an article to Chef’s Pencil. Topic centered around recipes that don’t make it on the usual ‘Top 10 Bosnian Dishes’ lists (but should!). Chef’s Pencil is an unusual food website. It’s not a recipe aggregate, nor a website authored by one person. Instead, the site shares experiences from chefs from all walks of life. BLB and CF follow the same content creation approach. 

    Quality trumps quantity. Always.

    I now have a chance to reciprocate, so the article below is by Chef’s Pencil’s Corina. It focuses on Croatian food scene and its top chefs. (Naturally, Croatian cuisine is an integral part of the Balkan cuisine, and here on BLB you can find many Croatian dishes.) Hope you enjoy learning about today’s Croatian chefs, and if you have a little bit of time you should out CP.

    Croatian Food Scene and Top Croatian Chefs

    Food lies at the very foundation of a country’s cultural identity and Croatian cuisine is deeply rooted in Croatians’ way of life. Croatia has a diverse cuisine and in the past decade or so it has transformed itself into a veritable foodie destination.

    The fact that Croatia has become a hugely popular tourist destination (yes, it’s a gorgeous country!) helps a lot, and it has propelled its food and restaurant industry to the new heights.

    Croatia prides itself on having 70 restaurants listed in the exclusive Michelin guide, seven of them earning the highly coveted Michelin star. No small feat for a country of just 4 million!

    Croatian Cuisine and Dining Scene

    Croatia boasts an amazingly diverse cuisine. Due to its geographical position, its cuisine is influenced by Mediterranean cooking, which involves plenty of fresh ingredients. Neighboring Italy has itself left a mark on this nation’s cuisine, especially along the coast where you’ll encounter myriad dishes based on fish and seafood.

    At the same time, there is an equally rich Central & Eastern European heritage that can be seen especially in continental Croatia; these influences translate into dishes such as soups, stews, and goulash, and many other different meat specialties.

    If we were to split the Croatian territory into regions based on the dominant gastronomy, we’d get three main regional cuisines: Istrian – strongly tied to the Italian tradition and boasts some of the best truffles in the world together with excellent wines; Dalmatian – based on fish and vegetables; and Slavonian – where meat, fish, and paprika predominate together with different other dishes inspired by Central European, Hungarian, and Viennese cuisine.

    Croatia has a lot to offer in terms of dining options. You can find all sorts of restaurants here, ranging from humble eateries and family-run restaurants to modern Michelin-star restaurants. The Croatian dining scene is as varied as their cuisine and lots of improvements have been made over the past few years as the country has become one of the prime European tourist destinations. Let’s dive deeper into the current state of the Croatian food scene by hearing what top Croatian chefs have to say about it.

    Chef Tomica Đukić

    Tomica Đukić is Head Chef at Hotel Osijek and chef to the Croatian National Football Team. His passion for cooking and the skills he’s acquired over the years have made him one of the key contributors to putting Hotel Osijek on Croatia’s gastro map. Working for the past 15 years at Zimska Luka, Hotel Osijek’s restaurant, gave Chef Tomica Đukić the opportunity to perfect his skills and experiment with different types of dishes.

    This restaurant adheres to traditional Slavonian cuisine and offers a wide variety of options including a la carte, themed daily and weekend menus all year round. In terms of his choice of ingredients, Chef Tomica Đukić keeps to seasonal selections from ingredients provided by local family farms where he can. When asked what makes the Croatian food scene special, Tomica said that the balance between green, continental, and blue, Adriatic, cuisine together with natural local ingredients account for their cuisine’s success. When it comes to his signature dish, Chef Tomica Đukić opts for Flavored black Slavonian pig fillet with pumpkin and beetroot, a dish that surprises through its simplicity and ideal flavor balance.

    Chef Marina Gaši

    Chef Marina Gaši works at the Marina Restaurant, a welcoming family restaurant located in beautiful Novigrad. What makes this place special is the fact that all their meals are made of fresh and healthy ingredients from the Adriatic area, which makes it a true ambassador of sustainable gastronomy.

    At Marina Restaurant, Chef Gaši, a self-taught cook, prepares a set of 4 to 6 courses that clients can choose from for lunch and a set of 6 to 8 courses for dinner. Desserts are also available based on the restaurant’s daily selection. Since all the dishes are prepared with fresh, local ingredients, the menu changes throughout the year based on the season, weather, and of course, what the sea has to offer. Super fresh food and lots of fish-based dishes are the highlights of this restaurant and when it comes to Marina’s signature dish, Sardines Tartare is her choice.

    Chef Marko Gajski

    Chef Marko Gajski started out as an amateur cook and is today a Michelin-star chef. His career began when he joined a Masterchef competition. After the show, he got his first job offer in the field, as a chef at Divino restaurant on the island of Hvar. His passion for this domain grew large and he began investing in his own development by attending various courses and internship programs in London at top locations such as the Gauthier Restaurant, Alain Ducasse and Bar Boulud.

    Chef Marko Gajski also partnered with the LD restaurant, where he got the chance to further explore and develop his gastronomy signature. Speaking of which, his signature dish is his very own version of Komiška pogača, a dish that originates on the island of Vis. The highlight of his career was the moment he got Michelin star recognition, an award that also helped boost the image of the restaurant he was working for. According to Marko, what makes the Croatian cuisine special is the mix of cultural influences it was subject to throughout the centuries, including Italian, Austrian, French, Hungarian, and Ottoman cuisine.

    Chef Bruno Vokal

    Chef Bruno Vokal is head of the Noel restaurant, the first restaurant in Zagreb to receive a Michelin star. Chef Vokal has an impressive experience gathered from working in different premiere restaurants across Europe. He sharpened his skills in Montenegro, Austria, and the UK before deciding to return to his native land, Croatia.

    Here, he worked at the renowned Restaurant 360 in Dubrovnik, another Michelin-starred gem of the Croatian food scene. Describing his current work at Noel, Chef Bruno says that the key to their success lies in the special techniques they use to prepare idealistic dishes while following traditional patterns. Chef Vokal considers the mixture of different cultures that have left their mark on Croatian cuisine as its most impressive aspect.

    Chef Deni Srdoc

    Chef Deni Srdoc, the Head Chef at the famous Kvarner restaurant Draga di Lovrana, is Croatia’s youngest Michelin-star awarded chef.

    At just 24 years, he took over the helm at Draga di Lovrana and a couple of years later he was named Young Talent of the Year by Gault & Millau. One year later, at the age of just 27, he earned the highly coveted Michelin-Star, making him one of the youngest Michelin-star chefs out there.

    So what is Deni’s secret? "Innovation is the most important thing for me – never  recycling old ideas and presenting them as new, but always respecting the ingredient and the tradition," said Deni in an interview with Chef’s Pencil.

    Russian Salad or Salad Olivier

    Oct 15, 2020 · 14 Comments

    Russian salad or Salad Olivier (ruska salata, insalata Russa) is a holiday staple in Balkan homes. Delicious, rich, and filling, this salad is at once an appetizer, side dish, and the main course. Can another salad say the same? We didn't think so!

    Salad on a fork, and a bowl of salad behind.
    [feast_advanced_jump_to]

    What Is It

    Russian salad, or Salad Olivier, is probably the best salad to come out of Russia. (We'll be using the terms interchangeably!) It's a hearty, filling dish made with veggies, meat, and a dressing. Very much a New Year's Eve kind of thing!

    It's delicious. It lasts a long time... and it's a salad with a story!

    Invented by the Belgian chef Lucien Oliver in 19th century Moscow (who was also the owner of the then-famous restaurant Hermitage), it was hugely popular.

    Original salad Olivier involved interesting ingredients like caviar, veal tongue, and smoked duck. However, the exact recipe isn't known even today. Olivier was a paranoid guy. He kept the ingredients and cooking directions a secret.

    With good reason!

    At some point, his sous-chef Ivanov figured out most of the recipe. Ivanov then: 1. left Hermitage, 2. opened up the restaurant Moskva, and 3. served the salad under a new name. To add insult to injury, he also sold his adapted version to the newspapers!

    As time passed, Olivier salad spread through the Soviet and post-Soviet countries until it found its place in kitchens all over Europe, including the Balkans.

    Of course, much changed during the decades of this transition. The salad took on a new name (Russian salad or ruska salata), dropped a few ingredients, and became what we have today.

    Russian Salad Ingredients

    Seasonings, eggs, parsley, carrots, peas, potatoes, mayo, pickles and meat on a gray background.

    Ingredient Notes for Salad Olivier

    Eggs: More is more here, so 4 minimum. Eggs balance out and soften heavier ingredients. Sub with duck, goose, or quail eggs, but be aware that each has a different taste.

    Vegetables: Peas, carrots, and potatoes, plus pickles are all you need. If using frozen, cook for a shorter period of time. Canned works too.

    To make it easier on yourself, get the same type of veggies (either frozen, fresh, or canned). Try to avoid canned veggies though, as they're too mushy.

    Meat: Smoked beef or cured smoked or baked ham are the best choices. Sub with chicken or turkey breast, prosciutto, canned, fried, or baked fish, and bologna or salami. (Bologna or salami should be your last option!)

    Herbs and Seasonings: Less is more. Don't overwhelm this already rich salad. Salt and pepper to taste, as well as minced parsley garnish, are perfect. (Some like to add dill, which overpowers the taste. Be careful!)

    Dressing: Look below!

    Russian Salad Dressing

    Mayonnaise is the foundational Olivier salad dressing. Yup, good ol' mayo is all you need!

    • The best kind is homemade. However, if you don't have the time, mayo from your grocery store will do just fine. Get plain mayo from a brand that makes it on a milder side, otherwise it will hijack the salad taste.
    • Some like to spice the mayo up with lemon and mustard, but this is optional.

    If you're no fan of mayo here are ideas for substitutions for the Russian salad dressing:

    1. Half mayo half sour cream. Mix the two, then mix them into the salad.
    2. Sour cream. A pinch of olive oil and lemon is optional.
    3. Sour cream and soy sauce.
    4. Greek or plain yogurt. Look for a consistency similar to mayo.
    5. Kefir with yolks from boiled eggs.

    The best way to add the dressing is to add a little at a time until you are happy with the consistency. Check and add more before serving if necessary.

    Lightning-fast Instructions for Salad Olivier

    (Our lightning-fast instructions are here to give you an idea of how to make this dish. For more detailed information look at the recipe card below!)

    Side by side photos of Russian salad preparation.

    1. Layer ingredients in a large bowl starting with veggies, then eggs, pickles and meat.

    Side by side photos of salad preparation.

    2. Add mayo in batches, and continue stirring until integrated. Cover with saran wrap, and leave in fridge 3-4 hours (preferably overnight).

    Variations

    Here are the dish variations:

    • French Salad: Vegetarian version of Olivier salad (no meat or fish).
    • Muslim and Jewish friendly: No pork.
    • Orthodox fast friendly: Remove eggs and meat (fish is ok) and make sure dressing (mayo) is homemade and fast approved.

    Expert Tips

    Here are a few tips that make my Olivier salad the best in the family!

    Ingredient size: The smaller the better. Ingredients should match in size. If using frozen veggies it's easiest to use them as a guide as they're usually diced. Otherwise, think half the size of a sugar cube, or smaller.

    Mixing: Mix ingredients in batches and thoroughly. First the veggies, then add eggs, pickles, and meat. When all are integrated, add the dressing.

    Make ahead: Olivier salad tastes best on day 2 after the flavors have settled together in the fridge.

    Add your signature: This is one of those salads you should make your own. Add and subtract ingredients until you think it tastes perfect. For me, I add less mayo and more eggs. For you, it may be less meat and more pickles, etc.

    So, less mayo is more! And also, more eggs is more!

    Serving, Storing, Freezing

    Glass bowl full of Russian salad on black background.

    Serving: Serve as a side or a main dish for breakfast, lunch, or dinner. Take it to a potluck, picnic, or barbeque. It goes splendidly with bread, toast, buns, and crackers. Best if prepared at least the night before.

    Storing: Store in the fridge for up to 7 days. 

    Freezing: Don't even think about it!

    Recipe FAQs

    Why is it called Russian salad?

    Russian salad was originally called Oliver salad based on the Moscow-based Belgian chef who invented it. During the 20th century, the dish spread throughout Europe and adopted the name Russian salad.

    How many calories are in the Russian salad?

    Russian salad calories greatly depend on its dressing. For example, it'll be more caloric if you use mayo versus if you were to use sour cream.

    What countries eat Russian salad?

    Too many to count!

    Russia, former Soviet countries, Ex-Yugoslavia states, the remainder of the Balkan countries, and finally, Mediterranean countries. Also, other countries with the diaspora populations of the abovementioned countries. (We heard it reached Argentina!?!)

    So, people all over the world eat Russian salad. You should too!

    More Salads You'll Be Crazy About

    • The prettiest of them all: Beat & Carrot Salad
    • So tasty everyone fights over it: Shopska Salad
    • Garlicky to starve off energy vampires: Red Pepper & Garlic
    • How about some cabbage baby: Fermented Cabbage
    • You can't say no to tuna and egg: Tuna & Egg

    Can You Do Me a Solid?

    If you make Russian Salad and like it, please leave a ⭐️⭐️⭐️⭐️⭐️ (5-star) rating. This will help others find the recipe more easily!

    You can also leave a comment, I read EVERY one! Otherwise, if IG is more your thing, consider tagging us @balkanlunchbox.  

    Prijatno and bon appetit!

    Glass bowl full of Russian salad on black background.

    Russian Salad or Salad Olivier

    Aida
    Flavorsome Russian salad or Salad Olivier (ruska salata) will become your favorite holiday staple. This shapeshifter easily transforms from a fancy side to the main course.
    5 from 1 vote
    Print Recipe Pin Recipe
    Prep Time 40 minutes mins
    Cook Time 20 minutes mins
    Resting time (in fridge) 2 hours hrs
    Total Time 3 hours hrs
    Course Salad
    Cuisine Bosnian, Croatian, Kosovan, Macedonian, Montenegrin, Serbian, Slovenian
    Servings 8
    Calories 291 kcal

    Ingredients


    • 10 ounces carrots medium, peeled, diced, cooked until fork tender
    • 10 ounces potatoes peeled, diced small, cooked until fork tender
    • 10 ounces sweet peas cooked until fork tender*
    • 5-6 eggs hard boiled, peeled, diced
    • 7 ounces ham or dried/smoked beef, cooked skinless chicken or fish, diced
    • 3 ounces pickles about 5-7 medium, diced small
    • 10-12 tablespoons mayonnaise plain, milder brand, use 10 tablespoon first and 2 more before serving after fridge
    • Salt and pepper to taste
    • 2-3 tablespoons fresh parsley minced

    Instructions
     

    • In a large bowl start layering ingredients. Start with cooked vegetables, add eggs, pickles, and meat. As you're adding them mix them until they're thoroughly integrated.
    • Add mayo in batches (about 10 tablespoons), and continue stirring until integrated. Cover bowl with saran wrap and leave in the fridge for at least 3-4 hours, preferably overnight. If necessary, mix in two more tablespoons of mayo before serving.

    Video

    Notes

    Try to dice ingredients the same size! You can cook eggs and veggies in the same pot, or not, up to you. 
    Vegetables:  To make it easier on yourself, get the same type of veggies (either frozen, fresh, or canned). Try to skip canned if you can (too mushy). Before cooking dice carrots and potatoes the size of half a sugar cube. Place in boiling water and cook 10-12 minutes or until fork tender. Fresh veggies take a little longer. 
    Eggs:  4-5 minimum. For hard boil place in boiling water and cook for 12 minutes. Sub with duck, goose, or quail eggs, but be aware that each has a different taste.
    Meat: Smoked beef or cured smoked or baked ham are the best choices. Sub with chicken or turkey breast, prosciutto, canned, fried, or baked fish, and bologna or salami. (Bologna or salami should be your last option!)
    Dish variations: French Salad: Vegetarian version of Olivier salad (no meat or fish). Muslim and Jewish friendly: No pork. Orthodox fast-friendly: Remove eggs and meat (fish is ok) and make sure dressing (mayo) is homemade and fast approved.
    Make ahead: Olivier salad tastes best on day 2 after the flavors have settled together in the fridge. If out of time, leave for at least 2 hours.
    Storing/ Freezing:  Keep covered in the fridge for up to 5-7 days. Preferably closer to 4. Do not freeze!

    Nutrition

    Serving: 1bowlCalories: 291kcalCarbohydrates: 15gProtein: 12gFat: 20gSaturated Fat: 4gPolyunsaturated Fat: 9gMonounsaturated Fat: 6gTrans Fat: 1gCholesterol: 125mgSodium: 567mgPotassium: 477mgFiber: 4gSugar: 5gVitamin A: 6455IUVitamin C: 25mgCalcium: 49mgIron: 2mg
    Tried this recipe?Let us know how it was!

    Let's Combine This into a Meal!

    • Woman holding halved pogacha.
      Pogacha (Pogača): Traditional Balkan Bread Without Yeast
    • Veal Shank Roast (Teleća Koljenica)
    • Three pieces of pie on top of each other.
      Phyllo Cheese Pie (Pita Sirnica or Cheese Burek)
    • A piece of cake cut with a fork on a white background.
      Chocolate Hazelnut Cake (Šamponeze Torta)

    Chocolate Orange Cake with Meringue (Vasina Torta)

    Mar 3, 2020 · 2 Comments

    Traditional Serbian cake called Vaso's Cake. Made with dark chocolate, oranges, walnuts and meringue.

    Dark chocolate orange cake with meringue and ganache, also known as Vaso’s cake or Vaso’s torte (Vasina torta) is the best Serbian traditional cake. The cake boasts three layers: a nut-based crust, a chocolate and orange topping, and a topping made entirely out of meringue. Shall we?

    Traditional Serbian cake called Vaso's Cake. Made with dark chocolate, oranges, walnuts and meringue.
    [feast_advanced_jump_to]

    Quick Background

    Most desserts in the Balkan region are old-fashioned. They require ingredients that were once pricey. (Think eggs, walnuts, butter, et al.)

    A lot was at stake, so people judged desserts on their quality. And quality meant rich, filling, and aesthetically pleasing... all at once.

    Today’s dark chocolate orange cake with meringue and ganache is no exception.  The cake - also called Vaso’s cake or Vaso’s torte (Vasina torta)- is flawless!

    I can almost guarantee that it'll become a regular on your Holiday dessert table!

    (Btw, a torte is a just type of cake with a few layers. Please note that the terms torte and cake are used interchangeably in the text.)

    Why You'll Love This Cake

    • If the pairing of dark chocolate, meringue, and an infusion of freshly squeezed orange juice sounds like a dream come true to you, then we've got your dream dessert right here!
    • Who doesn't love a fantastic dessert inspired by a real love story? (You can read about Vaso and Jelena below!)
    • This orange chocolate cake is a high-quality classic dessert made by the perfect union of citrus and chocolate flavors glazed with a chocolate ganache. The result? A rich and moist slice you won't be able to stop eating.
    • Having three thick, colorful layers PLUS a ganache topping, this chocolate orange cake is so beautiful it's as if it came straight out of Alice in Wonderland illustrations.
    • After making this chocolate orange cake (which with a little bit of effort and our precise, step-by-step instructions will be super doable!) you will NEVER be intimidated by another dessert again.

    Expert Tips For Chocolate Orange Cake Layers

    Layer 1:

    What's unusual about this chocolate orange cake is that there is only one cake (crust) layer. (Most cakes have on average 2-3 crust parts for layering.) This layer is made with eggs (separately mixed), ground walnuts, sugar, and grated baking chocolate. It's very similar to the cakes we've done before.

    Layer 2:

    The foundation of this second layer is the sugar syrup and walnuts, eggs, and chocolate. But it's the freshly squeezed orange juice mixed with orange zest (which helps turn the flavor citrus-y), that gives this cake that wow factor.

    Layer 3:

    Classic Italian meringue forms the third layer of our chocolate orange cake. You may remember that what makes this meringue different is the addition of sugar syrup to egg whites whipped into soft peaks.

    If meringue scares you I found a website with great tutorials for every kind of meringue you can imagine. I find it helpful to think about it this way: at its most basic, meringue is just egg whites, a pinch of salt, and a mixer.

    Layer 4:

    Most people use a portion of the meringue to plaster cake sides with a nice snowy finish. But my source, Jelena, insists this chocolate orange cake was best when the fourth and final layer was made entirely of dark chocolate, for the Jaffa effect.

    (Jaffa is a type of cookie biscuit topped with (artificial) oranges and chocolate.) Chocolate is poured on top of the cake and left to drizzle on the sides, leaving a perfect window into layers one, two, and three. It's pure magic!

    Other Tips

    Get a Baking Buddy! Even if you are an experienced baker, give yourself at least three hours the first time you make this orange chocolate cake. (No worries, the layers don't take an hour each. It's just that there are waiting periods in between.)

    Don't Skip the Wait! The first cake layer needs some time to cool off after baking. Parallel to that, it's best if you leave the orange layer in the fridge for 30-45 minutes. You'll have an easier time spreading it over the cake layer after it's toughened. Also, these two should really integrate in the fridge together for at least an hour or two before you make the meringue.

    Practice Restraint! I found this chocolate orange cake tastes best a couple of days after you make it. If unable to wait that long (who has the time?), at least promise me you'll give it a solid "sleepover" in the fridge. You must!

    Vaso's cake, vaso's torte or Vasina torta is the BEST traditional Serbian cake beloved throughout Balkans. How to make Vaso's cake. Homemade.

    Love Story Behind Vaso's Cake

    We can't know for sure how much of this story is fiction and how much isn't, but I'd like to think it's all a true story. I’ve picked up the pieces via several online sources, so forgive me if I don’t get all the details right.

    At the beginning of the 20th century there lived (in a small Serbian town of Paraćin), a handsome man named Vaso Čokrljan. A longtime bachelor, Vaso's marital status was for many years the main topic of town gossip.

    What a surprise it was to everyone to hear that at the tender age of 41 Vaso finally married! The lucky lady in question was Jelena, who'd later describe Vaso as gentlest and kindest of husbands.

    When Jelena was pregnant with their child, local doctors informed them she probably wouldn’t survive giving birth. Vaso was devastated.

    Sparing no expense he traveled to Vienna with Jelena so she could see the best specialists. Both Jelena and their baby girl survived.

    After recovering in Vienna, they returned to Paraćin. To celebrate their triumphant return, Vaso’s mother-in-law organized a huge celebration. She made many regional delicacies, but the main attraction became a special cake she created in honor of her son-in-law.

    This three-layered cake boasted the best region had to offer (different types of nuts, meringue, and eggs), and was paired together with a citrus orange flavor. These ingredients (oranges especially), were expensive and difficult to procure, so this wasn’t a cake just anyone could whip up.

    And that's how we got today’s chocolate orange cake.

    Inspiration

    I drew inspiration from two sources for today's Vaso's Torte:

    1. The Big National Cookbook: A classic Yugoslavian cookbook, "The Big National Cookbook" (Veliki narodni kuhar) is a great collection of Yugoslav recipes. I own the 6th edition published in 1984, as a collaboration between National book, Belgrade (Narodna knjiga Beograd) and Youth book, Ljubljana (Mladinska knjiga, Ljubljana). The recipe for Vasina Torta is on page 398.

    2. Jelena from Food for Thought: Jelena is a Belgrade food blogger (she's not Vaso's Jelena!), and her website is called Food for Thought. Unfortunately, she seems to have stopped blogging circa 2015. Her posts are translated into English, so you can browse her recipe index. Phenomenal food! (Jelena, if you read this post at some point thank you for your blog, for your detailed and patient way of responding, and for the treasure of knowledge you shared!)

    Step by step instructions for how to make Vaso's cake.

    More Chocolate Recipes

    • No Bake Walnut Pralines aka Bajadera
    • Mama’s Chocolate and Walnut Cake
    • Walnut Marzipan Squares 
    • Choco Hazelnut Cake
    • Balkan No Bake Wafer Cake

    Would You Do Me a Favor?

    If you make today's Chocolate Orange Cake with Ganache and Meringue and like it, please consider leaving a ⭐️⭐️⭐️⭐️⭐️ (5-star) rating. This will help others find the recipe more easily!

    You can also leave a comment, I read EVERY one! Finally, if IG is more your thing, consider tagging us @balkanlunchbox.  

    Prijatno and bon appetit!

    Traditional Serbian cake called Vaso's Cake. Made with dark chocolate, oranges, walnuts and meringue.

    Chocolate Orange Cake (Vasina Torta)

    Aida
    Dark chocolate orange cake with meringue (Vasina torta) is the best Serbian traditional cake. The cake boasts three layers (a nut-based crust, a chocolate and orange topping, and a topping made entirely out of meringue) of perfectly combined citrus and chocolate flavors and an (optional) chocolate glaze.
    5 from 1 vote
    Print Recipe Pin Recipe
    Total Time 3 hours hrs
    Course Desserts
    Servings 8 -12

    Ingredients
      

    • Layer 1 Cake Crust Batter
    • 5 egg yolks
    • 5 tablespoons regular sugar
    • 1 tablespoon white flour
    • 1.5-2 ounces ground walnuts
    • 1.5 ounces grated baking or dark chocolate
    • 5 egg whites
    • Pinch of salt
    • 1-2 tablespoons melted butter
    • Layer 2 Orange Infused Topping
    • 4-4.5 ounces milk
    • 4-4.5 ounces regular sugar
    • 7 ounces ground walnuts
    • 2 ounces grated baking or dark chocolate
    • 2-3 tablespoons milk
    • 7-10 tablespoons juice from one fresh orange
    • Grated zest of 1 orange
    • Optional 1-2 tablespoons rum or Grand marnier
    • 4 egg yolks
    • 4 tablespoons regular sugar
    • 5.5 ounces butter room temperature
    • Layer 3 Italian Meringue
    • 5 ounces water
    • 8.5 ounces sugar
    • 4 egg whites
    • Pinch of salt
    • Optional & Highly Recommended Layer 4 Chocolate Glaze (Ganache)
    • 5.5 ounces baking or dark chocolate
    • 2 tablespoons oil
    • 3-4 tablespoons milk
    • 3 tablespoons butter

    Instructions
     

    Layer 1 (Cake) Crust Batter

    • Heat oven to 395°F (200°C).
    • In a large mixing bowl start mixing yolks with a hand mixer while adding the sugar to the bowl one tablespoon at a time. Mix 5-6 minutes on high, or until yolks turn light yellow and easily separate from bowl walls.
    • With a wooden spatula add flour, walnuts and chocolate to egg yolks. Stir everything until well integrated.
    • In a separate large mixing bowl beat egg whites and a pinch of salt with a hand mixer. Start by mixing on low for one minute, then finish off with 2-3 minutes on high or until firm peaks form.
    • With a wooden spatula add egg yolk mixture to egg whites. Mix in slowly but thoroughly so that at the end the batter feels light and airy.
    • Take a 9-10 inch (24cm) adjustable cake ring (pan) and line the bottom with parchment paper. Using a baking brush paint the ring walls and bottom generously with butter.
    • Pour batter into cake ring and shake lightly until batter is evenly distributed. Lower temperature to 355°F (180°C) and bake for 20 to 30 minutes. Use a toothpick to check for doneness.
    • Cool the cake off completely. Using a knife gently separate cake from ring walls. Open the ring and transfer the cake (crust face down) onto plate you’ll be serving it on. Carefully remove parchment paper from the cake.

    Layer 2 Orange Infused Topping

    • In a small pot combine milk and sugar and bring to a boil on high. Lower the temperature and stir frequently until sugar dissolves in milk.
    • Melt chocolate with 2-3 tablespoons of milk on low at the same time.  Stir frequently to prevent burning.
    • In a large mixing bowl cover walnuts evenly with sugar and milk. After walnuts absorb the liquid completely add melted chocolate, orange juice and zest. (If using, add rum or Grand marnier now also.) Mix well until integrated. Let cool.
    • Meanwhile make a bain marie (heated bath) by placing a pot filled with water one third of the way on the stove. Bring water to a boil, then lower temperature just enough to keep it at a slow boil.
    • (Parallel to water warming up) In a large metal mixing bowl (that can partially fit into the pot from the step above) start mixing yolks with a hand mixer while adding the sugar to the bowl one tablespoon at a time. Mix 3-4 minutes on high, then transfer the bowl into the pot. (There should be a little bit of space between the water and the bottom of the bowl, but the bowl should prohibit the steam from leaving the pot.) Keep stirring egg yolks quickly and continuously with a plastic spatula around 5 minutes. Remove egg yolks from steam heat and let cool.
    • In a large mixing bowl mix butter until soft with a hand mixer. Add egg yolks and continue mixing. Finally add the remaining mixture (walnuts, etc.) and mix a few more minutes until the layer is well integrated and airy (light) at the same time. Transfer to fridge for 45 minutes to 1 hour.
    • Combining layers 1 and 2: Place a (clean) cake ring (just the side portion) about half way up the cake crust and close it. Evenly distribute layer 2 on top of the cake crust. Use a knife if necessary. Transfer back to fridge leaving the cake ring on.

    Layer 3 Italian Meringue

    • In a small pot bring water and sugar to a boil. Bring temperature to low and stir occasionally. Cook for 20-30 minutes, or until the syrup is of a consistency of thin honey.
    • About 5 minutes before syrup is finished in a large mixing bowl beat egg whites and a pinch of salt with a hand mixer. Start by mixing on low for one minute, then finish off with 2-3 minutes on high or until firm peaks form.
    • (Please note if you are wary of bacteria (salmonella) you can do this step using a bain marie like you did for layer 2 egg yolks. Fill a pot one third with water and bring to a boil on high. Water should be boiling by the time you’re ready to beat egg whites, or about 5 minutes before the syrup is done. The rest is the same by adding the syrup in while mixing on steam.)
    • Continue beating egg whites while lightly pouring the syrup into the bowl. You are now mixing until stiff peaks form. Syrup should be trickling in for about 5 minutes to give you enough time to mix it in. After you’ve mixed all the syrup turn the mixer off, and flip the bowl around. If the meringue stays in the bowl you’re finished. If it moves mix a little longer.
    • Combining layers 1 and 2 with layer 3. Take the cake out of the fridge and remove the cake ring. Wash and dry it, then place back on the cake (about half-way up) and close again. Pour meringue on top and evenly distribute as the third layer. As you’re distributing push lightly to avoid air being trapped inside. Return back to the fridge.

    (Optional & Highly Recommended) Layer 4 Chocolate Glaze (Ganache)

    • After the meringue layer has completely cooled down, melt all glaze ingredients on low. Stir frequently to avoid burning. If it looks too thick, add a little more milk. (Meringue has to be completely, 100% cool.)
    • Transfer to a strong plastic bag, cutting off a very small tip on one end. Pour chocolate first on meringue edges so that chocolate drips down the sides of all of the cake’s layers for a beautiful visual effect. Pour remaining chocolate on top and use a dull edge of a long knife to even it out.
    • Return to the fridge. Leave overnight at the very least. (Best if you can wait an entire day before you eat it.)
    • The cake lasts up to 7 days in the fridge.

    Notes

    This recipe heavily relied on Vaso’s cake recipes by Jelena from food for thought food blog as well as The Big National Cookbook (a classic Yugoslavian cookbook). My gratitude goes out to both!
    Layer 1
    Take eggs out of the fridge 1-2 hours ahead so they’re at room temperature once you start baking. It’s good to have more eggs on hand than you expect you’ll need, accidents happen.
    Separate egg yolks from egg whites as precisely as you can. If some egg white ends up in egg yolk section it’s no big deal, however if you get any yolks in egg whites remove them as much as possible. Otherwise  you’re better off using new egg whites.
    Wash your mixer rotating parts and cake ring (pan) after each use as you’ll use them for several steps and they need to be completely clean for each.
    Toothipick test: stab the cake several times in different places with a toothpick. If it comes out clean, the cake is done. Otherwise, if the toothpick has crumbs on it, bake a few minutes longer then repeat the test. To prevent burning, place parchment paper on top of the cake.
    Layer 2
    The volume of fresh orange juice will depends on how much you like orange and dark chocolate flavor combo.
    Bain marie is a method by which you’re cooking ingredients on steam heat. This method is excellent for killing bacteria while still allowing ingredients to keep a smooth consistency. Keep stirring egg yolks quickly and swiftly otherwise they have a potential to overcook and become an omelette. All the “fancy” equipment you’ll need for a water bath are a pot for boiling the water and a mixing bowl (preferably a metal one) whose bottom partially fits into the pot. Fill the pot one third of the way with water and bring to a boil. Place the mixing bowl inside so the least amount of steam escapes. Some people allow the bottom of the mixing bowl to hit the water, while others don’t. I’ve tried both ways and prefer the method where there is a little bit of a distance.
    Layer 3
    Please note I don’t use bain marie for egg whites, but this is my choice. Egg whites are generally not a good growing ground for salmonella, plus I’ve never had a problem with it before. However, I understand you may want to protect yourself in the slightest possibility of contamination. I get you. In this case, create a bain marie the same way as you did for layer 2 egg whites. Be careful and steady the bowl in the pot (wear a mitten or use a kitchen towel to protect your fingers) while beating egg whites. When you start adding in sugar syrup you’ll have to either turn off mixer several times while you add it in, or use the hand that was steadying the pan and bowl to add the syrup in. Do it slowly and you’ll be ok.
    Layer 4
    In absence of a strong plastic bag (it has to be strong, lest it falls apart), use a small dish with a pour spout for pouring chocolate. By the way anything will work, from džezva (Balkan coffee dish) to a sauce bowl.
    Some only use baking chocolate and heavy cream (50-50) to make the glaze. Whatever you decide, test it ahead for consistency.
    Cake
    For best taste leave the cake in the fridge overnight. It’s even better if you can hold off 24 hours before eating it. The cake lasts up to 7 days in the fridge. As per Jelena, when cutting it run your knife under hot water first.
    Tried this recipe?Let us know how it was!
    • « Go to Previous Page
    • Page 1
    • Page 2
    • Page 3
    • Page 4
    • Page 5
    • Page 6
    • Interim pages omitted …
    • Page 16
    • Go to Next Page »

    Primary Sidebar

    Aida and Aleksandra of Balkan Lunch Box, standing together.

    Welcome! I'm Aida, creator of Balkan Lunch Box, food blog about traditional and contemporary Balkan cuisine. My sister Aleksandra helps me.

    Learn more about me →

    As seen on

    Popular

    • Three biscuits on a gray background, one being halved with a fork.
      Čupavci: Balkan Lamingtons [One Hour]
    • Closeup of four wafers.
      Balkan No Bake Wafer Cake (Oblatne, Oblande)
    • Old Fashioned Goulash with Beef and Mushrooms
    • Stewed apple in a clear bowl, on the table.
      Stewed Stuffed Apples in Syrup (Tufahije)
    • Soup in a silver bowl with a lid, a kitchen cloth, two slices of bread, a lemon wedge and a spoon.
      Okra Soup: Creamy Chicken Soup with Okra (Bosnian Bey's Soup, Begova Čorba)
    • ajvar, chutney, pepper chutney, eggplant chutney, balkan spread, balkan dip ajvar, red pepper and eggplant dip, pepper dip | balkanlunchbox.com
      Ajvar
    • Moussaka in a pan.
      EASY Serbian Ground Beef Potato Moussaka Casserole
    • Closeup of a stuffed pepper.
      Best Classic Baked Stuffed Peppers with Ground Beef and Rice (Punjene Paprike)
    • Quarter of a burek pie on a plate on gray background.
      Burek
    • Rice and chicken in a sheet pan, overhead.
      Easy Baked Chicken Over Rice Casserole (Chicken Thighs and Drumsticks) [4 Ingredients, 1 Pan]

    Favorite Salads

    • Russian Salad or Salad Olivier
    • Bowl with carrots and apple, and carrot and apple and a spoon on a table.
      Grated Apple and Carrot Salad [Two Ingredients, Ten Minutes]
    • A bowl of carrot and beet salad, a beet, carrots and fork on the side.
      Grated Beet and Carrot Salad [Five Ingredients, Ten Minutes]
    • Shopska Salad

    Latest & Greatest

    • A ladle holding bean soup above the blue bowl, on an orange background.
      High Protein Balkan Bean Soup (Visokoproteinski Grah/ Visokoproteinski Pasulj)
    • A glass bowl full of stuffed peppers.
      21+ Pepper Recipes
    • A hand holdling a fork with scallion salad above a black bowl filled with salad on an orange background.
      Scallion Salad with Sour Cream (Lukmira) [2 Ingredients, 5 minutes]
    • Four photographs of different stews in one pin.
      14+ Best Stew Recipes


    Footer

    ↑ back to top

    About

    • Privacy Policy
    • Accessibility Statement

    Newsletter

    • Sign Up! for emails and updates

    Contact

    • Contact

    Copyright © 2014 - 2025 Balkan Lunch Box

    Rate This Recipe

    Your vote:


    A rating is required
    A name is required
    An email is required