• Skip to primary navigation
  • Skip to main content
  • Skip to primary sidebar
  • Balkan Recipes
  • About BLB
  • Nav Social Menu

    • Facebook
    • Instagram
    • Pinterest
    • RSS
menu icon
go to homepage
subscribe
search icon
Homepage link
  • Recipe Index
  • About
    • Facebook
    • Instagram
    • Pinterest
    • RSS
    • YouTube
  • ×
    Balkan Lunch Box > Blog

    Savoy Cabbage Soup

    Feb 7, 2017 · 5 Comments

    A bowl with savoy cabbage soup and a spoonful above being held by a hand.

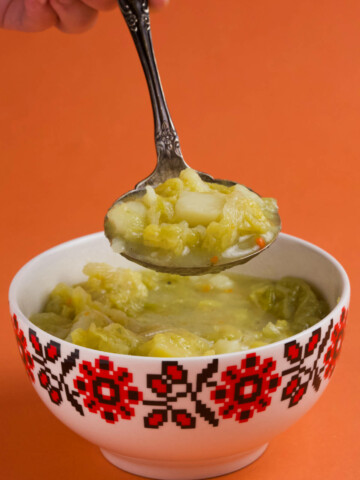
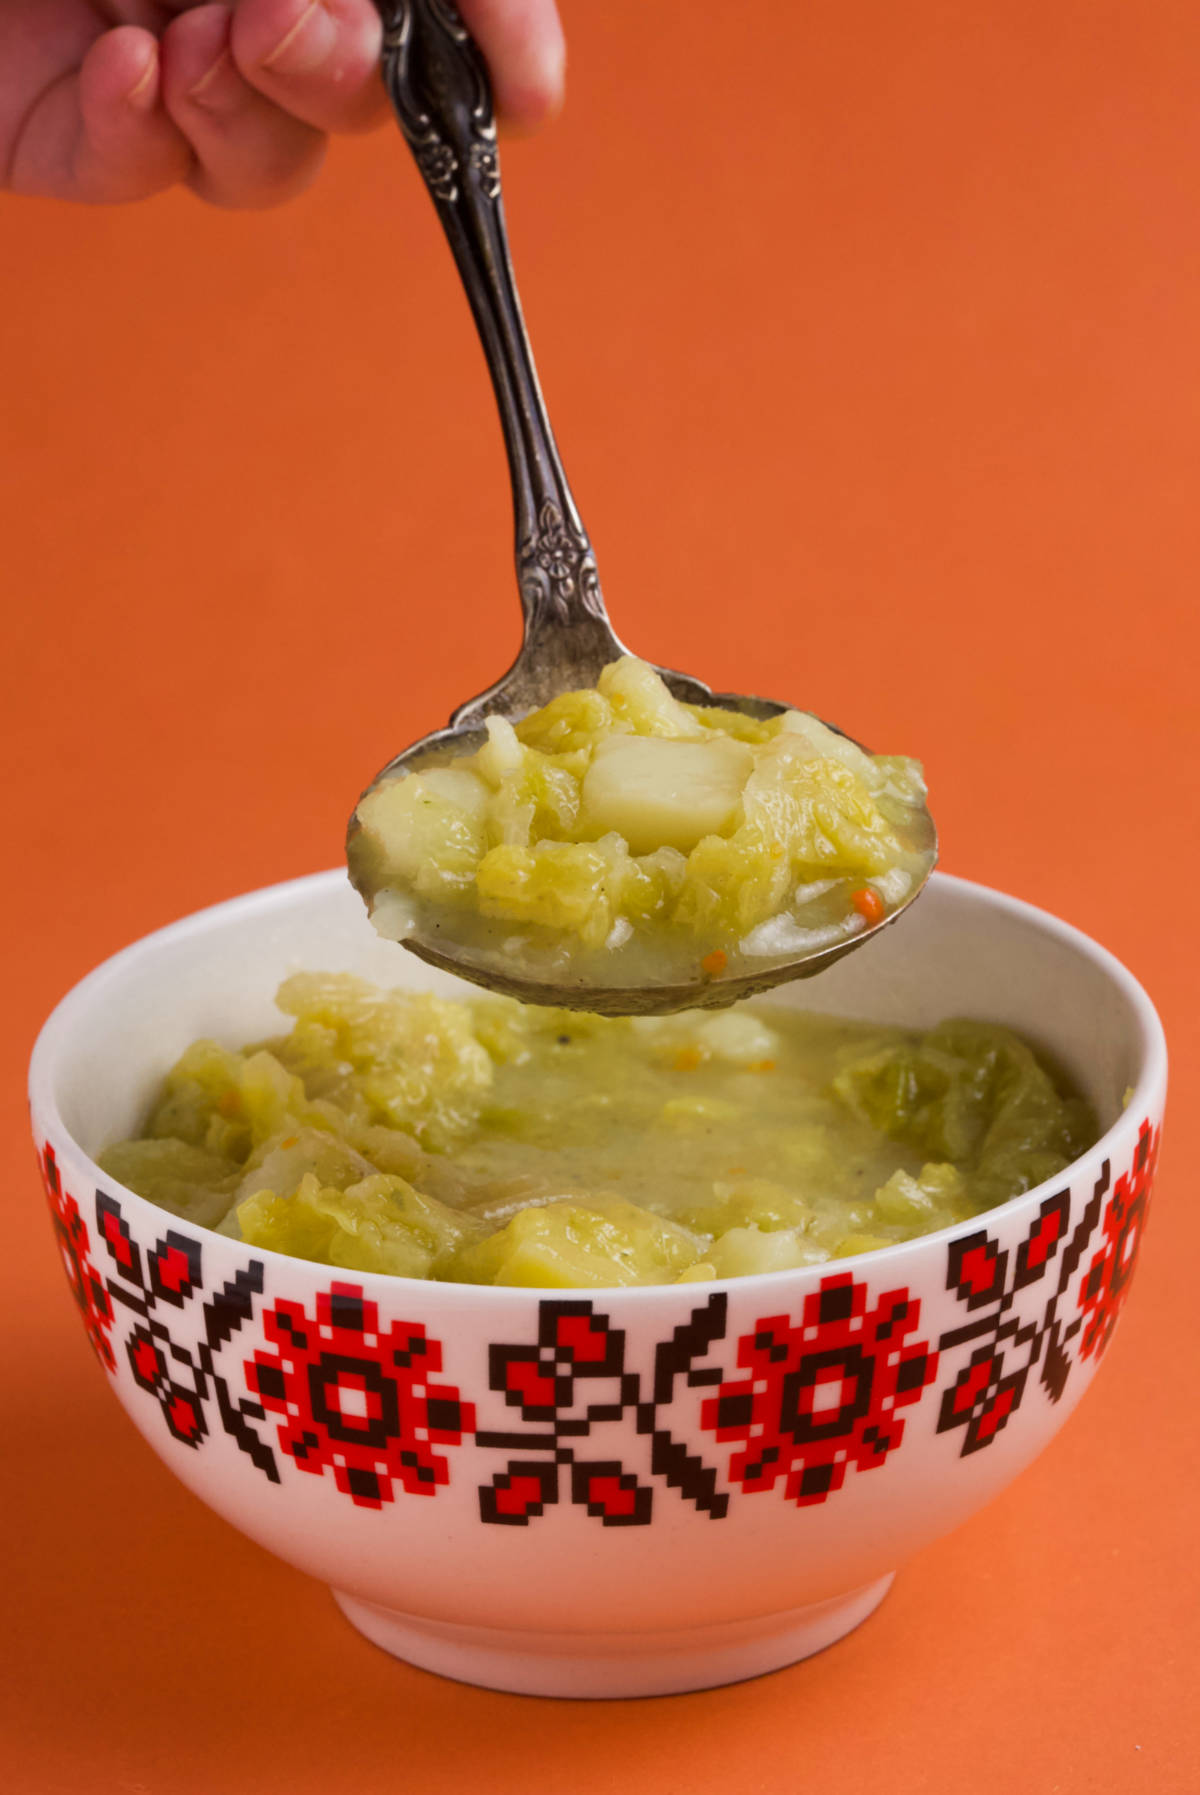
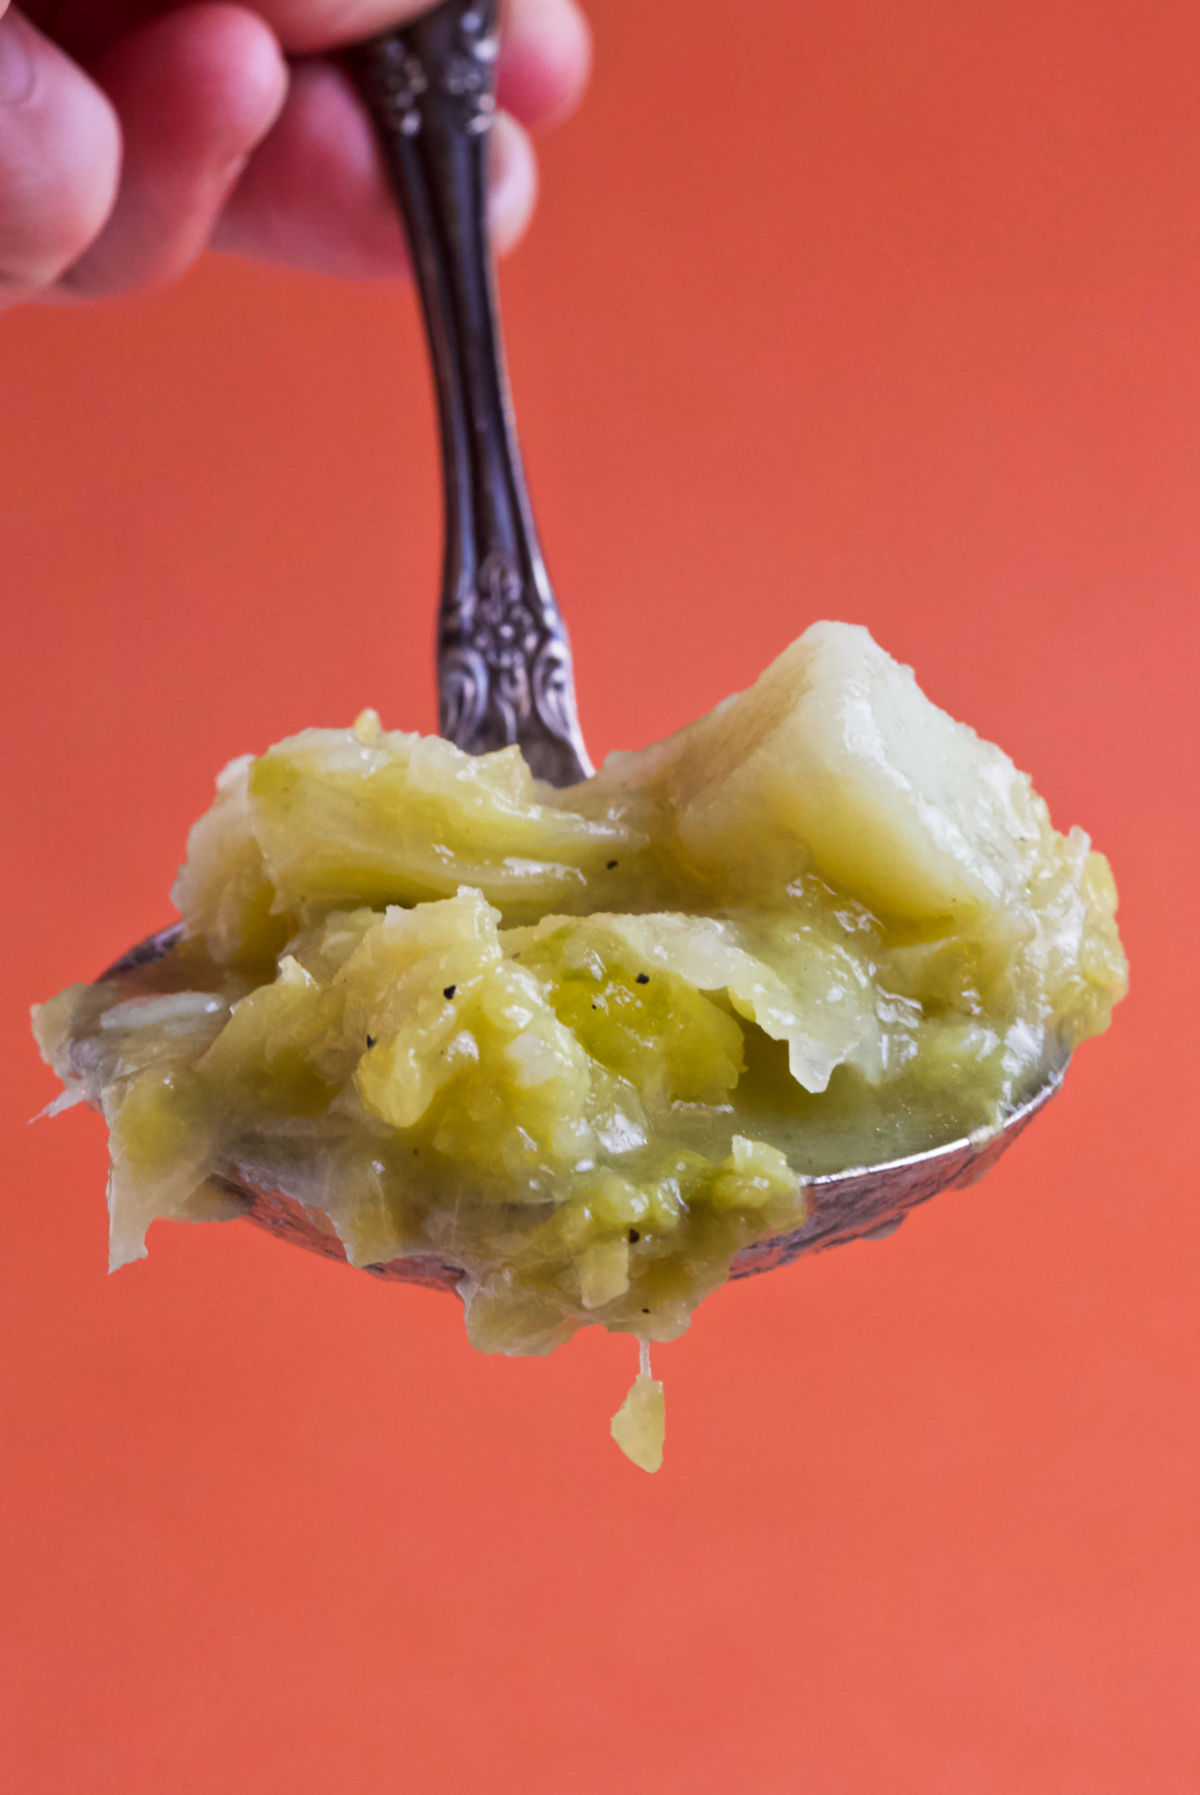
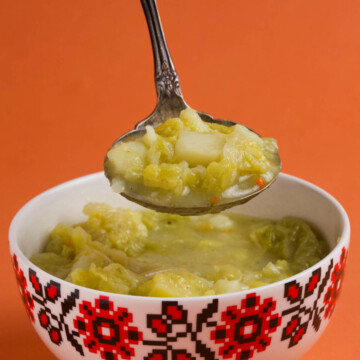
    Savoy cabbage soup (kelj kalja) is a beloved spring dish. Comforting and flavorful, it comes together quickly, with just a few ingredients. Shall we?

    A bowl with savoy cabbage soup and a spoonful above being held by a hand.
    [feast_advanced_jump_to]

    Background

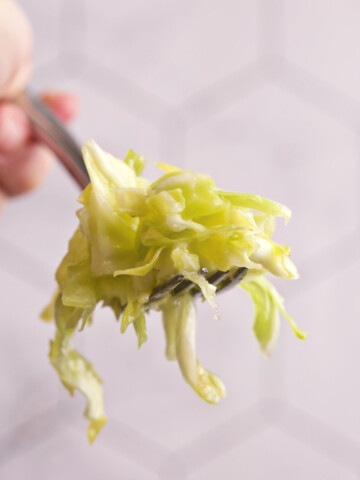
    Savoy cabbage, known as kelj, is a staple in many Balkan kitchens. This is a versatile, nutritious vegetable with curly leaves, and tender, almost sweet, flavor.

    Savoy cabbage soup - kelj kalja - is kind of like a herald of spring. In a matter of days, we pause making heavier dishes like sarma, and reach toward something lighter.

    This stewy soup comes together quickly, with just a few ingredients: savoy cabbage, garlic, and potatoes. It tastes mild, comforting, and refreshing.

    Savoy cabbage soup (kelj kalja) is a fantastic standalone dish, while it also pairs well with bread, or a side of meat like rissoles.

    Why You'll Love This Recipe

    • Minimal Ingredients. Mainly just potatoes, garlic, and Savoy cabbage.
    • Lightening Fast. Ready in less than 45 minutes.
    • Nutritious. Jam-packed with fiber, vitamins, and minerals.
    • Side or Main. Your choice!

    Ingredients

    Gather these ingredients for Savoy cabbage soup (kelj kalja):

    Overhead photo of ingredients: bouillon, savoy cabbage, potatoes, garlic, black pepper and oil.
    • Savoy Cabbage. As fresh as you can get it. Avoid frozen.
    • Garlic.
    • Potatoes. Look for Russett or Yukon Gold.
    • Oil. Any type.
    • Flour. All-purpose.
    • Seasonings. Bouillon, Vegeta, or stock powder.
    • (Optional) lemon.

    Instructions

    Let’s make Savoy cabbage soup—follow these steps:

    Two by three photographs of preparing savoy cabbage soup in a pan.

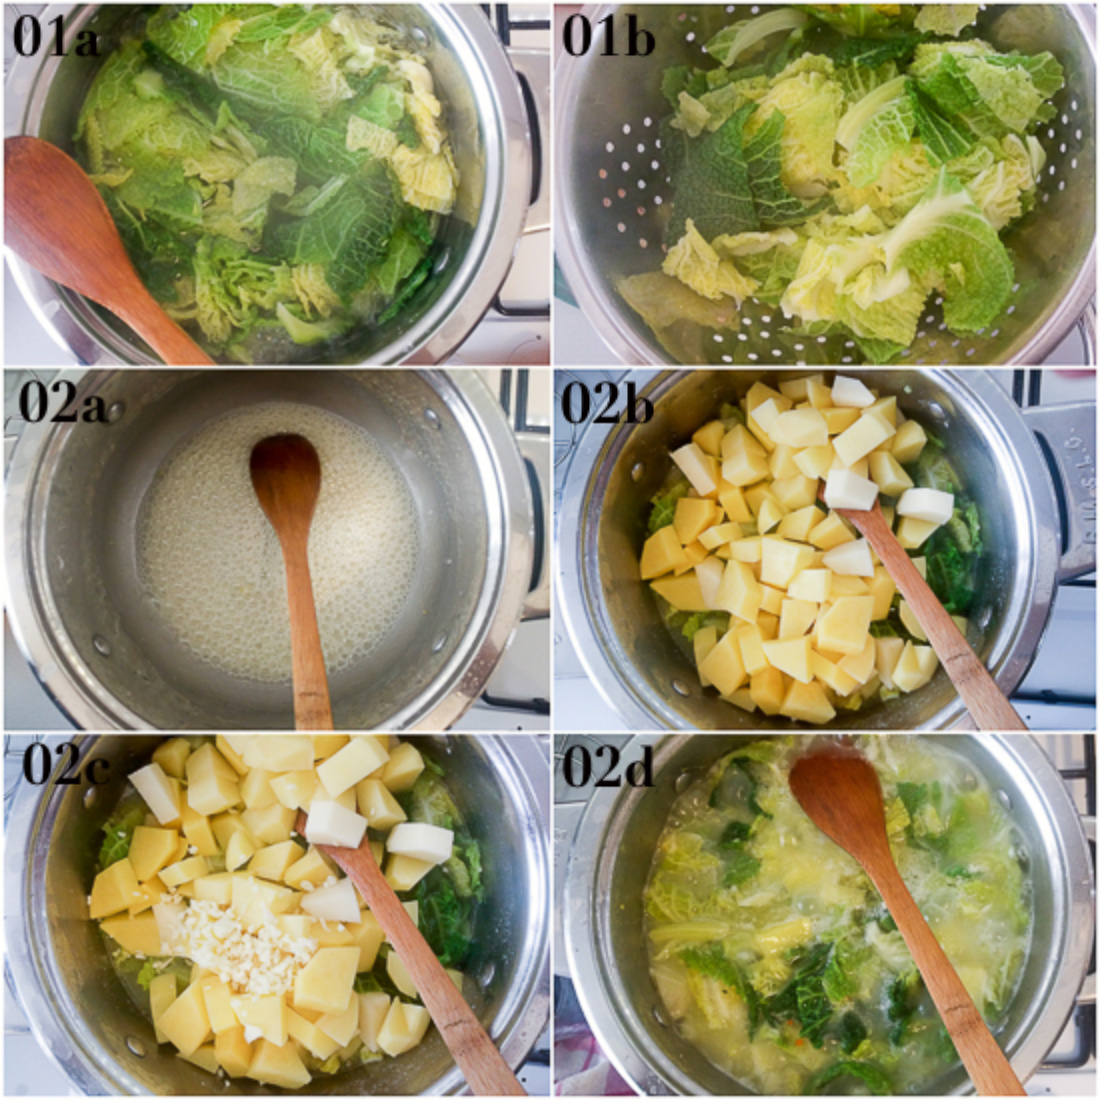
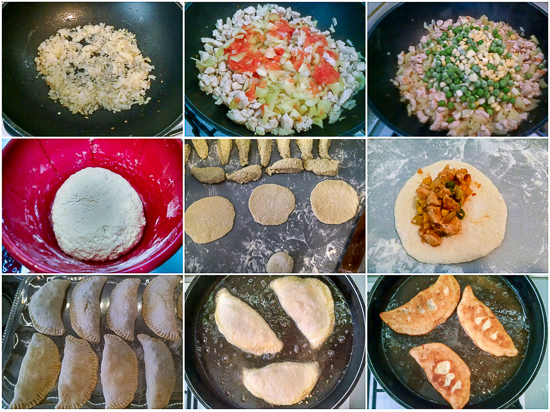
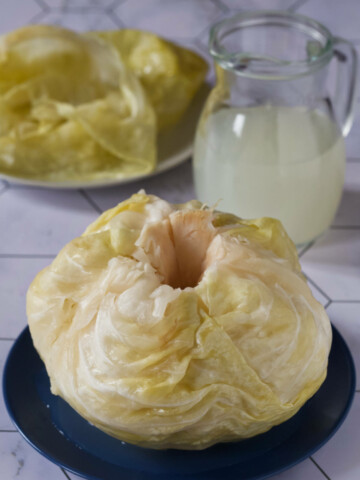
    Step 1. Boil and strain savoy cabbage.
    Step 2. Combine with savoy cabbage, potatoes, garlic, seasonings, and liquid. Cook for 20-30 minutes.

    Handling

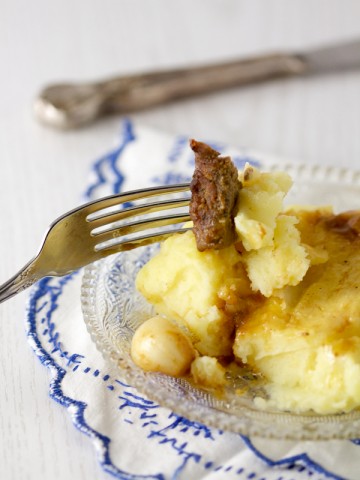
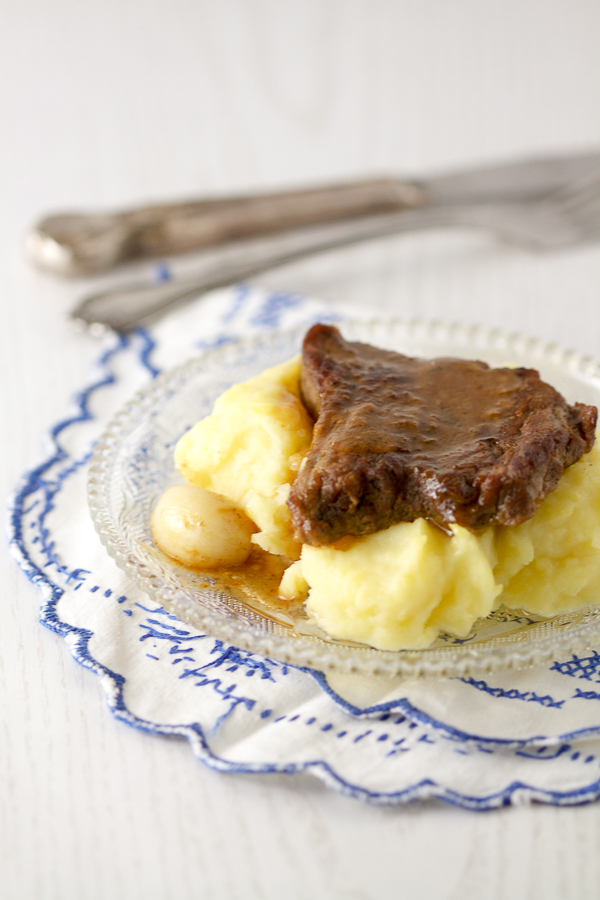
    • Serve warm with bread, and/ or a side of meat.
    • Store in an airtight container for up to a day.
    • Reheat using your preferred method.
    • Don't freeze!

    Recipe FAQs

    What's the difference between savoy cabbage and regular cabbage?

    Regular and savoy cabbage both belong to the same family of vegetables.

    Savoy cabbage head resembles a curly flower that's opening, while regular cabbage heads are tightly wound.

    Savoy cabbage is lighter and softer. It goes best in stews. Regular cabbage is more sturdy and more versatile in cooking and fermenting.

    Both are highly nutritious, although regular cabbage plays a more prominent role in Balkan cuisine.

    Can you eat savoy cabbage raw?

    While you're welcome to eat it, raw savoy cabbage isn't tasty.

    How healthy is savoy cabbage?

    Savoy cabbage is a nutritious vegetable from Brassicaceae family. It's full of vitamins and minerals, as well as being a fantastic source of fiber.

    For more information, look here.

    A spoonful of savoy cabbage soup being held by a hand.

    Thoughts?

    If you made our Savoy Cabbage Soup (kelj kalja) and liked it, please consider giving it a ⭐️⭐️⭐️⭐️⭐️ (5-star) rating. This helps others find the recipe more easily!

    Also, feel free to leave a comment (I read each one!), and don't forget to tag a photo #balkanlunchbox, or us @balkanlunchbox, on IG.

    Prijatno and bon appetit!

    A bowl with savoy cabbage soup and a spoonful above being held by a hand.

    Savoy Cabbage Soup (Kelj Kalja)

    Aida
    Mild, tender, and nourishing broth - great as a standalone dish or with a side.
    5 from 1 vote
    Print Recipe Pin Recipe
    Prep Time 15 minutes mins
    Cook Time 30 minutes mins
    Total Time 45 minutes mins
    Course Main Dish
    Cuisine Bosnian, Croatian, Serbian
    Servings 4
    Calories 437 kcal

    Ingredients


    • 1 savoy cabbage head medium-sized, the outer leaves and veins are discarded; dice the rest
    • 4 potatoes peeled and chopped; medium, Russett or Yukon Gold, 1lb (500g) after they're peeled
    • 2 garlic cloves minced
    • 1.75 ounces oil all types
    • 1-2 tablespoons flour
    • salt and pepper
    • 1-2 tablespoons Vegeta or 1 bouillon cube, or 1 tablespoon stock powder; alternatively use 4 cups of broth instead of water and Vegeta
    • (Optional) a few lemon wedges

    Instructions
     

    • In a large pot, combine plenty of salt, Savoy cabbage, and water. Bring to a boil on medium. Boil for 2-3 minutes (4-5 minutes if the Savoy cabbage is older). Strain cabbage and set aside. Rinse the pot quickly.
    • Return the pot to the stove, and heat the oil on medium. Add flour and mix vigorously until the roux forms (about 1-2 minutes). Bring the temperature down to low. Add potatoes, garlic, seasonings, and 4 cups (1 liter) of water (or broth). Stir well, and simmer for 20-30 minutes, or until potatoes are fork-tender.
    • Serve warm with bread, and/ or a side of meat, and a squeeze of lemon.
      Store in an airtight container for up to a day.
      Reheat using your preferred method.

    Video

    Nutrition

    Serving: 1of 4Calories: 437kcalCarbohydrates: 48.1gProtein: 5.2gFat: 22.6gSodium: 1325mgPotassium: 770mgSugar: 2.5g
    Tried this recipe?Let us know how it was!

    More Recipes to ❤️

    • A hand holding a forkful of cabbage salad.
      Kupus Salata - Balkan Cabbage Salad
    • Quarter of a burek pie on a plate on gray background.
      Burek
    • ajvar, chutney, pepper chutney, eggplant chutney, balkan spread, balkan dip ajvar, red pepper and eggplant dip, pepper dip | balkanlunchbox.com
      Ajvar
    • A spoonful of baked sauerkraut.
      Baked Sauerkraut (Podvarak)

    Breaded Eggplant and Zucchini

    Feb 6, 2017 · 3 Comments

    Breaded eggplant and zucchini: if you've ever had doubts about these two, now is the time to put them to rest. Tough but dewy eggplant and zucchini, dipped in flour and egg, then frizzled until a perfectly crunchy yet soft.

    Breaded eggplant and zucchini: if you've ever had doubts about these two, now is the time to put them to rest. Flavorful, dewy eggplant and zucchini, dipped in flour and egg, then sizzled until they achieve a perfectly crunchy softness. 

    If there was a vegetable popularity contest, zucchini and eggplant wouldn’t score high. (Not with potato around!)

    As if they’re some vegetable ugly stepsisters, eggplant and zucchini are never the meal's headliner. So here they are, as side pieces. But oh, what side pieces!

    Breaded and fried!

    Gasp!

    That’s right! Breaded eggplant and zucchini. Then fried.  Not everything is healthy, nor does it need to be. (Still beats anything packaged.)

    This avoidance of eggplant and zucchini on the menus is mostly due to texture (especially eggplant texture), which when placed against pepper crunchiness or tenderness of your everyday spinach, doesn’t rank well.

    There is also the water content.

    Both zucchini and eggplant usually require a good sweat (zucchini due to water, and eggplant due to bitterness) before use, adding an extra 15-45 minutes to preparation time. Who has time for that?

    Not you! Not me!

    Today’s breaded zucchini and eggplant recipe circumvents elaborate sweating. Trust me, I’ve tried them every which way, but this breaded version tops them all.

    Everyone will tell you to wait. But you're adventurous, I feel it!

    You may like to leave the skin on both, but it's best if at the very least you peel the eggplant. Not only is eggplant skin bitter and you won't end up eating it, but it's usually full of chemicals too.

    You'll notice in the video for this breaded eggplant and zucchini recipe that zucchini isn't peeled. This is because zucchini for the video came from Aleksandra's garden. It was 100% organic and pesticide free.

    (Otherwise I'd peel both!)

    Breaded eggplant and zucchini: if you've ever had doubts about these two, now is the time to put them to rest. Tough but dewy eggplant and zucchini, dipped in flour and egg, then frizzled until a perfectly crunchy yet soft.

    For the recipe to work, you have to work fast. You probably prefer it that way anyway!

    You need twenty - definitely no longer than thirty minutes - to end up with an impressive bowl-full of crunchy vegetables that are somehow soft at the same time.

    On the crunchiness scale, these fall between the breaded baked zucchini and breaded crepes. Additionally, quick frying and avoidance of sweating help seal in the freshness. 

    The process results in taste of compounded flavors, where from the initial crunch the eggplant and zucchini are almost in their fresh state but with warm, softer overtones, and a coat of mouthwatering breading.

    You could do all sorts of things with eggplant and zucchini once you bread them. 

    These are a perfect side you can dip in ketchup, tartar sauce, ajvar or hummus. (Tailgating anyone?)  Breaded eggplant is a great option to upgrade your eggplant parmesan. And while you're at it, have you tried our breaded and baked zucchini? 

    Finally, this recipe is a decent vegetarian dish option for those of you who are finding Balkan cuisine overly meat centric.

    Vegans, I’m working on it. Meanwhile jump over to Nicole’s fantastic blog, where she shares a lot of vegetarian and vegan wisdom as she makes her way through the Balkans.

    Meanwhile, how did you like these?

    Breaded eggplant and zucchini: if you've ever had doubts about these two, now is the time to put them to rest. Tough but dewy eggplant and zucchini, dipped in flour and egg, then frizzled until a perfectly crunchy yet soft.
    Breaded eggplant and zucchini: if you've ever had doubts about these two, now is the time to put them to rest. Tough but dewy eggplant and zucchini, dipped in flour and egg, then frizzled until a perfectly crunchy yet soft.

    Breaded Eggplant and Zucchini

    Aida
    Breaded eggplant and zucchini: if you’ve ever had doubts about these two, now is the time to put them to rest. Tough but dewy eggplant and zucchini, dipped in flour and egg, then frizzled until they achieve a perfectly crunchy softness. 
    5 from 1 vote
    Print Recipe Pin Recipe
    Prep Time 5 minutes mins
    Cook Time 15 minutes mins
    Total Time 20 minutes mins
    Course Side Dish
    Servings 6

    Ingredients
      

    • 2 eggplants medium, peeled and sliced into ½ inch rounds
    • 2 zucchinis medium, peeled and sliced into ½ inch rounds
    • 4-5 eggs
    • 1.5 cups white flour
    • Salt to taste if not using seasoned salt
    • Optional 2 tablespoons seasoned salt (or Vegeta, or 1 bouillon cube crushed)
    • Oil

    Instructions
     

    • In a medium bowl, beat eggs, and add salt (or seasoned salt). Take another medium bowl and add flour to it.
    • Take a deep pan and add a generous amount of oil for frying. Heat on high.
    • Dip vegetable rounds and slices first in flour then in eggs. Add to the pan. Fry the first few batches for two minutes on each side on high. (Later, as oil gets hotter lower it down to medium.) Later batches may need less time.
    • Transfer to a paper towel so it soaks extra oil.
    • Consume warm.

    Video

    Tried this recipe?Let us know how it was!

    Chicken Turnovers

    Jan 31, 2017 · 4 Comments

    Chicken turnovers: healthy stuffing made of combined veggies (bell peppers, corn, peas and tomatoes) combined with chicken breast, wrapped in dough and then baked. It's like a salad, main course, and a side all in one terrific turnover.

    Chicken turnovers: a healthy veggie  stuffing (bell peppers, corn, peas and tomatoes), combined with chicken breast, wrapped in dough, and then baked. It's like a salad, main course, and a side all in one. 

    Chicken turnovers: healthy stuffing made of combined veggies (bell peppers, corn, peas and tomatoes) combined with chicken breast, wrapped in dough and then baked. It's like a salad, main course, and a side all in one terrific turnover.

    A sandwich is a comfort food. And there are different type of sandwiches. You could consider burrito a sandwich in a way, just as a crepe, loosely, can be a sandwich too. Today we do the best "sandwiches" of them all: chicken turnovers.

    These kinds of meals are all a form of pie. This one would be a type of a chicken pie. And we've done vegetarian pies, and ground beef pies.

    No need for a dissertation here. We'll just fry up some veggies with chicken, while separately making the dough. A fantastic thing about these is that you can make more of each, the filling and the dough, and freeze them separately. Then, when you run out of ideas for dinner take them out, fill them up, and fry them.

    That's it for today folks.

    Chicken turnovers: a healthy veggie stuffing (bell peppers, corn, peas and tomatoes), combined with chicken breast, wrapped in dough, and then baked. It's like a salad, main course, and a side all in one.
    Chicken turnovers: a healthy veggie stuffing (bell peppers, corn, peas and tomatoes), combined with chicken breast, wrapped in dough, and then baked. It's like a salad, main course, and a side all in one.
    Chicken turnovers: a healthy veggie stuffing (bell peppers, corn, peas and tomatoes), combined with chicken breast, wrapped in dough, and then baked. It's like a salad, main course, and a side all in one.

    Chicken turnovers: healthy stuffing made of combined veggies (bell peppers, corn, peas and tomatoes) combined with chicken breast, wrapped in dough and then baked. It's like a salad, main course, and a side all in one terrific turnover.

    Chicken Turnovers

    Aida
    5 from 1 vote
    Print Recipe Pin Recipe
    Prep Time 50 minutes mins
    Cook Time 10 minutes mins
    Total Time 1 hour hr
    Course Main Dish
    Servings 8

    Ingredients
      

    Filling:

    • 1 large yellow onion
    • 1 garlic clove
    • 1 bell pepper
    • 1 large tomato
    • 2 ounces corn kernels
    • 2 ounces green beans
    • 8 ounces chicken breast
    • ½ zucchini
    • 1 tablespoon butter
    • 3 tablespoons vegetable oil
    • Seasonings to taste seasoned salt, ground pepper, parsley
    • 2 ounces tomato paste

    Dough:

    • 1 pound white flour
    • 1 teaspoon baking powder
    • ½ teaspoon salt
    • 1 egg
    • 12 ounces yogurt* please read the note
    • Oil

    Instructions
     

    • Heat up butter and oil in a wok over medium heat. Add onion (minced) and garlic (diced) to the wok and simmer for 5 minutes.
    • Add (diced) chicken breast to the wok and simmer for 5 minutes.
    • Add bell peppers (cut into small stripes) and tomato (skinned and diced). Simmer for 10 minutes.
    • Add green beans, corn kernels, zucchini (diced), seasonings and tomato paste. Simmer another 10 minutes. Remove off heat.
    • In a large bowl, combine dough ingredients except for yogurt. Start pouring yogurt in slowly as you knead the dough. Continue kneading for 7-10 minutes vigorously, or until you have a smooth and elastic ball of dough. Divide into 16 equal pieces. With a rolling pin, roll out each one out into a round shape that's about 5-6 inches in diameter. Take one round and place 1 tablespoon of filling on one half of it. Lift the other half and fold over the first half and the filling. Use your fingers to seal it together. (Optionally, lightly press a fork on ends to seal it in even more.) Repeat with remaining dough rounds.
    • Pour a generous amount of oil into a frying pan, and heat it up over medium heat. When the oil is hot, place the turnovers in (you may have to do it in batches), and fry each side for 1 minute. Remove from heat and place on a paper towel to soak up extra oil.
    • Serve hot, with your favorite condiments.

    Notes

    *The US stores generally don't carry the same yogurt as in Europe. This yogurt has the consistency of buttermilk, but the taste is closer to Greek yogurt. If you can find it, fantastic. If you can't, a good substitute is Greek yogurt, mixed until smooth. Add a little water if necessary until it's smooth like buttermilk. After you combine Greek yogurt and water, that's when you measure out 12 ounces for the dough.
    Serving size is 2 turnovers, you'll be making 16, so you'll end up with 8 servings.
    Time for the filling: 10 minutes for dicing/ mincing vegetables, 30 minutes for simmering. Time for the dough: 45 minutes to make the dough and fill each round, 10 minutes for frying. However most of this can be done parallel to each other, therefore total time to prep and cook is 1 hour.
    Tried this recipe?Let us know how it was!

    Veal Rump Medallions And Mashed Potatoes

    Jan 23, 2017 · 5 Comments

    Mekani, sočni teleći medaljoni dinstani u redukcionom umaku, posluženi sa nježnim krompir pireom. 

    Moist and smooth veal rump medallions simmered in reduction sauce and served over softest mashed potatoes.

    veal rump medallions teleci medaljoni 00

    These veal rump medallions are my go-to recipe when I want something substantial quickly. The caveat is remembering to marinate them at least a few hours ahead, preferably overnight. (While the medallions are done in a jiffy, the wait time is long.)

    I remember back in the day when marinading seemed daunting. Indeed, there are complicated marinades out there. The trick here is to establish a baseline with a simple one you can use each time. Meaning, look for a two-three ingredient marinade. If you have to go to a specialty store to get all the supplies, run the other way and don't look back!

    Marinade we're doing today is made predominately from mustard. We're not even talking dijon. Just plain mustard. Any mustard you can put on a hot dog will work well. What it does is tenderize the meat, so the veal ends up even softer and chewier after it's prepared.

    Another trick to make these the most tender medallions is to fry them for one minute on each side on a light film of very hot oil before continuing on medium heat. This quickly closes the pores on the meat sealing in the moisture.

    You know how to make good mashed potatoes. Right? If you don't, here are a few tips. Peel and cut (even dice) potatoes before boiling. Once they're tender, drain. Add some milk and some butter and mash. Keep tasting until you get just the right consistency. They're simple to prep. There's no excuse for going with the preservative ridden ones from the bag.

    You don't have to, but in the Balkans there is always some type of a soup (salad too) when a meal does not consist of a stew. If you are motivated, you can go for beef or the grits noodle chicken ones. But since you've been so good preparing the mashed potatoes all by yourself, I'll be ok if you go with the bag soup here.

    P.S. Here's another veal recipe: cutlets in red wine also known as drunken schnitzels.

    veal rump medallions teleci medaljoni 0
    Moist and smooth veal rump medallions simmered in reduction sauce and served over softest, fluffiest mashed potatoes.
    veal medallions teleci medaljoni 00

    Veal Rump Medallions With Mashed Potatoes

    Aida
    5 from 1 vote
    Print Recipe Pin Recipe
    Course Main Course
    Servings 6

    Ingredients
      

    • 8 veal rump medallions about 2 pounds of veal
    • ½ tablespoon mustard
    • 1 bouillon cube crushed into flour
    • Ground pepper to taste
    • 2 pounds Russet potatoes
    • 7 ounces milk
    • 3 tablespoons butter
    • Salt to taste
    • 6 ounces beef broth
    • 1-2 garlic cloves whole
    • 2 ounces white wine
    • 2 tablespoons parsley minced
    • Oil

    Instructions
     

    • Marinade veal the night before you plan to make them (or 4-5 hours ahead). Start by spreading mustard on all sides (use hands). Follow with bouillon and ground pepper. Seal everything in with a coat of oil (2-3 tbsp). Cover with saran wrap and leave in the fridge.
    • The following day take the veal out, and uncover an hour or so before preparation.
    • Peel and quarter potatoes. Place in a pot and cover with water. Bring to a boil on high. Lower the temperature and cook until you can easily cut into them with a fork. (About 15-20 minutes.) Remove from heat and drain. Add milk, butter, and salt. Mash vigorously with a masher or hand mixer until completely smooth (3- 5 minutes).
    • In a deep skillet, heat a light film of oil on high. Add veal. Brown on high for 1 minute on each side. Lower to medium and simmer 5 minutes. Add beef broth and simmer another 5-7 minutes. Finally, add white wine, garlic cloves and parsley. Simmer for final 5 minutes. (By this time most of the alcohol will evaporate, and the sauce will thicken.)
    • Serve hot over mashed potatoes.

    Notes

    Serving size is about 1 to 1.5 veal medallions.
    Prep time for medallions is about 3 minutes, and cook time is about 20 minutes. Make sure you leave the medallions to marinate for at least a few hours. Best if left overnight.
    Prep and cook time for mashed potatoes is about 30 minutes.
    You can do these parallel to each other.
    Tried this recipe?Let us know how it was!

    Walnut Cookies (Orašnice)

    Jan 11, 2017 · 6 Comments

    Rapidly fast walnut bites (cookies).

    Our four-ingredient walnut cookies (orašnice) are a perfect melt-in-your-mouth crunchy indulgence! Prepared with just eggs, sugar, baking powder, and walnuts, they're a breeze to make. Shall we?

    A plate with five walnut cookies, a pitcher with milk and a small glass of milk on a marble background.
    [feast_advanced_jump_to]

    Background

    Orašnice, Balkan walnut cookies, are traditionally a holiday treat. But they're so crunchy on the outside, and melt-in-your-mounth on the inside, we can't help making them all year long! Luckily, they're incredibly easy to make.

    Among all nuts, walnuts reign supreme in the region and are a favorite addition to desserts. Their robust flavor seamlessly blends with most ingredients.

    Walnuts nestle perfectly in layers of phyllo dough to create roses and baklava. Paired with chocolate, they produce the highest quality, traditional chocolate cake. Even a simple olive oil cake is elevated to the next level with a few of these versatile nuts.

    Today's cookies (orašnice) are very special because the walnuts take center stage. Mixed with sugar, baking powder, and eggs, these cookies practically make themselves.

    Ingredients

    Here are the only four ingredients you'll need to make today's walnut cookies (orašnice).

    Four ingredients in glass bowls on a wooden table (sugar, egg, baking powder, walnuts).
    • Walnuts: deshelled and ground raw walnuts. It's best to buy them deshelled and grind them at home in a food processor or a blender. Avoid candied, or flavored walnuts.
    • Sugar: regular sugar works best. (If you make it with a different type of sugar let us know!)
    • Egg: regular egg, no egg substitutes.
    • Baking Powder.

    Instructions

    Here are the two world's easiest steps for making walnut cookies (orašnice). Similarly to baklava, they're "dried" more than "baked" for an hour at a very low temperature.

    Four photographs, two by two, of walnut cookie preparation: first and second photo have a glass bowl with ingredients, the third has a pan with cookies ready to bake, and fourth depicts cookies already baked.

    Step 1: combine walnut cookie ingredients well until the batter feels like wet sand.

    Step 2: form walnut cookies (orašnice) into small marbles, and place them on the parchment paper in a baking pan. Bake.

    Recipe FAQs

    Are walnuts healthy?

    Walnuts are among the healthiest seeds. They're chockful of nutrients like Omega-3s, antioxidants, copper, folic acid, phosophorus, Vitamins E and B6.

    There have been studies suggesting they have anti-cancerous properties as well.

    Why did my cookies flatten out?

    It's natural for walnut cookies to flatten a little bit as they bake. Sometimes they're more 'dome' shaped, and sometimes they flatten out completely.

    While the shape depends on different factors like humidity and walnut quality, the taste is always the same: divine!

    Handling

    Here's how to store and serve your walnut cookies.

    Serving: Serve by themselves, or with whipped cream, ice cream, brownies, tea, or coffee.

    Storing: Store up to 2 weeks in a cookie jar, or a container with a lid.

    More Sweets

    If you're like us, you've got a major sweet tooth! Check out some other Balkan favorite desserts.

    • Closeup of four wafers.
      Balkan No Bake Wafer Cake (Oblatne, Oblande)
    • Stewed apple in a clear bowl, on the table.
      Stewed Stuffed Apples in Syrup (Tufahije)
    • Three biscuits on a gray background, one being halved with a fork.
      Čupavci: Balkan Lamingtons [One Hour]
    • Traditional Serbian cake called Vaso's Cake. Made with dark chocolate, oranges, walnuts and meringue.
      Chocolate Orange Cake with Meringue (Vasina Torta)

    In the mood for more sweet goodness? Check out these banana pudding truffles from Take Two Tapas!

    Thoughts?

    If you made walnut cookies (orašnice) and liked it, please consider giving it a ⭐️⭐️⭐️⭐️⭐️ (5-star) rating. This helps others find the recipe more easily!

    Also, feel free to leave a comment (I read each one!), and don't forget to tag a photo #balkanlunchbox, or us @balkanlunchbox, on IG.

    Prijatno, Dobar Tek, and Bon Appetit!

    A plate with five walnut cookies, a pitcher with milk and a small glass of milk on a marble background.

    Walnut Cookies (Orašnice)

    Aida
    Irresistible walnut cookies, a delightful blend of melt-in-your-mouth texture, and satisfying crunch! (Known in the Balkans as orašnice.)
    5 from 2 votes
    Print Recipe Pin Recipe
    Prep Time 10 minutes mins
    Cook Time 55 minutes mins
    Total Time 1 hour hr 5 minutes mins
    Course Dessert
    Cuisine Bosnian, Croatian, Montenegro, Serbian
    Calories 338 kcal

    Ingredients


    • 5.5 ounces walnuts raw and ground, best to buy de-shelled and grind at home; avoid candied or flavored walnuts
    • 5.5 ounces granulated sugar regular, white sugar
    • 1 egg
    • 1.5 teaspoon baking powder

    Instructions
     

    • In a large bowl, combine all ingredients. Mix well with your hand until the batter feels like wet sand. Form small, sturdy balls the size of a large marble. (You should have around 30-35.) Heat oven to 250°F (120°C).
    • Line a large baking pan (or sheet) with baking paper. Place the balls on baking paper keeping some distance between them. (They'll spread out, and flatten some during baking.) Bake for 55-60 minutes. (Adjust your oven to a little hotter or a little cooler accordingly.) Cookies are done when they blush (but not too much), and flatten out a little bit.
    • Serve by themselves or with tea or coffee. Store in a cookie jar for up to two weeks.

    Video

    Notes

    • Video
    In the video, a double batch of cookies is being made. Regular recipe volume produces about 30-35 cookies. 
    • Nutrition Info
    As always, nutrition information is an approximation and was based on 2 cookies in a batch of 34 cookies. Serving size is whatever you want it to be!

    Nutrition

    Serving: 2cookiesCalories: 338kcalCarbohydrates: 39.8gProtein: 0.85gFat: 19.7gSaturated Fat: 1.3gCholesterol: 22mgSodium: 17mgPotassium: 1068mgFiber: 2.4gCalcium: 405mgIron: 2mg
    Tried this recipe?Let us know how it was!

    More Recipe 💙

    • Sauce being poured over medallions
      Veal Medallions in Creamy Mushroom Sauce
    • Two glasses and a glass bottle with juice on a dark background.
      Fermented Juniper Berry Juice (Smreka or Kleka)
    • Stuffed cabbage on a spoon in a copper pot.
      Sarma: Best Traditional Balkan Stuffed Sour Cabbage Rolls
    • Piece of pie on a blue plate, a napkin and a pan with pie in the back, on a gray background.
      Meat Pie Recipe with Ground Beef (Ćoravi Burek)

    Balkan Mushroom Crêpes (Palačinke sa Gljivama)

    Jan 4, 2017 · 12 Comments

    Eight crepes on a plate, and a hand holding tartar saauce.

    This is a recipe for Palačinke, Balkan crepes, stuffed with a mushroom crepe filling, topped with tartar sauce, and baked. (Don’t worry, our crepe batter is super easy!) The result is a hearty entrée oozing with yummy umami flavor mixed with savory tartness. Shall we?

    Eight crepes on a plate, and a hand holding tartar saauce.
    [feast_advanced_jump_to]

    Background

    Let’s be honest, we couldn’t call ourselves a Balkan food blog without at least one stuffed crepes main course! Ok, ok, there are also the Breaded Ham and Cheese Crepes and the Spinach and Cheese Crepe Cake.

    But to make a serious dent in the palačinke universe we needed to share a recipe with a mushroom crepe filling.

    For those who are unfamiliar, palačinke are Central and Southeast Europe’s answer to crepes. In fact, they’re one of the most popular area dishes.

    So popular in fact, that palačinke with sweet and savory fillings are on the menu of almost every regional restaurant, from Bosnia to Slovenia!

    And this mushroom crepes recipe will show you why!

    (Please note that the terms palačinke and crepes/ crêpes are used interchangeably in the text below.)

    Why This Mushroom Crepe Recipe Works

    • First of all, this mushroom stuffing is the best traditional savory crepe filling. Once you make it, you’ll realize why sometimes adding just one ingredient makes all the difference!
    • Isn't it time for palačinke to stop playing second fiddle to Nutella? Here's a great example how adding a tasty crepe filling easily transforms palačinke into a legitimate main course.
    • Mushrooms, whose flavor is best described as umami, taste even more splendidly when coupled and baked with the slightly sour tartar. Go mushroom crepes go!
    • While making crepes can be intimidating, we share expert tips for crepe batter to help you make these thin European pancakes perfectly on your first try.
    • The resulting palačinke dish is so flavorful and visually pleasing it looks like you put a ton of time and effort into it. However, you and I will know it’s easy as 1-2-3.

    Ingredients

    Here are all the ingredients you'll need to make mushroom crepes.

    Twelve ingredients on top of the table.

    Mushrooms: For a more ‘mature’ crepe filling taste, sub with portobello, cremini, shiitake or oyster mushrooms, or a mix of. 
    Butter: Sub with coconut oil.  
    (Optional) Sugar: some palačinke lovers add a teaspoon of sugar to the crepe batter for a touch of sweetness. 
    Tartar sauce:  Sub with equal parts mayo and sour cream mix. 

    Instructions

    Here are the fastest instructions to make mushroom crepes.

    Nine photographs of crepe making.

    Step 1. Cook onion and mushroom crepe filling.
    Step 2. Make crepe batter.
    Step 3. Heat the pan and grease it.
    Step 4. Cook crepes.

    Six photographs of crepes with mushrooms.

    Step 5. Stuff them. Heat up the baking pan and butter. 
    Step 6. Place mushroom crepes in the baking pan. Top with tartar. Bake. 

    Expert Tips for Perfect Crepe Batter

    • Perfect Volume: After much testing we found the best crepes are made in a pan that’s 8-9 inches in diameter (25cm), with ½ cup of crepe batter for each one.
    • Oil: Instead of pouring oil into the pan, it’s best to lightly coat it with a paper towel that’s been dipped in oil. (Watch your fingers!) This way the crepe batter will produce palačinke that are not sticky, nor greasy. Also, it'll be easier to add the crepe filling to palačinke made this way.
    • Perfect Flip: For the perfect crepe flip use a knife to lightly unseal its edges from the pan. Then shake it in the pan a little bit to ensure the rest of it is not glued to the pan. Finally, hold the pan in your hand and do a slight wrist movement up and down. (The greatest mistake in flipping palačinke is thinking you need to make huge movements.)
    • Resting Time: If you can, rest the batter in the fridge for mushroom crepes a bit before frying. Whisk it if it separates, and add a pinch of water.

    Handling

    Here are tips for serving and storing your mushroom crepes (palačinke sa gljivama):

    Serving: Serve mushroom crepes warm, or (optional) with additional tartar sauce. Add a side soup or salad, per taste.

    Storing: Store crepe batter in the fridge for up to 2 days. When you’re ready to use it, bring the batter to room temperature and whisk it, adding a pinch of water. Meanwhile, store finished crepes in an airtight container in a cooler kitchen for a day or in the fridge for up to two days.

    Recipe FAQs

    What is a crepe and how is it different from a pancake? 

    A crepe is a flattened European pancake. Regionally it goes by different names, like palačinke in the Balkans.

    While in the US pancakes are usually a breakfast or brunch food, crepes are usually a dessert or a main course. The best way to make them into a main course is by stuffing them with a hearty crepe filling.

    Are crepes healthy?

    Crepes (palačinke) aren't unhealthy, but they're not exactly diet food. Think of crepes as pleasure food. If you are trying to eat healthier and have your crepes make sure that you don't overdo it with the crepe filling(s).

    What are crepes often filled with?

    Everything!

    Dessert crepes are often filled with Nutella, honey, walnuts, sugar, lemon, cherries, bananas, vanilla, and chocolate. Meanwhile, savory crepes can be filled with cream cheese, cottage cheese, chicken, ham, spinach, mushrooms, and other vegetables. Additionally, they can be stuffed, baked, and/or fried.

    What goes with crepes for dinner?

    When you find a good recipe for a savory crepe filling you won’t need anything else to make crepes into a dinner that will fill you up. Today’s recipe is an example. However, you can add a side of soup or salad if you’re extra hungry.

    Closeup of a mushroom crepe on a fork.

    More Crepe and Mushroom Recipes

    • Simple Lacy Crepes
    • Ground Beef and Potato Pie
    • Cream of Mushroom
    • Spinach Pie
    • Mushroom Lasagna

    Thoughts?

    If you make today's Mushroom Crepes (Palačinke sa Gljivama) and like them, please consider leaving a ⭐️⭐️⭐️⭐️⭐️ (5-star) rating. This will help others find the recipe more easily!

    You can also leave a comment, I read EVERY one! Finally, if IG is more your thing, consider tagging us @balkanlunchbox.  

    Prijatno and bon appetit!

    Closeup of a mushroom crepe on a fork.

    Balkan Muhroom Crepes (Palačinke sa Gljivama)

    Aida
    Balkan crepes, stuffed with a mushroom filling, topped with tartar sauce, and baked!
    5 from 2 votes
    Print Recipe Pin Recipe
    Prep Time 40 minutes mins
    Cook Time 50 minutes mins
    Total Time 1 hour hr 30 minutes mins
    Course Main Course
    Cuisine Bosnian, Croatian, Serbian
    Servings 6
    Calories 461 kcal

    Ingredients


    Filling: 

    • 2 tablespoons oil
    • 1 onion peeled, minced
    • 1.5 pounds button mushrooms diced small
    • 1 teaspoon salt
    • Pepper to taste

    Crepes: 

    • 10-11 ounces white flour
    • 2 eggs
    • ½ teaspoon salt
    • 2 cups milk
    • 1 cup water plus/minus a little bit
    • ½ teaspoon baking powder
    • 1-2 ounces oil for crepe pan coating
    • 2 tablespoons butter cubed, for regular pan coating

    Topping:

    • 10 ounces tartar sauce store-bought or homemade

    Instructions
     

    • Filling: In a large skillet heat up oil over high. Lower temperature to medium and add onion. Cook until translucent (3-5 min). Raise temperature to high again and add mushrooms and salt. Saute, and frequently stir mushrooms until they’re tender and the liquid they expel has mostly evaporated (15-20 min). Set mushroom crepe filling aside.
    • Crepes (palačinke): (Making palačinke can be done parallel to making the crepe mushroom filling.) In a large bowl combine flour, eggs, salt, milk and baking powder. Mix batter with a hand mixer. Slowly add water to batter as you mix. Pause mixing once or twice and scrape batter from the sides of the bowl.  Crepe batter is ready when it’s smooth, crumb-free, and has the consistency of heavy cream. (You may have to add a little bit more or a little bit less water.)
    • Take a piece of paper towel, wrinkle it up in your palm, and dip it in oil. Use this to carefully coat the crepe pan. Heat the coated pan up on highest until the oil is really hot (2-3 min). The oil may get slightly smokey. 
    • Grab crepe batter with a ladle (or another tool with a volume of approximately ½ cup) and transfer to a crepe pan (sized approximately 8-9 inches in diameter). Lift the pan and watching that the batter doesn’t leave the pan, swirl it around until it coats the pan bottom evenly and there are no ‘holes.’ Return to the stove and cook the crepe 60-90 seconds on one side. Flip to the other side and cook another 60 seconds. Transfer the finished crepe onto a plate. 
    • Repeat step 4 until you run out of crepe batter. You should have 15-16 crepes, and it’ll take about 30-40 min to cook them. Halfway through cooking the crepes (palačinke) heat oven to 350°f (175°c). Then place butter cubes into a 10x15 inch baking pan and heat it up in the oven for 3 min, or until butter melts.
    • Assembly: (Assembling/ stuffing the crepes with mushroom filling can be done parallel to making the crepes.) Fill each crepe with a heaping tablespoon of mushroom crepe filling. Roll them up and place them in the hot pan. Repeat until you run out of crepes and filling. Pour and spread tartar sauce evenly over the crepes. Bake (15-20 min), until crepes and tartar sauce congeal and get a blush a little bit.  
    • Serve crepes warm with (optional) additional tartar sauce. Keep in the fridge for up to a day. They can be consumed cold or warm. 

    Video

    Notes

    Be careful not to burn your fingers while coating the crepe pan with oil. Cooking crepes on highest is a suggestion. Adjust temperature based on how hot your stove runs. 
    You can mix the batter manually (with a spatula), or in a blender also. 
    To flip a crepe first take a knife and circle around the crepe's edge, slightly lifting it on all sides. Then shake the pan in a left-right motion to ensure the crepe isn't glued to the bottom. (You can also use the knife and underneath the entire crepe before flipping it.) At this point, flip the crepe. Flipping is easily done by holding the crepe pan in your hand while doing a slight wrist movement up and down. (Alternatively, use the dull side of the knife to flip the crepe.) 
    Expect that the first couple of crepes to be ‘uglier’ and harder to make. This happens almost always as it takes a little while for the crepe pan to achieve the right temperature, and also for you to get a hang of ‘swirling’ the batter.

    Nutrition

    Serving: 1of 6Calories: 461kcalCarbohydrates: 52gProtein: 14gFat: 22gSaturated Fat: 4gPolyunsaturated Fat: 8gMonounsaturated Fat: 9gTrans Fat: 1gCholesterol: 67mgSodium: 1002mgPotassium: 606mgFiber: 3gSugar: 10gVitamin A: 298IUVitamin C: 5mgCalcium: 154mgIron: 3mg
    Tried this recipe?Let us know how it was!

    Santa's Sugar Cookies

    Dec 27, 2016 · 15 Comments

    Santa’s sugar cookies: classic butter and sugar dough that can be used for several different cookies. Make the dough the night before. The day off, roll the dough out, and shape and bake. Done in 15 minutes.

    Santa's sugar cookies... 

    Santa’s sugar cookies: classic butter and sugar dough that can be used for several different cookies. Make the dough the night before. The day off, roll the dough out, and shape and bake. Done in 15 minutes.

    Bite sized melt-in-your-mouth sugar cookies. Perfect with a glass of milk.

    Santa’s sugar cookies: classic butter and sugar dough that can be used for several different cookies. Make the dough the night before. The day off, roll the dough out, and shape and bake. Done in 15 minutes.

    Santa’s sugar cookies: classic butter and sugar dough that can be used for several different cookies. Make the dough the night before. The day off, roll the dough out, and shape and bake. Done in 15 minutes.

    Santa’s sugar cookies: classic butter and sugar dough that can be used for several different cookies. Make the dough the night before. The day off, roll the dough out, and shape and bake. Done in 15 minutes.

    Santa's Sugar Cookies And The Review of 2016

    Aida
    5 from 1 vote
    Print Recipe Pin Recipe
    Prep Time 20 minutes mins
    Cook Time 15 minutes mins
    Total Time 35 minutes mins
    Course Santa's Sugar Cookies

    Ingredients
      

    • 2 sticks butter
    • 2 cups flour
    • 2 egg yolks
    • 1 cup sugar
    • 1 teaspoon vanilla extract
    • Optional m&m's, gummy bears, etc.

    Instructions
     

    • Leave butter to soften on room temperature. Transfer to a larger bowl and mix with a hand mixer for one minute.
    • Add flour, sugar and egg yolks, and vanilla extract. This time mix with hands until the mass becomes a thick dough. Divide the dough into three parts. Work each a little longer. Cover each in saran wrap. Leave in the fridge overnight. (The dough will keep up to two weeks.)
    • When ready to make cookies, take the dough out of the fridge and give it some time to adjust to room temp. Heat oven to 375F.
    • Sprinkle the working area with flour. Unwrap the dough, and use a rolling pin to roll each out the thickness of three pennies stacked together. Use cookie cutters of your choice to cut up the dough into different shapes, or a knife if you don't have cookie cutters. Place cookies on a baking pan covered with baking paper.
    • Bake for 10-15 minutes. They only need a short time to be done, so watch that they don't over bake.
    • (Optional) Top with m&m's, gummy bears, etc.

    Notes

    This amount of dough yields 3-4 dozen or more.
    Tried this recipe?Let us know how it was!

    Bite sized melt-in-your-mouth sugar cookies. Perfect with a glass of milk.

    PERFECT simple sugar cookies. Adorn them in anything!

    Mama's Walnut Cake with Chocolate (Čokoladna Orah Torta) [Classic, European, Old Fashioned Torte Cake]

    Oct 17, 2016 · 3 Comments

    Cake being cut and a hand holding it on the bottom.

    Walnut cake with chocolate (čokoladna torta sa orasima) blends rich chocolate and earthy walnuts. This classic European torte is our cherished family tradition, and the very cake Mom bakes for each one of our birthdays. Shall we?

    Cake being cut and a hand holding it on the bottom.
    [feast_advanced_jump_to]

    Background

    (Please note while we understand that cakes and tortes are similar but not the same, in the text below the terms will be used interchangeably.)

    When you think of a classic European torte overflowing with creaminess, substance, and taste, you get our Mom's chocolate and walnut cake.

    Known as čokoladna orah torta, or čokoladna torta sa orasima, this dessert captures the essence of a timeless torte. Made from the comforting flavors of everyday ingredients, the cake offers a taste of warm home and family traditions.

    The cake biscuit consists of a spongy layer made from egg whites, egg yolks, sugar, and walnuts baked to a golden perfection and divided into three parts. Not to be outdone, the creamy filling (which also counts as frosting!) consists of egg whites, egg yolks, and sugar with the addition of melted chocolate.

    Whether it’s a solo indulgence or a family affair, this chocolate walnut cake is sure to bring joy to your mouth with every bite.

    Why You'll Love Walnut Cake with Chocolate

    • Easy to Make: This cake is simple and easy to follow, making it ideal for beginners, seasoned bakers, and non-bakers alike.
    • Minimal Equipment: No need for a bunch of fancy tools you'll never use again. A few basic kitchen essentials will have you covered.
    • Rich Flavor: The blend of rich, high-quality ingredients makes for a dessert where one slice is enough to leave you completely and utterly satisfied.
    • Timeless Appeal: This cake's time-tested amazing flavor will be equally as delicious for generations to come.

    Ingredients

    Here are all the (simple) ingredients you'll need for mama's walnut cake with chocolate (čokoladna torta sa orasima).

    Cake biscuit ingredients

    Ingredients for cake biscuit on a white background: walnuts, chocolate, eggs, flour, salt and sugar. .

    Cake filling ingredients

    Ingredients for cake filling on white background: chocolate, butter, powdered sugar, eggs, salt.

    List of all ingredients

    • Walnuts. Deshelled and as fresh as possible. For the best consistency and taste, grind about three-quarters of them, and finely chop the remaining quarter. Substitute with hazelnuts, or a mix of hazelnuts and walnuts.
    • Chocolate. You have some freedom with the chocolate. We've used everything from baker's chocolate, dark chocolate, milk chocolate, white chocolate, chocolate chips, and the combination of. Avoid chocolates with additions (nuts, seeds, etc.).
    • Regular Sugar. Here we're talking about table sugar or granulated sugar. If you substitute with the ground or another sugar, leave a comment and let us know how it went.
    • Eggs. If you can, look for the freshest, organic, free-range chicken eggs you can find. As the cream is thermally processed (cooked over a water boiler), the eggs should be as fresh as possible. (If you can't, regular, store-bought eggs will do.)
    • Salt. Table salt will do.
    • Flour. Regular white flour.
    • Powdered Sugar. (Conectioner's or icing sugar.) This sugar, with its flour-like consistency, is combined with egg yolks as a part of the creamy filling (frosting). If you must substitute, make sure the sugar you're substituting with is as finely grained as possible.
    • Butter. Unsalted is best, but slightly salted is fine also.
    • (Optional) Rum. Sprinkling a little bit of rum onto the cake before you add cream intensifies the flavor of our walnut cake with chocolate.

    Instructions

    Here are the step-by-step instructions for making mama's walnut cake with chocolate (čokoladna torta sa orasima).

    Making the cake biscuit

    Six photographs, two by three, of preparation steps for the walnut cake.

    Step 1. Line the cake ring with foil and grease/sprinkle.
    Step 2. Separate eggs.
    Step 3. Add salt. Mix whites until stiff. Set aside.

    Six photographs, two by three, of preparation steps for the walnut cake: the biscuit.

    Step 4. Add sugar. Mix yolks.
    Step 5. Add chocolate. Mix. Add Walnuts. Mix.

    Six photographs, two by three, of preparation steps for the walnut cake: baking.

    Step 6. Combine with egg whites. Whisk. Add flour. Whisk.
    Step 7. Transfer the batter to the cake ring. Bake.

    Two photographs, side by side, of the cake in cake ring, and without it.

    Step 8. Cool off.
    Step 9. Remove the ring and foil.

    Making the filling

    Four photographs, two by two, of egg whites whipped into stiff peaks for the cake filling.

    Step 1. Separate eggs.
    Step 2. Mix egg whites.

    Two by three photographs of filling made over water boiler.

    Step 3. Heat water.
    Step 4. Thermally process egg yolks.
    Step 5. Melt chocolate.

    Two by three photographs of the filling with butter added, then chocolate and egg whites added.

    Step 6. Add butter.
    Step 7. Add chocolate.
    Step 8. Combine everything.
    Step 9. (Not pictured). Transfer to fridge.

    Combining cake biscuit and filling

    Four photographs, two by two, of the cake being cut, and filling divided.

    Step 1. Cut the biscuit. Sprinkle with rum.
    Step 2. Divide filling.

    Eight photos, two by four, of the cake biscuit and cake filling combined into a cake.

    Step 3. Combine.

    Handling

    A piece of cake on a fancy plate and the remaining cake in the background on a marble background.
    • Serving: take the chocolate walnut cake out of the fridge 10-15 minutes before serving. For easier cutting warm the knife up by dipping it in hot water in between slicing. (We usually keep a pitcher of it nearby.)

      Serving size is up to you. We find that this size cake produces about 12-16 slices. Walnut chocolate cake is a very rich, filling dessert. One decent slice will keep you satisfied for quite some time.

      Serve the cake itself, with Bosnian coffee, or alongside vanilla ice cream or berry fruit (blueberries, strawberries, etc.).
    • Storing: store in an airtight cake container in the fridge for up to 3-5 days. Although the quality does deteriorate a little bit, it'll still be delicious.

    Recipe FAQs

    What are the best types of chocolate to use in a chocolate walnut cake?

    Most chocolate types are great to use in a chocolate walnut cake.

    We've tested everything from baker's chocolate, dark chocolate, milk chocolate, white chocolate, and a mix of. Chocolate chips also work.

    However, avoid chocolates with additions like nuts, seeds, caramel, etc.

    Can you substitute walnuts with other nuts in a chocolate walnut cake?

    Yes. You can substitute with hazelnuts.

    How do you ensure a chocolate walnut cake stays moist and flavorful?

    The cake tastes best 1-2 days after making. However, as long as it is secured in an airtight container, the cake will stay moist and flavorful for about 5-7 days in the fridge. While the quality does deteriorate day after day, the flavor will still be very tasty.

    To ensure it's moist after taking it out of the fridge, leave it outside for 10-15 minutes to adjust to the room temperature.

    Can you make a chocolate walnut cake ahead of time?

    Absolutely. In fact, it's best to make the cake a day or two ahead of when you plan to serve it, and keep it in the fridge until then.

    Expert Tips

    Cake on a plate on a white background an cutting utensils in the back.

    Here are some expert tips to ensure that your walnut chocolate cake (čokoladna torta sa orasima) comes out perfect every single time.

    • 1 Cake Ring (Pan). Using 3 pans can complicate things. We prefer one pan or ring and cutting the cake into three layers—simpler and easier to fix mistakes.
    • Sprinkle with Rum. Sprinkling the biscuit (cake) layers with rum (or another liqueur) enhances the flavor in a big way.
    • No Egg Yolks in Egg Whites. If any egg yolk mixes with the egg whites and you have trouble whipping them, discard everything and start with fresh eggs. Egg yolks contain fats that disrupt the egg whites' ability to foam.
    • Start at the Lowest Mixer Speed. Always start at the lowest mixer setting and gradually increase after 10-20 seconds to avoid a mess.

    More Chocolate 💙

    • Traditional Serbian cake called Vaso's Cake. Made with dark chocolate, oranges, walnuts and meringue.
      Chocolate Orange Cake with Meringue (Vasina Torta)
    • A hand holding a chocolate ball above a glass bowl full of chocolate balls.
      Hazelnut Chocolate Balls (Bombice od Lješnjaka/ Lešnika)
    • Chocolate Pudding Dessert Cup
    • A piece of cake cut with a fork on a white background.
      Chocolate Hazelnut Cake (Šamponeze Torta)

    Thoughts?

    If you make today's Mama's walnut cake with chocolate (čokoladna orah torta, čokoladna torta sa orasima) and liked it, please consider leaving a ⭐️⭐️⭐️⭐️⭐️ (5-star) rating. This will help others find the recipe more easily!

    You can also leave a comment, I read EVERY one! Finally, if IG is more your thing, consider tagging us @balkanlunchbox.

    Prijatno, Dobar Tek, and Bon Appetit!

    A piece of cake on a fancy plate and the remaining cake in the background on a marble background.

    Mama's Chocolate Walnut Cake (Čokoladna Orah Torta)

    Aida
    Traditional walnut cake with chocolate, a cherished family heirloom passed down through generations, blends rich chocolate and earthy walnuts for a timeless torte.
    5 from 1 vote
    Print Recipe Pin Recipe
    Prep Time 40 minutes mins
    Cook Time 50 minutes mins
    Resting Time (Fridge) 2 hours hrs
    Total Time 3 hours hrs 30 minutes mins
    Course Dessert
    Cuisine Bosnian, Croatian, Montenegro, Serbian
    Servings 14
    Calories 679 kcal

    Equipment

    • 1 (one) 10-inch cake ring (1 big is better than 3 small)

    Ingredients


    Cake Biscuit

    • 4 ounces baking chocolate grated; note that most types of chocolate work: choc. chips, milk chocolate, baking chocolate, dark chocolate, a combination of, etc.
    • 10 eggs find as organic and free-range as possible (if you can)
    • 1 cup granulated white sugar regular white table sugar
    • 4 tablespoons white flour two tablespoons for cake, two for coating the pan
    • 9 ounces de-shelled ground walnuts ¼ of these walnuts can be finely chopped for a richer texture
    • pinch of salt

    Filling (and Frosting)

    • 10.5 ounces baking chocolate note that most types of chocolate work: choc. chips, milk chocolate, baking chocolate, dark chocolate, a combination of, etc.
    • 5 eggs find as organic and free-range as possible (if you can)
    • 1 cup confectioner's sugar icing or powdered sugar
    • 9 ounces butter room temperature or softer
    • a pinch of salt

    (Optional) Topping

    • 2-3 ounces ground or finely chopped walnuts
    • 1-2 ounces chocolate syrup or grated chocolate
    • 1-2 m&m's, gummy bears, candy, etc.

    Instructions
     

    Making the Cake Biscuit

    • Prep Pan and Oven. Line the cake ring (or pan) with foil on the inside and coat it generously with flour (1-2 tablespoons) to prevent sticking. (Optionally grease with 1-2 tablespons of oil.) Set aside and preheat the oven to 350°F (175°C).
    • Separate Eggs. In two large mixing bowls, carefully separate the egg yolks from the egg whites. Ensure no yolk gets into the egg whites, as even a small amount can prevent proper whipping. If later the egg whites don't foam as expected, discard everything and start over.
    • Mix Egg Whites. Add a pinch of salt to the bowl with egg whites. Using a hand or stand mixer, start at the lowest speed for 10-20 seconds. Then, increase to the highest speed and beat for 3.5-5 minutes, or until the egg whites are stiff and hold their shape. Test by flipping the bowl upside down— the egg whites should remain in place.
    • Mix Egg Yolks. Add sugar to the bowl with egg yolks. Using a hand or stand mixer, start at the lowest speed for 10-20 seconds, then mix for 3.5- 5 minutes on the highest setting.
    • Add Chocolate and Walnuts. Add grated chocolate to the egg yolks and sugar mixture, and mix on the lowest setting for 1-2 minutes, or until fully combined. Then add the walnuts and mix on the lowest setting for another 1-2 minutes.
    • Combine with Egg Whites. Fold the whipped egg whites into the bowl with walnuts using a wooden spatula until fully integrated. Then, whisk in two tablespoons of flour until the batter has the consistency of a thick soup.
    • Bake. Pour the batter into the cake ring and place it in the oven. Bake at 350°F (175°C) for 15 minutes. Then, lower the temperature to 320°F (160°C), cover with foil, and bake for an additional 25-35 minutes. (You can cover the cake with foil even earlier, as soon as it starts to blush.)*
      Starting at about 30 minutes of total baking time, start checking for doneness by inserting a toothpick. If it comes out clean, the cake is done. If crumbs or stickiness remain, continue baking and test again every 5 minutes.
    • Cool. Take the cake out and let it cool down for about 30 minutes.
    • Remove Ring. Carefully remove the cake biscuit from the cake ring, and then remove the foil around it. Finally, place it on a clean, flat surface.

    Making the Filling (Parallel to Baking)

    • Separate Eggs. In two large bowls (one should be stainless steel or a medium-sized pot), carefully separate the egg yolks from the whites, placing the yolks in the stainless steel bowl or pot. (You'll work egg yolks over a water boiler later.)
    • Mix Egg Whites. Add a pinch of salt to the bowl with egg whites. Using a hand or stand mixer, start at the lowest speed for 10-20 seconds. Then, increase to the highest speed and beat for 3.5-5 minutes, or until the egg whites are stiff and hold their shape. Test by flipping the bowl upside down— the egg whites should remain in place.
    • Heat Water. Parallel to mixing egg whites, fill a smaller pot halfway with water and bring it to a rolling boil. Bring the temperature down to low, or medium low. (The pot should be large enough so that it snugly fit the stainless steel bowl or pot with egg yolks.)
    • Thermally Process Egg Yolks. On the work surface, add powdered sugar to the bowl or pot with the egg yolks and mix with a wooden spatula until well combined.
      Place the bowl or pot over the small pot of boiling water to create a double boiler. Using a hand mixer, start mixing the yolk mixture on low speed, gradually increasing to the highest setting within 10-20 seconds. Work carefully, to prevent spillage and burns.
      Continue mixing over the steam for 7-10 minutes, until the mixture turns pale yellow, and easily separates from the walls of the bowl/ pot. Remove from heat and let it cool on your working surface.*
    • Melt Chocolate. Parallel to the egg yolks cooling, melt the chocolate. Place the chocolate in a microwave-safe bowl and melt it in 20-30-second increments for approximately 1-3 minutes. After each 20-30 seconds, remove the bowl to check the chocolate and give it a whisk to check for doneness.
    • Add Butter. After the processed yolks have cooled for a few minutes, add room temperature (or softened) butter. Begin mixing with a hand mixer on the lowest speed, gradually increasing as the ingredients combine.
    • Add Chocolate. After about 1-2 minutes, slow the mixer down again and add the melted chocolate. Continue mixing for 1-2 more minutes until the mixture is smooth and fully combined.
    • Combine Everything. Gently fold the whipped egg whites into the mixture with a wooden spatula until all ingredients are combined.
    • Transfer to Fridge. Transfer the filling to the fridge. Let it stiffen for at least 1 hour, or until it achieves the consistency of cream cheese or slightly thicker.

    Combining Cake Biscuit and FIlling

    • Cut Cake Biscuit. Using a thin, large knife, slice the sponge cake lengthwise into three equal layers. This may take some practice. (A sharp knife, patience, and slow moves are your friends here.) Sprinkle each with rum.
    • Divide Filling. Remove the filling from the fridge and divide it into three equal parts, with one part being slightly larger.
    • Combine Cake and Filling. Place one cake layer on a flat surface.* Spread one part of the filling evenly over the top. Add the second cake layer and spread the second portion of filling on top. Place the third cake layer on top, then use the remaining largest part of the filling to cover the top and sides of the cake. Smooth the filling evenly over the sides with a spatula or knife.

    (Optional) Add Topping

    • (Choose and Add Toppings.) Our favorite topping is ground and chopped walnuts sprinkled all around and top of the cake. You can also add grated chocolate on top, or use chocolate syrup or candy to further decorate.

    Firming Up Cake

    • Transfer the cake to an airtight container, and then to the fridge for at least two hours to firm up, preferably overnight.

    Handling

    • Serving:  take the chocolate walnut cake out of the fridge 10-15 minutes before serving. For easier cutting warm the knife up by dipping it in hot water in between slicing. (We usually keep a pitcher of it nearby.)
      Serving size is up to you. We find that this size cake produces about 12-16 slices, depending on how thick the slices are cut. Walnut chocolate cake is a very rich, filling dessert. One decent slice will keep you satisfied for quite some time.
      Serve the cake itself, with Bosnian coffee, or alongside vanilla ice cream or berry fruit (blueberries, strawberries, etc.).
      Storing: store in an airtight cake container in the fridge for up to 3-5 days. Although the quality does deteriorate a little bit, it'll still be delicious.

    Video

    Notes

    • Thermally Processing Eggs
    We thermally process egg yolks for safety, thickening, and a stable, smooth texture. It's essential to mix the yolks until they turn pale yellow, which takes about 7-10 minutes, but be careful not to overdo it—if they curdle and become grainy, you'll need to start over with fresh yolks.
    • Combining Cake and Filling
    You can combine the cake with the filling on the fancy plate or a cake stand from the start. Also, be as free as you'd like in putting the cake together. We don't spend too much time making it stylistically perfect. However, if you are a baker, and have extra equipment, go ahead and put it together any way you'd like. 
    • Baking
    As always, you can adjust the temperature slightly, based on how hot/ cold your oven runs. 

    Nutrition

    Serving: 1of 14Calories: 679kcalCarbohydrates: 29gProtein: 17gFat: 56g
    Tried this recipe?Let us know how it was!

    More Recipe 💙

    • ajvar, chutney, pepper chutney, eggplant chutney, balkan spread, balkan dip ajvar, red pepper and eggplant dip, pepper dip | balkanlunchbox.com
      Ajvar
    • Quarter of a burek pie on a plate on gray background.
      Burek
    • Shopska Salad
    • Sour cabbage head on a blue plate, a pitcher of kraut juice and a white plate with sauerkraut leaves on it, on a marble background.
      Fermented Cabbage Heads (Homemade Sauerkraut Heads, Kiseli Kupus) [Balkan Recipe, Three Ingredients]

    • « Go to Previous Page
    • Page 1
    • Interim pages omitted …
    • Page 10
    • Page 11
    • Page 12
    • Page 13
    • Page 14
    • Interim pages omitted …
    • Page 16
    • Go to Next Page »

    Primary Sidebar

    Aida and Aleksandra of Balkan Lunch Box, standing together.

    Welcome! I'm Aida, creator of Balkan Lunch Box, food blog about traditional and contemporary Balkan cuisine. My sister Aleksandra helps me.

    Learn more about me →

    As seen on

    Popular

    • Three biscuits on a gray background, one being halved with a fork.
      Čupavci: Balkan Lamingtons [One Hour]
    • Closeup of four wafers.
      Balkan No Bake Wafer Cake (Oblatne, Oblande)
    • Old Fashioned Goulash with Beef and Mushrooms
    • Stewed apple in a clear bowl, on the table.
      Stewed Stuffed Apples in Syrup (Tufahije)
    • Soup in a silver bowl with a lid, a kitchen cloth, two slices of bread, a lemon wedge and a spoon.
      Okra Soup: Creamy Chicken Soup with Okra (Bosnian Bey's Soup, Begova Čorba)
    • ajvar, chutney, pepper chutney, eggplant chutney, balkan spread, balkan dip ajvar, red pepper and eggplant dip, pepper dip | balkanlunchbox.com
      Ajvar
    • Moussaka in a pan.
      EASY Serbian Ground Beef Potato Moussaka Casserole
    • Closeup of a stuffed pepper.
      Best Classic Baked Stuffed Peppers with Ground Beef and Rice (Punjene Paprike)
    • Quarter of a burek pie on a plate on gray background.
      Burek
    • Rice and chicken in a sheet pan, overhead.
      Easy Baked Chicken Over Rice Casserole (Chicken Thighs and Drumsticks) [4 Ingredients, 1 Pan]

    Favorite Salads

    • Russian Salad or Salad Olivier
    • Bowl with carrots and apple, and carrot and apple and a spoon on a table.
      Grated Apple and Carrot Salad [Two Ingredients, Ten Minutes]
    • A bowl of carrot and beet salad, a beet, carrots and fork on the side.
      Grated Beet and Carrot Salad [Five Ingredients, Ten Minutes]

    Latest & Greatest

    • A ladle holding bean soup above the blue bowl, on an orange background.
      High Protein Balkan Bean Soup (Visokoproteinski Grah/ Visokoproteinski Pasulj)
    • A glass bowl full of stuffed peppers.
      21+ Pepper Recipes
    • A hand holdling a fork with scallion salad above a black bowl filled with salad on an orange background.
      Scallion Salad with Sour Cream (Lukmira) [2 Ingredients, 5 minutes]
    • Four photographs of different stews in one pin.
      14+ Best Stew Recipes


    Footer

    ↑ back to top

    About

    • Privacy Policy
    • Accessibility Statement

    Newsletter

    • Sign Up! for emails and updates

    Contact

    • Contact

    Copyright © 2014 - 2025 Balkan Lunch Box

    Rate This Recipe

    Your vote:


    A rating is required
    A name is required
    An email is required