• Skip to primary navigation
  • Skip to main content
  • Skip to primary sidebar
  • Balkan Recipes
  • About BLB
  • Nav Social Menu

    • Facebook
    • Instagram
    • Pinterest
    • RSS
menu icon
go to homepage
subscribe
search icon
Homepage link
  • Recipe Index
  • About
    • Facebook
    • Instagram
    • Pinterest
    • RSS
    • YouTube
  • ×
    Balkan Lunch Box > Blog

    Bosnian Milk Pasta (Omač)

    Aug 22, 2016 · 8 Comments

    Milk pasta on a plate on a pink background, overhead photo.

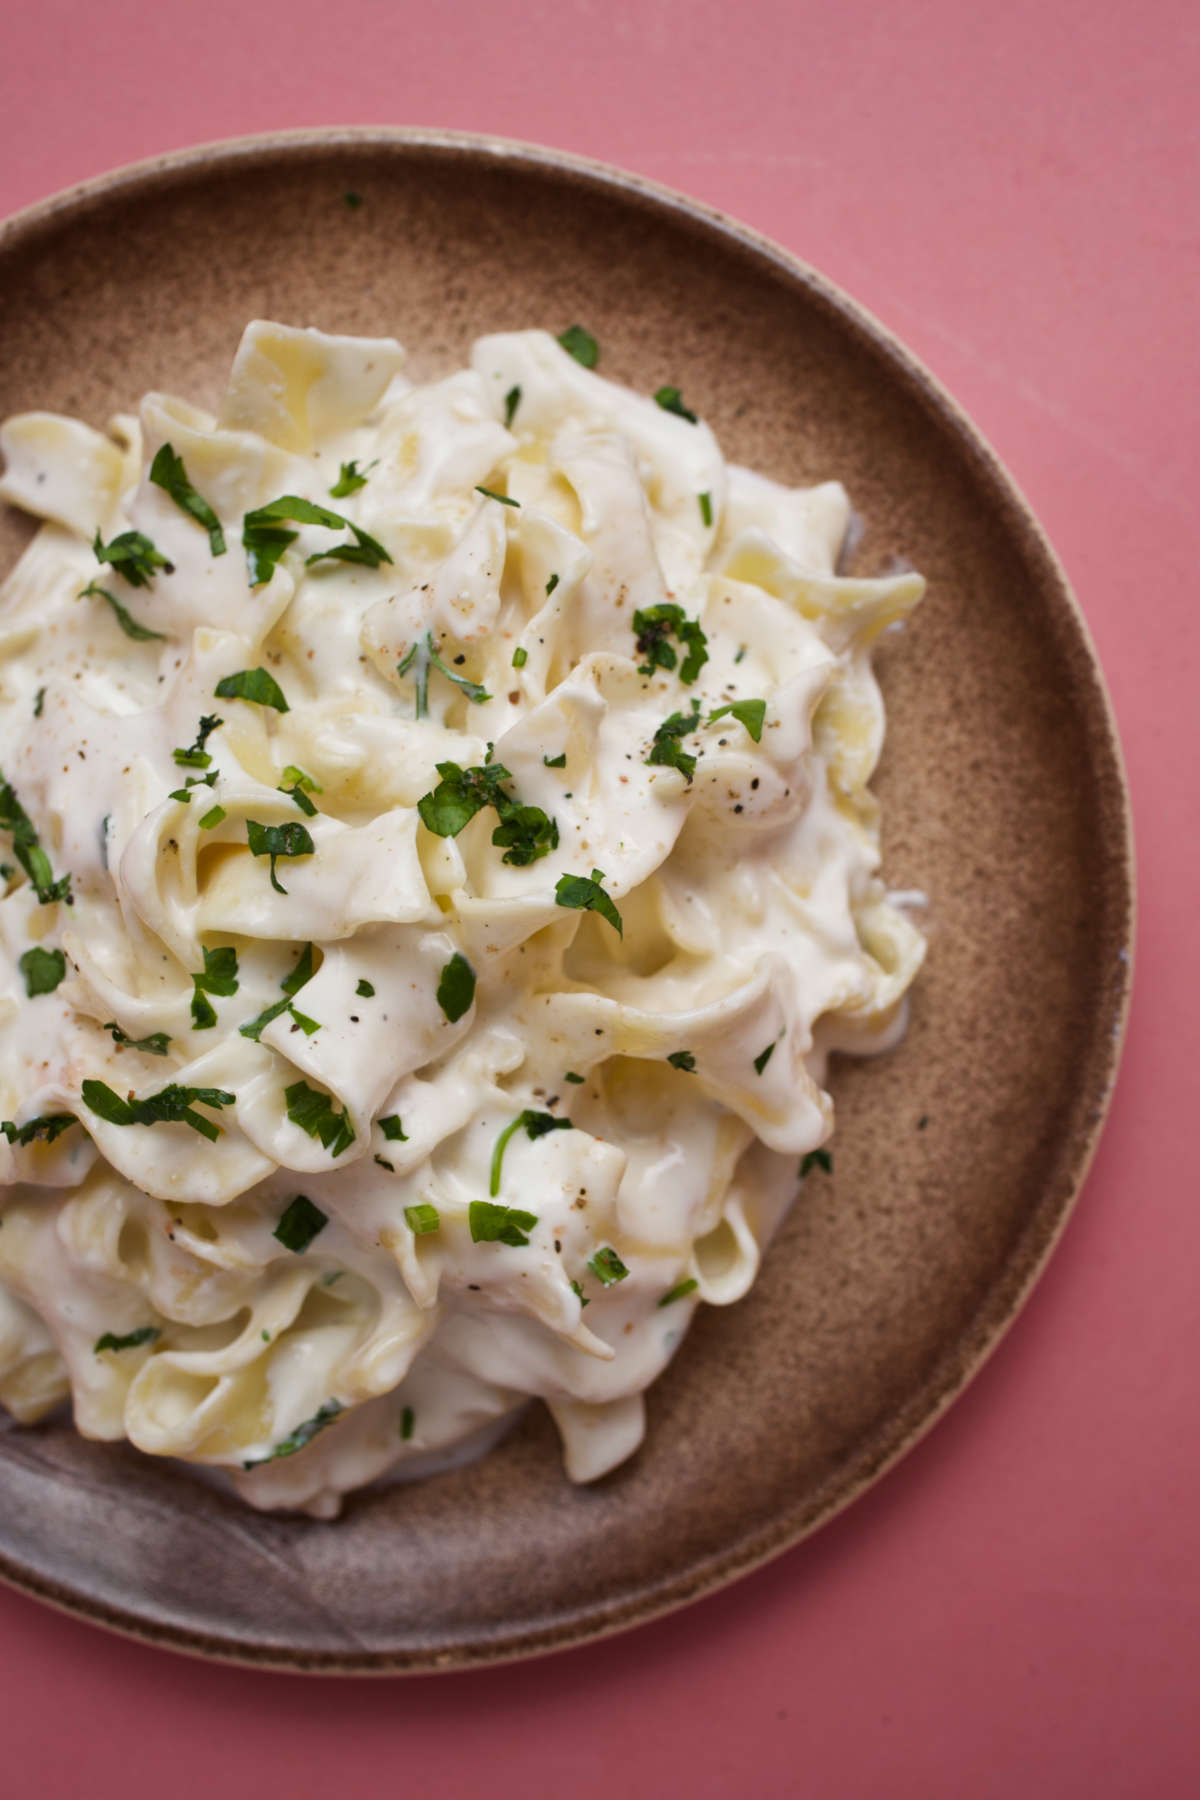
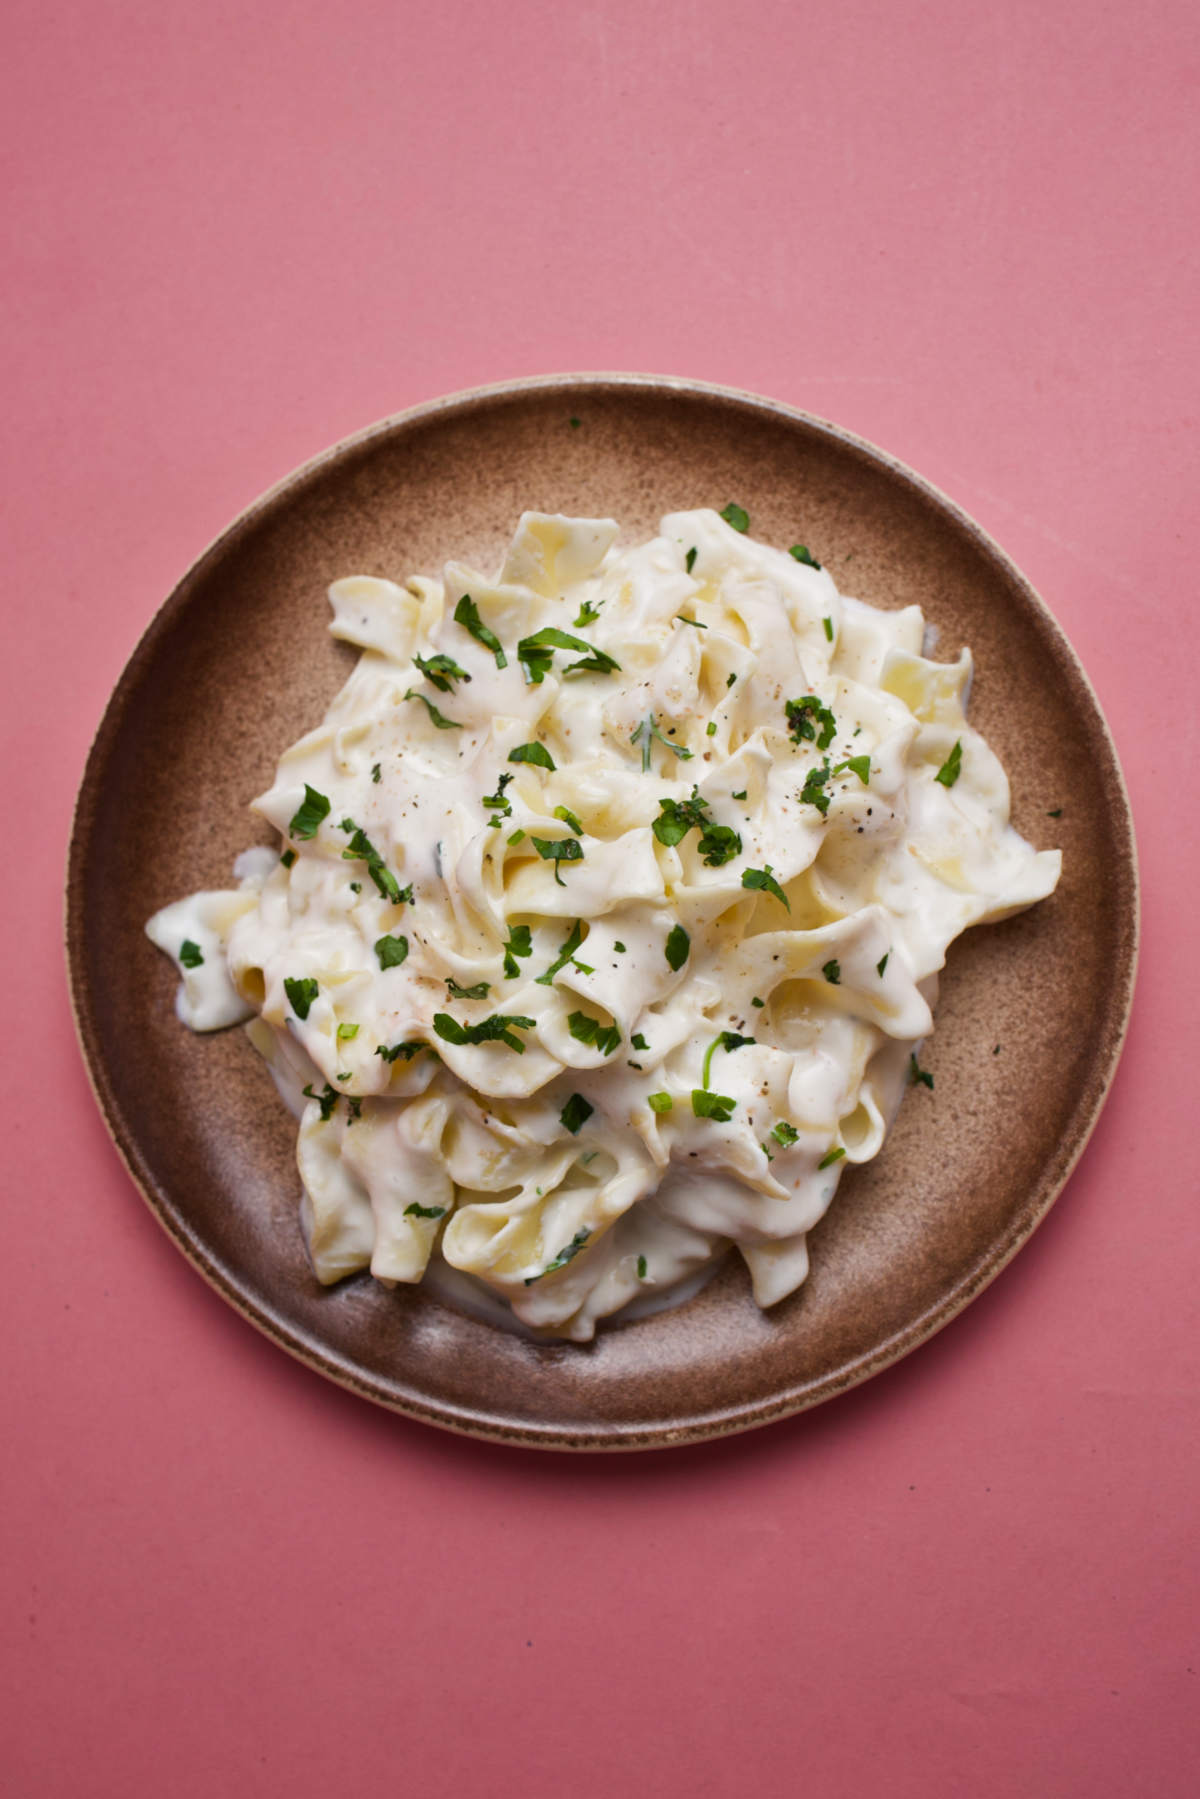
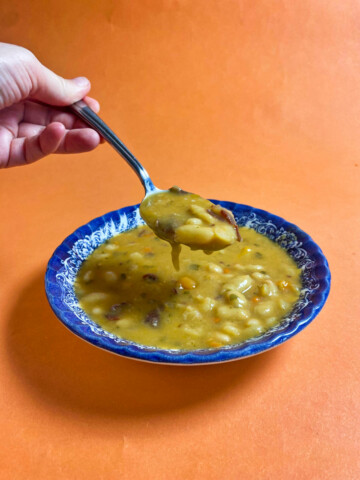
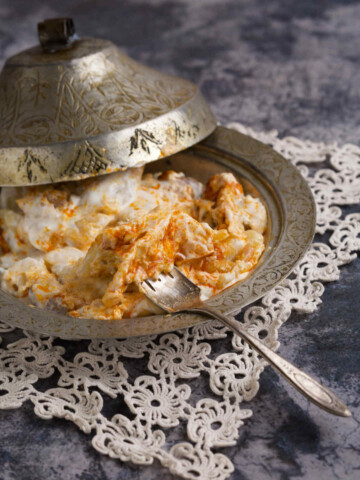
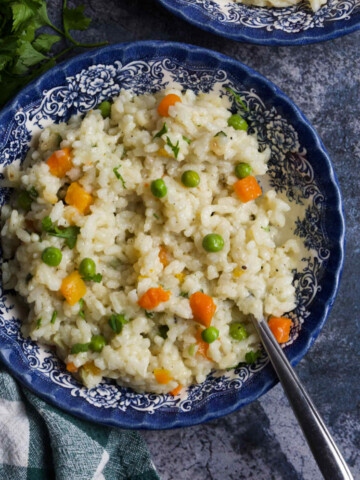
    Milk pasta with cheese (brzi omač) is a luxurious 5-ingredient pasta dish. (No heavy cream or flour are needed to make this ultra-creamy dinner!) It dials up the meaning of comfort food to the max. Shall we?

    Overhead photo of milk pasta on a plate on a pink background. .
    [feast_advanced_jump_to]

    Background

    Milk pasta - also known as omač - is a traditional dish from Bosanska Krajina, a region in western Bosnia. It's believed that omač originated in villages nestled around the Kozara and Grmeč mountains.

    Traditionally, omač involved cooking homemade pasta in milk. After cooking, it was topped with local cheeses, particularly kajmak (a rich, creamy Balkan clotted cheese).

    Today's version is a modern, quicker milk pasta dish we named brzi omač (fast omač). You'll only need some thicker pasta like fettuccine, in addition to milk, butter, feta, and sour cream.

    The combination of milk and thick pasta gives omač a soft, rich, full-bodied taste that's hard to forget. It's possible you'll always cook pasta this way from this recipe forward.

    Why You'll Love Bosnian Milk Pasta (Omač)

    • Minimal Ingredients. Only 5 ingredients for this creamy nostalgic magic.
    • No flour. No heavy cream. Just milk, cheese, and sour cream for this pasta dish.
    • Versatile. Pure perfection as a main course or a side dish.
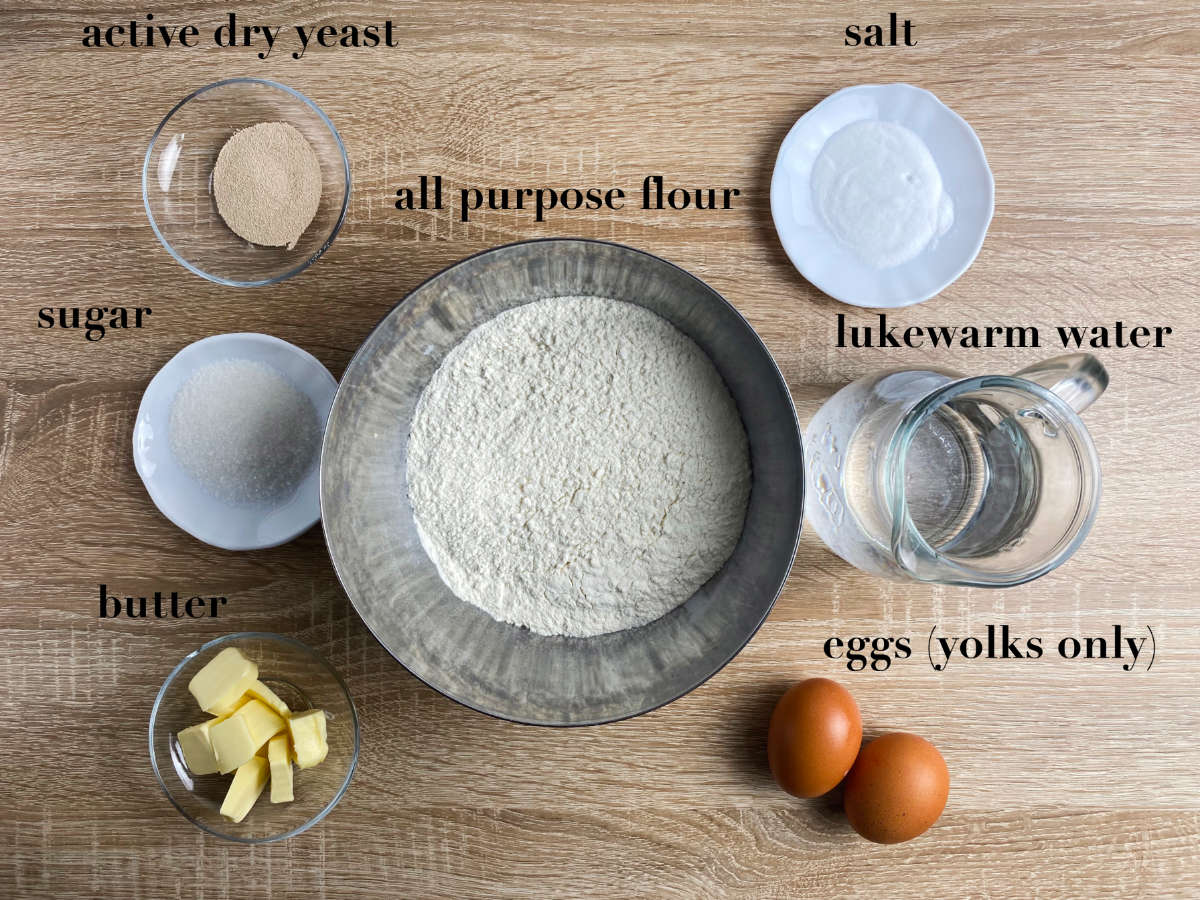
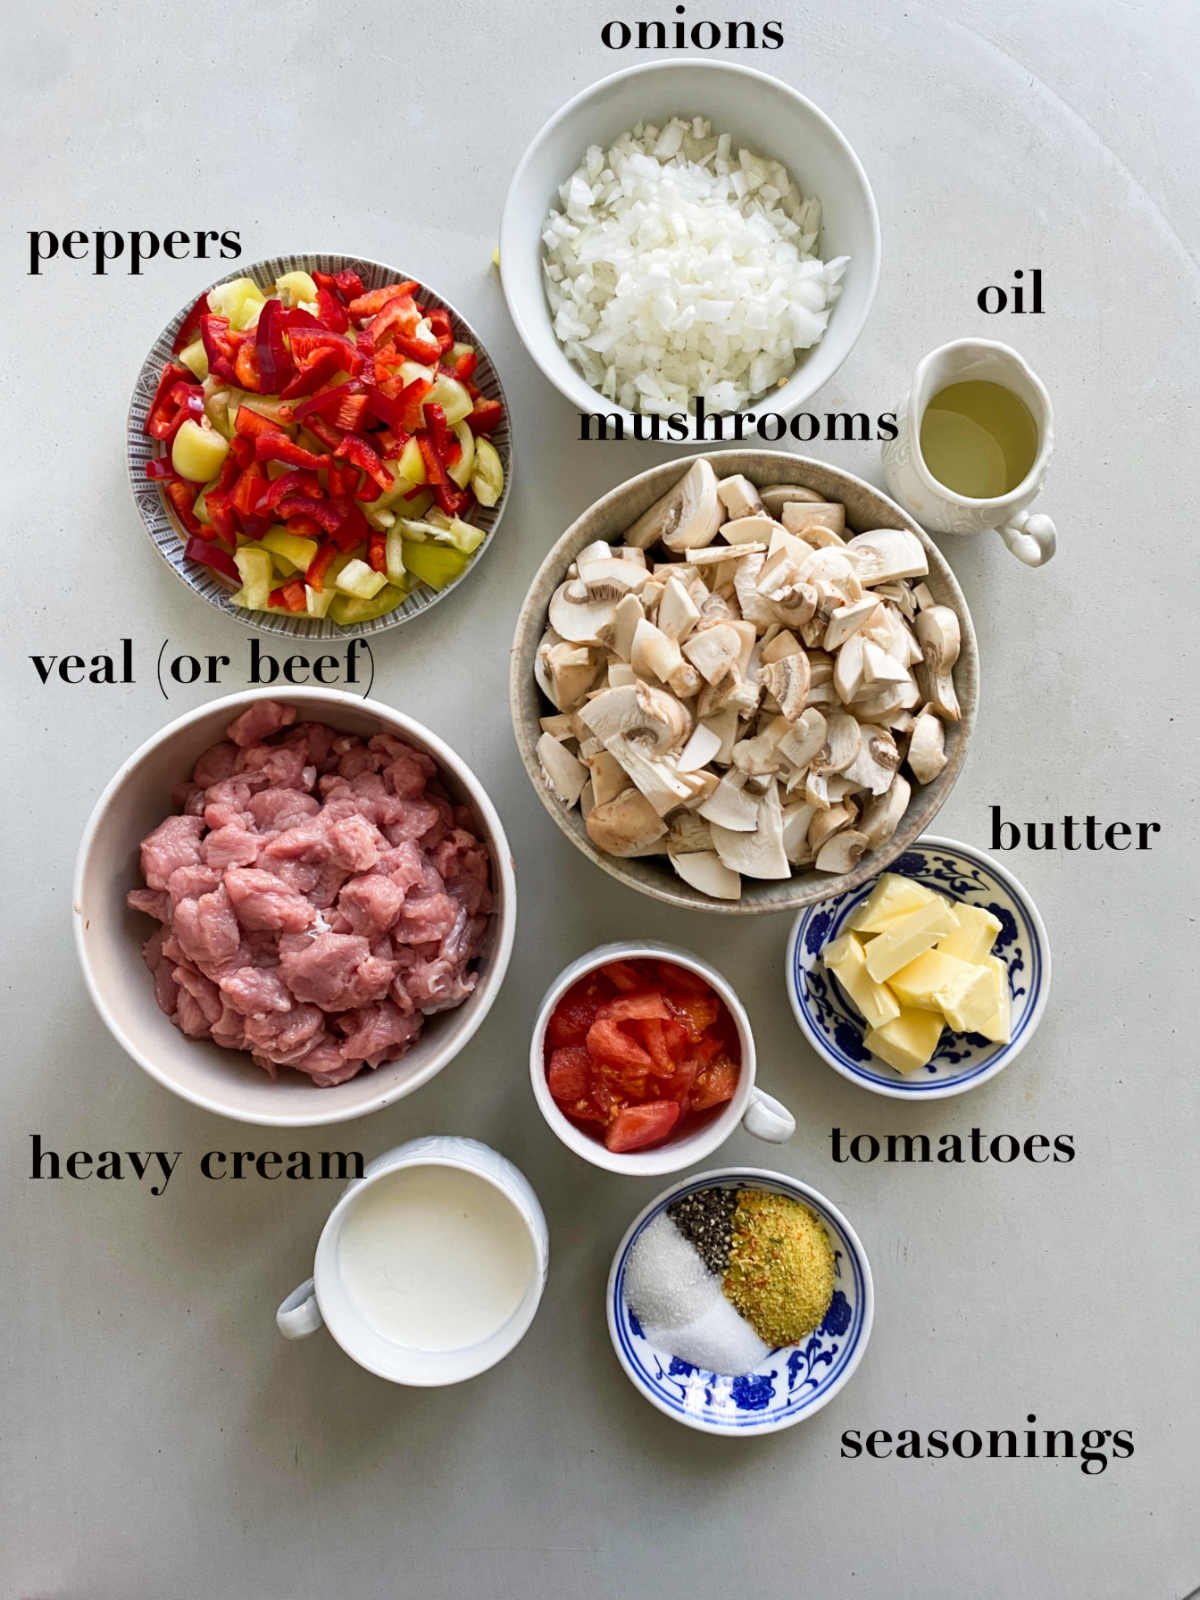
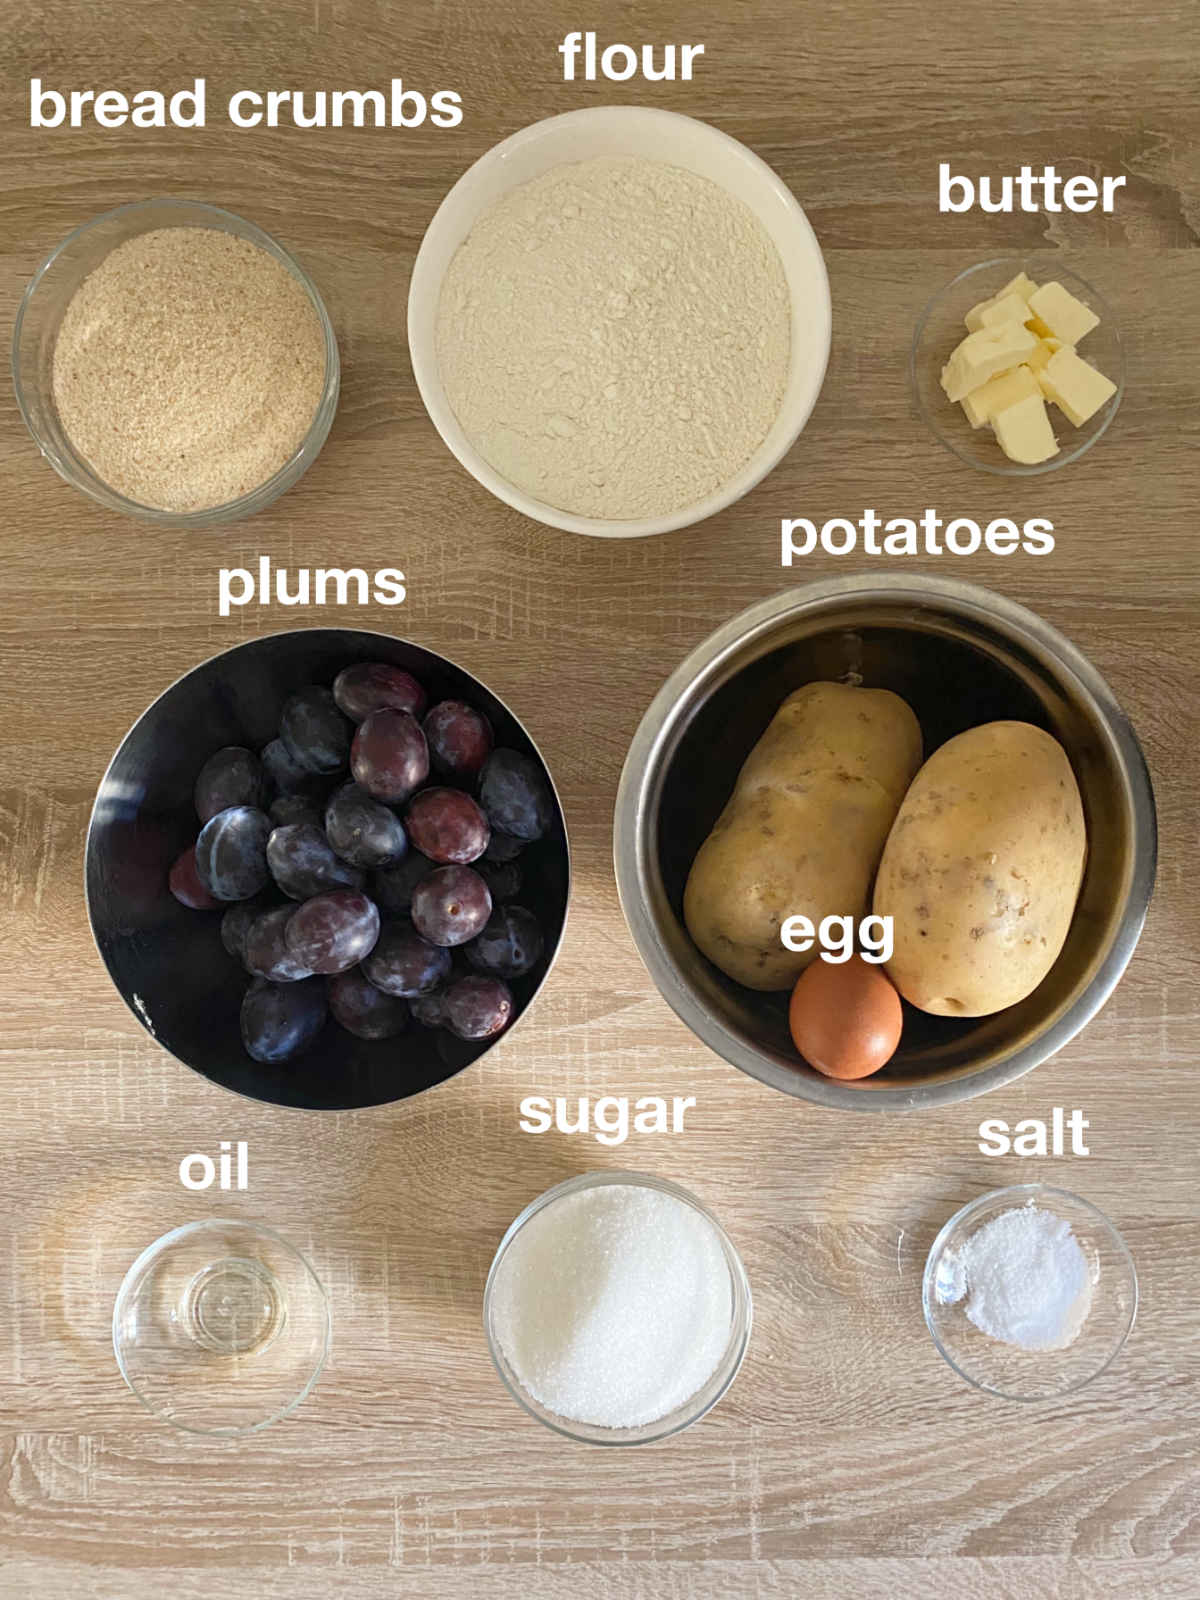
    Ingredients

    Gather these ingredients to prepare milk pasta (brzi omač):

    Overhead photograph of ingredients for the dish: pasta, milk, seasonings, butter, cheese and sour cream.

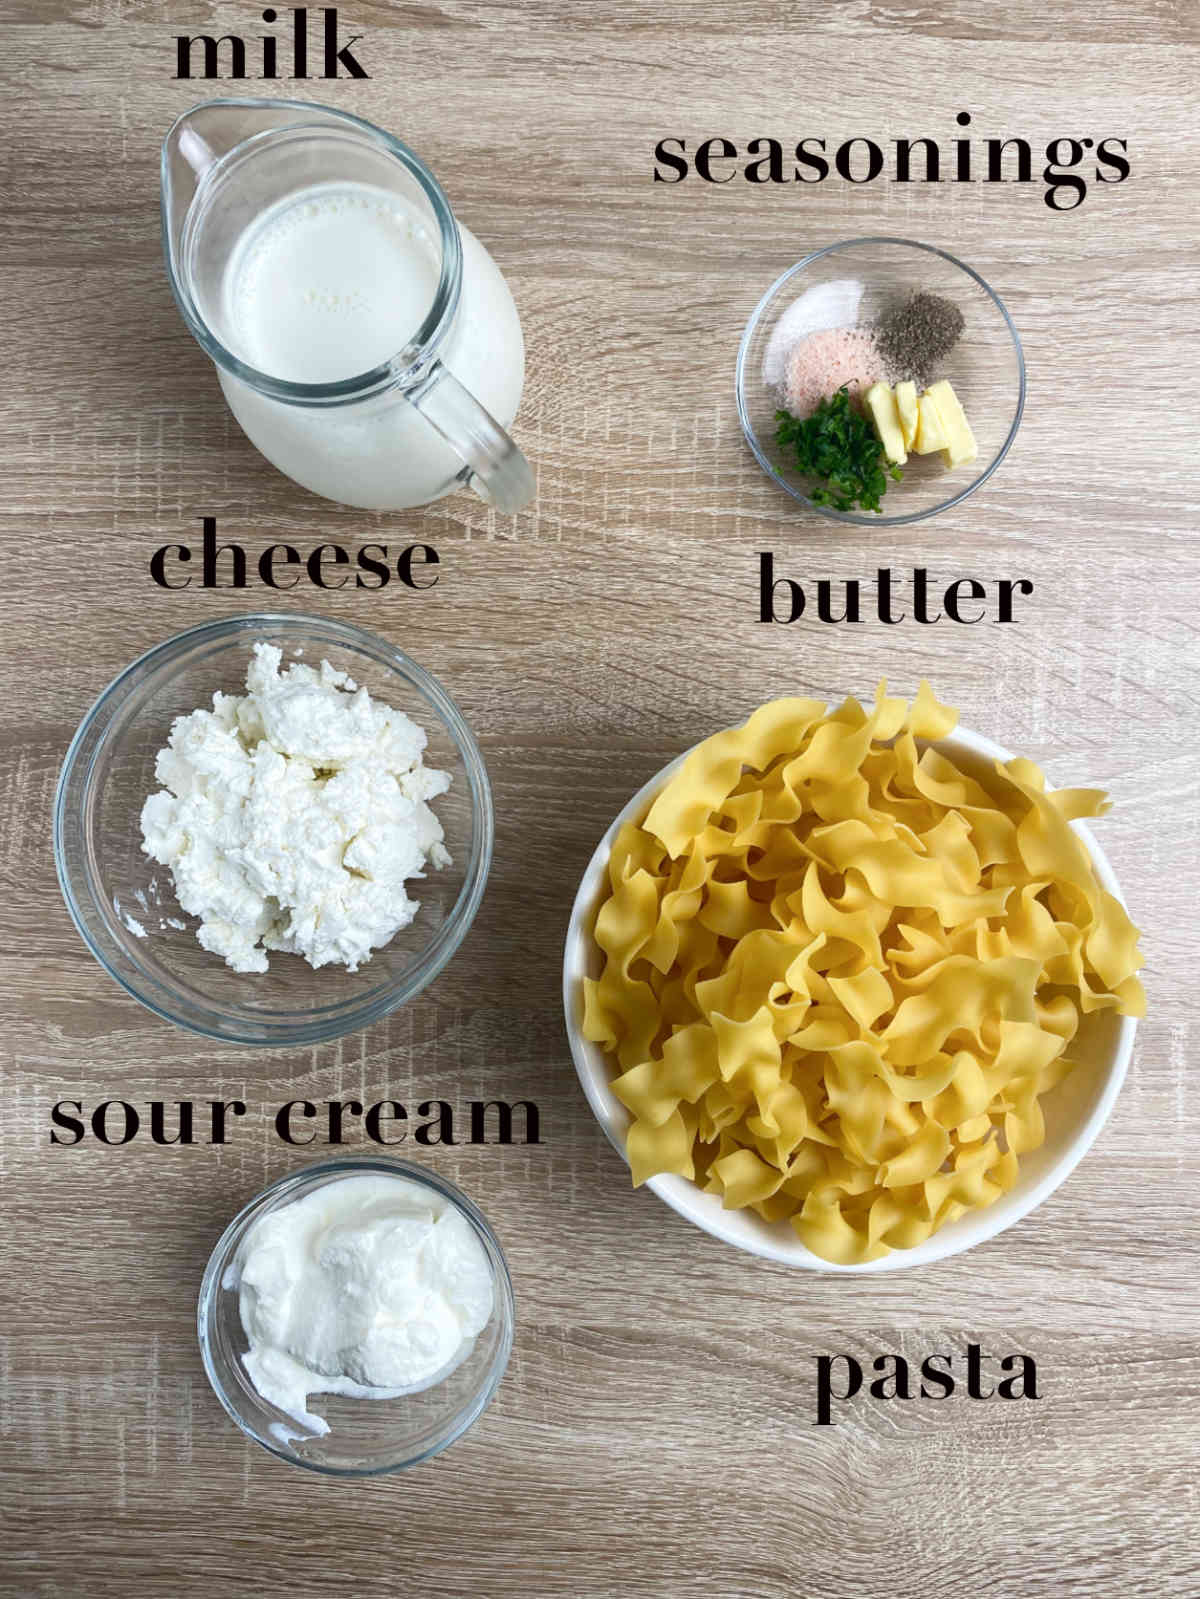
    Pasta. Look for thicker pasta like fettuccine, tagliatelle, pappardelle. Alternatively, crumble up a few lasagna sheets.

    Butter. Or ghee. Or lard. Avoid margarine, and oil(s).

    Milk. Regular cow, sheep, or goat milk will do. (If you used an alternative milk - or an alternative to milk - please let us know in the comments!)

    Feta. Or a similar, thick cheese. Locally, a type of cheese from the town of Travnik, near the Vlašić mountain is used.

    Sour Cream. Regular or low fat.

    Herbs and seasonings. Salt, pepper, parsley.

    (Optional) Kajmak. If you can find it, the Balkan clotted cheese takes the milk pasta taste to the next level without the need for any additional dairy.

    Instructions

    Let's get cooking! Here's how to make omač:

    Four photos, two by two, of pasta in milk being cooked.

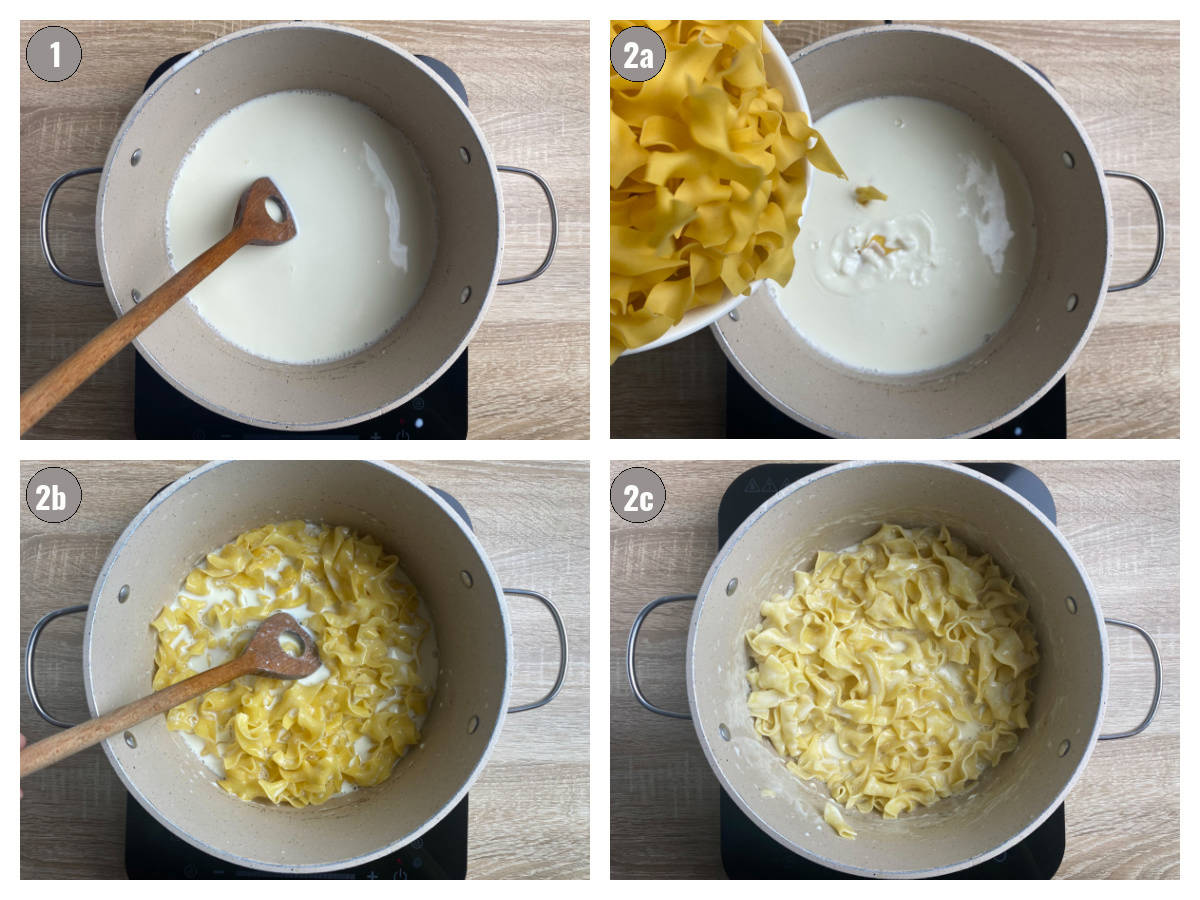
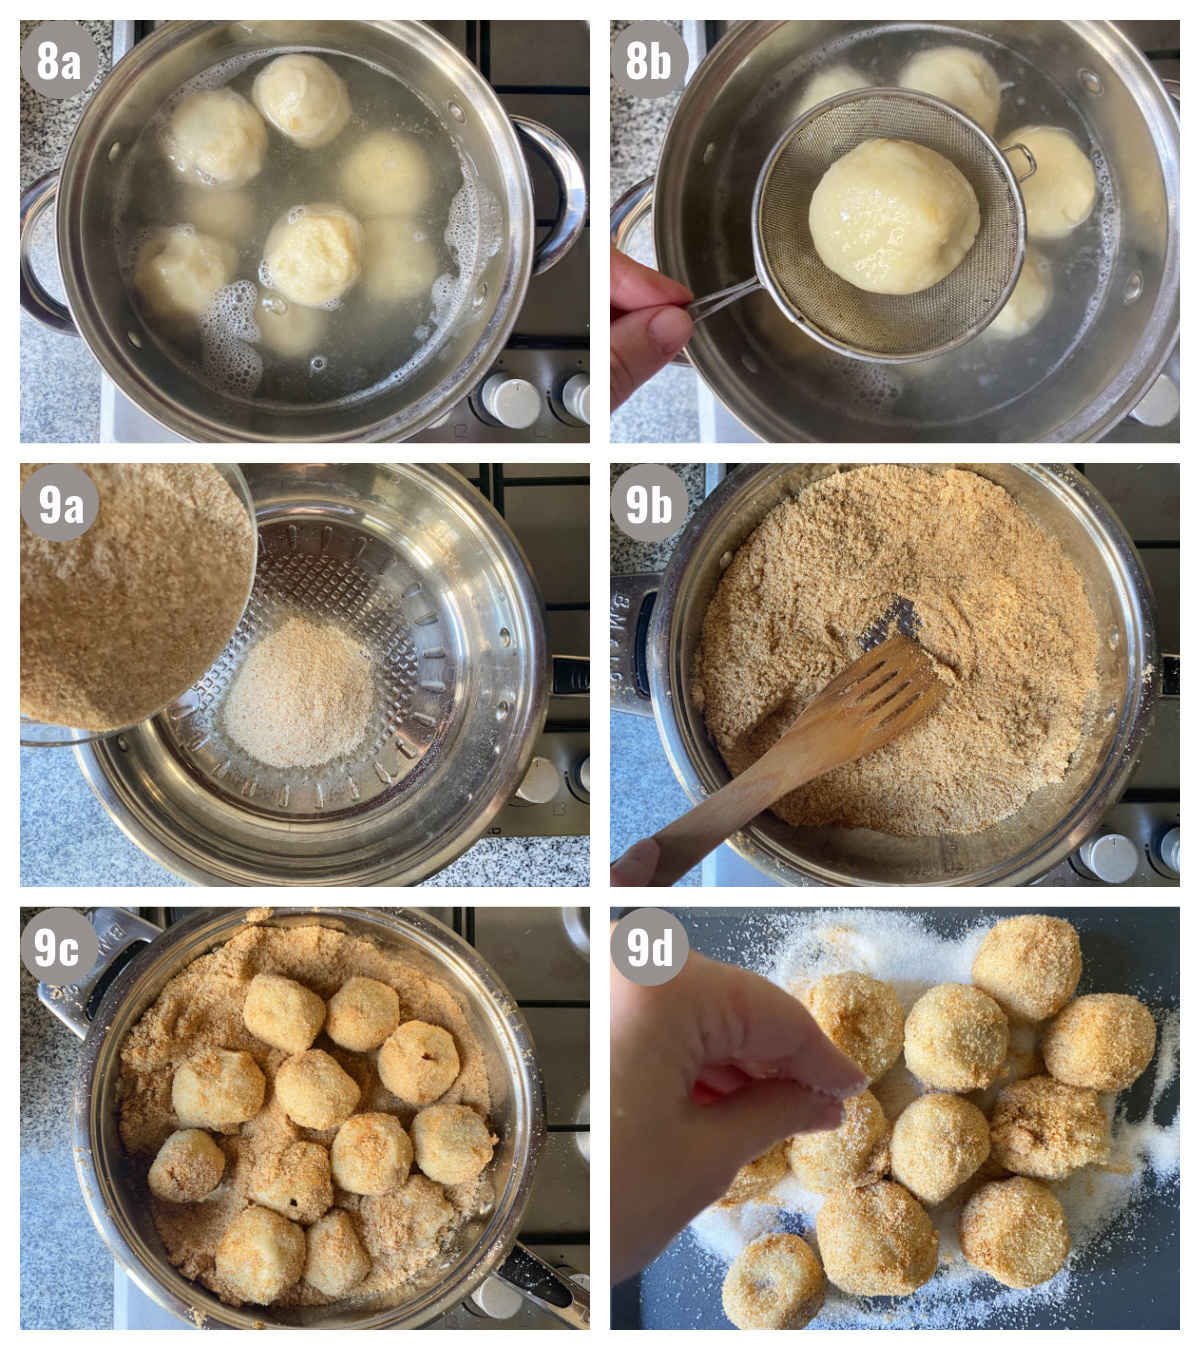
    Step 1. Heat the Milk. In a large pot, heat the milk on low until it reaches a gentle simmer. Stir frequently to prevent scorching. It will take several minutes.

    Step 2. Cook the Pasta. Add pasta to the milk. Stir often, and simmer gently. Pasta will take longer to cook than it usually would, perhaps even twice as long. Pay attention to the pasta texture rather than the exact time. It should be soft but not mushy.

    Four photographs in one, two by two, of pasta cooked in milk.

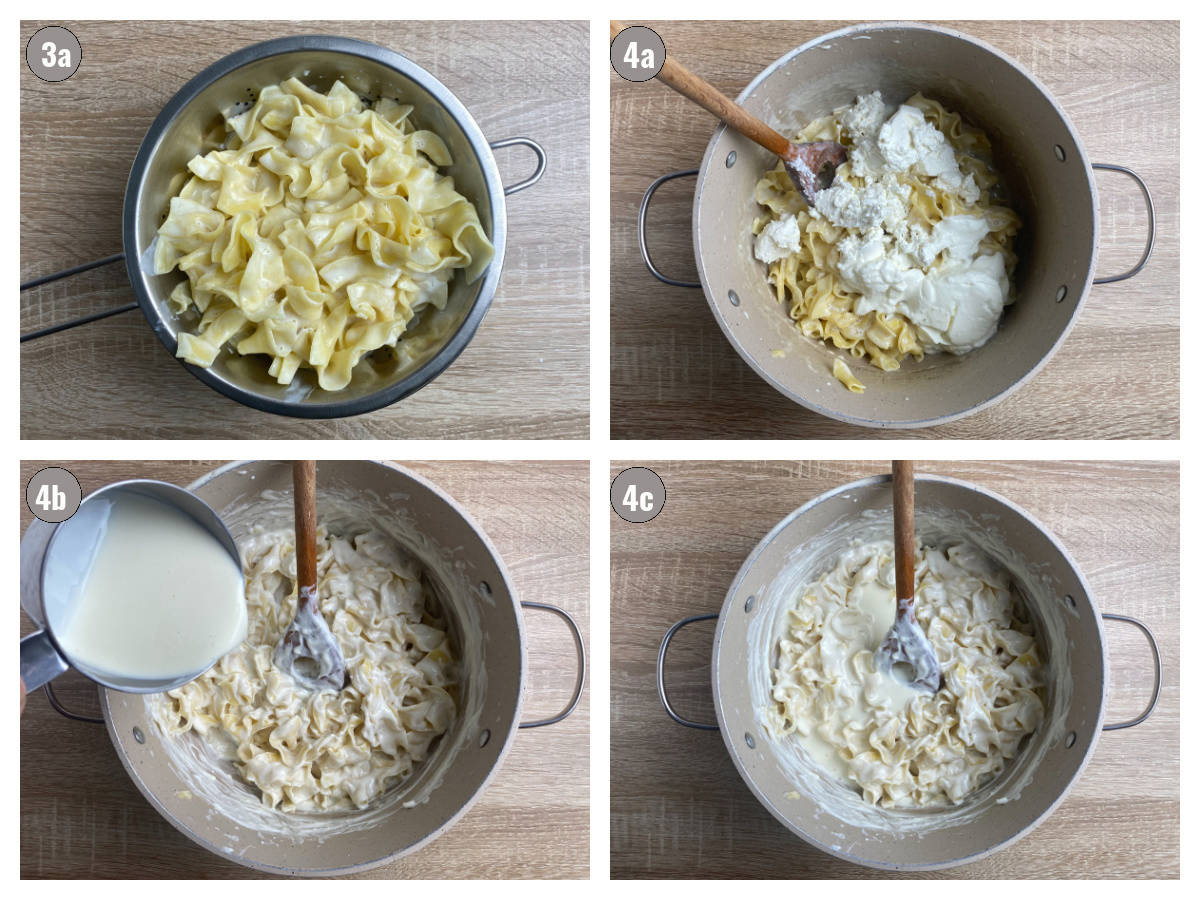
    Step 3. Drain the Pasta. Drain pasta, but save 1-2 cups of milk to adjust creaminess later.

    Step 4. Add Dairy. Stir in butter, letting it melt into the milk pasta. Follow with feta and sour cream. Finally, add the milk you saved. Stir well to combine all the ingredients. You can adjust creaminess by controlling the amount of milk you add. Alternatively, you can add a little bit of warm water to thin the sauce out, if it's too thick.

    Two phtoographs, side by side of a pot filled with pasta.

    Step 5. Add Herbs and Seasonings. Add salt, pepper and parsley. Mix and serve.

    Variations

    Here are some variations to make your creamy milk pasta even more interesting.

    Milk pasta on a plate on a pink background, overhead photo.
    • Cheese. Play around with cheeses to see what you like best. Ricotta, goat cheese, or Parm (go easy), are all good feta alternatives.
    • Pasta. As long as you use a thick kind of pasta, the sky is the limit. We sometimes crumble in lasagna sheets.
    • Veggies. Vegetables are a great spin on this dish. Add some kale, spinach, swiss chard, or minced broccoli. (Stick to one veggie!)
    • Meat. Smoked meat like beef, pancetta, sausage, bacon, or turkey bacon adds a deeper protein profile to this amazing pasta cooked in milk.

    Handling

    How to serve, store and reheat milk pasta (omač):

    • Serving. Enjoy hot. Top with more cheese or sour cream. Pair it with fresh homemade bread, and a salad. Alternatively, serve with a side of protein like breaded chicken or ground beef rissoles.
    • Storing. This dish is tastiest when it's fresh. Make it close to when you plan to eat it. Keep at room temperature for a few hours. Refrigerate it for up to a day.
    • Reheating. Reheat gently on the stovetop adding a dash of milk. Stir well, and add more cheese before serving.
    • Freezing. Skip. Milk pasta doesn't freeze well.

    Expert Tips

    1. Stir frequently to prevent milk from burning.
    2. Cook pasta till just right - soft but not mushy.
    3. Balance salt and cheese for the perfect savory taste.
    4. If adding more ingredients, add them gradually.

    Recipe FAQ

    Can you make pasta in milk?

    Absolutely! Cook it on a light simmer, and stir often to avoid milk burning.

    You can either cook pasta in milk, or add milk to cooked pasta together. Then top with cheese.

    Does milk make pasta creamy?

    Yes! As pasta cooks in milk, it releases starch. This starch mixes with slow simmered milk creating a thick, creamier milk.

    After draining, some of this milk is returned to pasta together with a selection of cheeses and sour cream. The end result is the creamiest pasta you've had in a while!

    Do you put salt in the milk while cooking pasta in it?

    No. This is to prevent adding too much salt to the dish.

    After cooking in milk, pasta is combined with cheese and sour cream. This is the best time to adjust the saltiness of the dish.

    What to eat with milk pasta (omač)?

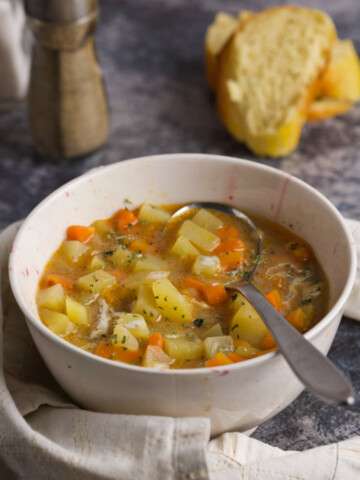
    Pasta cooked with milk (omač) goes great with a side salad, a few slices of fresh bread, or a side of protein like cutlets or schnitzels.

    Can I cook pasta in water and add milk later?

    Yes.

    Our earlier omač recipe followed a similar method. Many readers liked it. To do this cook pasta in water, and after draining, add cheese, sour cream, and about 2-3 cups of warm milk. Mix well and serve.

    We upgraded the recipe as it's even tastier when pasta cooks in milk.

    Can I cook pasta in milk and add water later?

    Yes.

    Adjust the volume of liquid to your liking. If after mixing all the ingredients, your pasta sauce is too creamy or too thick, add some warm water and mix.

    Keep adding water a little at a time, and mixing until you get your desired thickness (1-2 cups tops).

    More Pasta Dishes to Enjoy

    Milk pasta (omač) is only one of a few pasta dishes you'll enjoy on the blog!

    • Meat and Pasta Casserole - Balkan style Johnny Marzetti!
    • Pasta with Veggies in White Sauce - Simple Yum!
    • Creamy Chicken and Edam, with Frozen Veggies - Fast and Delicious!
    • No-Boil Lasagna - Two Sauces (Bechamel & Bolognese)!

    Thoughts?

    If you made milk pasta with cheese (brzi omač) and liked it, please consider giving it a ⭐️⭐️⭐️⭐️⭐️ (5-star) rating. This helps others find the recipe more easily!

    Also, feel free to leave a comment (I read each one!), and don't forget to tag a photo #balkanlunchbox, or us @balkanlunchbox, on IG.

    Prijatno and bon appetit!

    Milk pasta on a plate on a pink background, overhead photo.

    Milk Pasta with Cheese (Omač)

    Aida
    Luxurious and creamy pasta cooked in milk, then topped with cheese.
    5 from 2 votes
    Print Recipe Pin Recipe
    Prep Time 5 minutes mins
    Cook Time 45 minutes mins
    Total Time 50 minutes mins
    Course Main Course
    Cuisine Bosnian
    Servings 3 -4 people
    Calories 808 kcal

    Ingredients


    • 5 cups milk or slightly more
    • 8 ounces thick dry pasta tagliatelle, fettuccine, pappardelle, or crumbled lasagna sheets
    • 1 cup feta cheese crumbled; or a similar cheese
    • 1 cup sour cream or slightly less
    • 1 tablespoon butter
    • salt and pepper to taste
    • 3-4 tablespoons fresh parsley minced; or 1 tablespoon dry parsley
    • (Optionally) 1 cup (250grams) kajmak, or Balkan clotted cheese

    Instructions
     

    • Heat the Milk. In a large pot, heat the milk on low until it reaches a gentle simmer. Stir frequently to prevent scorching. (This may take up to 15-20 minutes.)
    • Cook the Pasta. Add pasta to the milk. Stir often, and simmer gently. Pasta will take longer to cook than it usually would, perhaps even twice as long or longer. (Ours took 30 minutes.)
      Pay attention to the pasta texture rather than the exact time. It should be soft but not mushy. Stir pasta even more frequently as time progresses. Pasta will release the starch into the milk and drink up some of the milk. The remaining milk will thicken. Stirring it often prevents burning.
    • Drain the Pasta. Drain pasta, but save 1-2 cups of milk to adjust creaminess later.
    • Add Dairy. Stir in butter, feta, and sour cream letting them melt into the milk. Finally, add the milk you saved. Stir well to combine all the ingredients.
      Adjust creaminess by controlling the amount of milk you add. Alternatively, you can add a little bit of warm water to thin the sauce out, if it's too thick.
    • Add Herbs and Seasonings. Add salt, pepper and parsley. Mix one more time and serve.
    • Serve hot. This dish is tastiest when it's fresh. Make it close to when you plan to eat it. Top with more cheese or sour cream. Pair it with fresh homemade bread, and a salad. Alternatively, serve with a side of protein like breaded chicken or ground beef rissoles.
      Store at room temperature for a few hours. Refrigerate it for up to a day.
      Reheat gently on the stovetop adding a dash of warm milk or water. Stir well, and add more cheese before serving.
      Don't freeze.

    Video

    Notes

    • Nutritional and Serving Information
    Serving size will depend on whether you make milk pasta your main course (3 servings), or a side dish (4 servings). Nutritional information is a rough estimate using 3 servings. 

    Nutrition

    Serving: 1of 3Calories: 808kcalCarbohydrates: 68gProtein: 24gFat: 44gSaturated Fat: 25gCholesterol: 120mgSodium: 1000mgPotassium: 470mgFiber: 2.5gSugar: 10g
    Tried this recipe?Let us know how it was!

    Recipes to ❤️

    • Coffee pot pouring coffee into a small cup on a silver tray.
      How to Make Bosnian Coffee (Bosanska Kafa, Kahva, Kava)
    • ajvar, chutney, pepper chutney, eggplant chutney, balkan spread, balkan dip ajvar, red pepper and eggplant dip, pepper dip | balkanlunchbox.com
      Ajvar
    • A bowl with potato and carrot soup, a spoon, bread, salt and pepper on a gray background.
      Simple Potato Soup Recipe [Stovetop, Few Ingredients]
    • Quarter of a burek pie on a plate on gray background.
      Burek


    Tepsijaš - Bosnian Homemade Pan Bread

    Aug 17, 2016 · 43 Comments

    Bread on a blue background.

    Tepsijaš is a classic Bosnian homemade bread inspired by old-fashioned bakery loaves baked in a pan (tepsija). With its golden crust and irresistible softness, it's a flavorful staple that pairs perfectly with any meal. Shall we?

    Bread on a blue background.
    [feast_advanced_jump_to]

    Background

    We've made a few baked goods before, like the traditional pogacha, and uštipci. However, today's homemade bread is the go-to loaf for families across the region.

    Tepsijaš, loosely translated as 'pan bread,' is a Bosnian staple served with almost every meal. You'll recognize it by its round shape, usually a result of the pan it's baked in, though that's not always the case.

    Traditionally, tepsijaš was baked in wood-fired ovens, in bakeries and homes alike.

    Now, with bakeries on almost every corner, most people don't make bread at home. But when they do, they make tepsijaš using a version of today's recipe.

    Why This Recipe Works

    • Simple Ingredients. No fancy stuff are needed for tepsijaš! Just pantry staples you have (and can actually pronounce!): flour, water, yeast, salt, sugar, egg yolk.
    • Beginning-Friendly, Expert-Approved. Whether it’s your first loaf or your hundredth, tepsijaš turns out great every time. Best of all? Amazing taste!
    • Soft and Wholesome. Unlike the rock-hard crusts you can chip a tooth on, tepsijaš is the kind of bread you can pinch, and it will come back up right away.

    Ingredients

    Follow these steps to get the most perfect tepsijaš (Bosnian homemade bread ever)!

    Overhead photo of ingredients for bread on a table: yeast, flour, salt, water, eggs, sugar and butter.
    • Yeast. Active dry yeast. Avoid: instant yeast as it tends to produce hard dough that doesn't rise as well.
    • Sugar. Any type works.
    • Flour. All-purpose white flour. Substitute one-third with integral or wheat flour.
    • Salt. Any type.
    • Water. Tap or bottled, but lukewarm. Avoid mineral or soda water.
    • Egg yolk. Or two.
    • (Optional) Butter. Real butter. Substitute with oil or ghee. Avoid margarine.

    Instructions

    Here are simple directions for Bosnian homemade pan bread, tepsijaš.

    Four photographs, two by two of bread being kneaded and prepared.

    Step 1. Combine yeast and sugar with a few tablespoons of warm, and let it activate (10-15 minutes or until the mixture bubbles up).
    Step 2. In a large bowl, combine flour, yeast mixture, salt, and (if using) butter. Start adding water and knead the ingredients together. Knead for a few minutes until you have a cohesive, elastic dough that's slightly sticky.

    Four photos, two by two, of bread being made.


    Step 3. Cover the bowl with a kitchen towel. Let the dough rise in a warm spot for 1 to 2 hours, or until it doubles in size.
    Step 4. (Not pictured) Punch the dough, then knead it for an additional 4-5 minutes, shaping it into a ball again. You can do this directly in the bowl, or transfer to a working space. (Dust lightly with flour to avoid sticking.)
    Step 5. Transfer the dough ball to an oiled pan. Let it rise again for about 45-60 minutes. At the very end heat oven to 475°F (245°C).
    Step 6. Brush the bread with the egg yolk on all sides.

    Four photographs, two by two, of baked bread.

    Step 7. (Not pictured) Lower temperature to 400°F (200 °C) and place the pan inside. Bake tepsijaš for 35-45 minutes. Lower the temperature or cover with foil if needed. Turn the pan 180° once during the baking.
    Step 8. Soak a clean kitchen towel in cold water, and wring it out well. ((Optional) Smear the butter generously on all the bread's sides.)Transfer hot bread onto the towel, wrap it up, and place it in a plastic bag. Leave for 20 minutes, then serve.

    Variations

    Here are a few ideas to take your tepsijaš to the next level!

    • Whole wheat. Swap half of the all-purpose white flour with whole wheat. You'll get a denser loaf. Bonus? Add a handful of nuts and seeds.
    • Cheese Lover’s Tepsijaš. Throw small cubes of hard cheese into the dough for unexpected bites of melty flavor.
    • Mediterranean-Inspired. Mix in finely chopped (green or black) olives, or use olive oil instead of butter.

    Handling

    Here's how to serve and store your Bosnian homemade pan bread, tepsijaš:

    Serving. After it's cooled down in a towel, take out out. Serve warm or at room temperature with anything and everything (think stews, spreads, meza, jam, etc.).

    Slicing. Cut tepsijaš using a serrated knife.

    Storing. Wrap the bread in a clean, dry kitchen towel, and keep it in a bag, breadbox, microwave, or in the oven for up to 2 days. Avoid refrigerating as it dries it out.

    Freezing. We're not fans of freezing homemade bread. However, wrapped in a plastic wrap it should last for 1 month in the freezer. Thaw at room temp, and then warm it up in the oven.

    Expert Tips

    • Slow Down. Trying to hurry up the resting time results in gummy bread.
    • Use Fresh Flour. When making tepsijaš (or burek), open a fresh bag of flour. There is something about fresh flour that makes it infinitely better, and easier to work with.
    • Sift Before Kneading. For a dough that's lighter, airier, and easier to manage, sift the flour beforehand. This extra minute of work often makes a lot of difference in taste.

    Recipe FAQs

    What's the secret to making homemade bread?

    There is no secret to making homemade bread! Anyone, and we mean anyone with a little courage, can make bread from scratch!

    It's all about combining the four main ingredients (water, flour, yeast, and salt), and (optionally) a few others, and then kneading them together.

    The hardest part, if you can call it that, is waiting for the bread to rise, twice.

    Is homemade bread healthier?

    For the most part, yes it is!

    Bread isn't a health food to start with. More and more we're learning about carbs and their connection to diabetes. Still, it's infinitely better to make food at home using the ingredients you're familiar with.

    Commercially produced bread has many additives. These are the substances that help alter the taste, and preserve food longer. Unfortunately, some additives are found to be cancerogenic.

    Can I use instant yeast instead of active dry yeast?

    Yes, but don't!

    Instant yeast simply doesn't perform as well as active dry yeast. The dough often comes out unmanageable.

    Why is my bread dense?

    If you've used too much flour, and haven't kneaded enough, your bread may turn dense. Use enough flour to keep the dough from being sticky, knead it vigorously, and you should be fine.

    (Unless you're using a no-knead recipe for homemade bread, of course.)

    How do I store homemade bread?

    Wrap bread in a clean kitchen towel, and place in a bread box, or a bag for up to 2 days. (You can even keep it wrapped in the microwave.)

    Although you're welcome to freeze it, we find it's always better to make fresh bread. Homemade thawed bread loses some of its texture.

    Why is my bread crumbly?

    Too much flour can make the bread crumbly.

    Sometimes when the dough is sticky, people try to fix it by adding too much flour. Instead, try kneading through the stickiness (wet your hands with water).

    Thoughts?

    If you make today's Bosnian homemade pan bread called tepsijaš and like it, please consider leaving a ⭐️⭐️⭐️⭐️⭐️ (5-star) rating. This will help others find the recipe more easily!

    You can also leave a comment, I read EVERY one! Finally, if IG is more your thing, consider tagging us @balkanlunchbox.

    Prijatno, Dobar Tek, and Bon Appetit!

    Homemade bread on a cutting board on a blue background.
    Homemade bread on a cutting board on a blue background.

    Tepsijaš - Bosnian Homemade Pan Bread

    Aida
    Soft, golden Balkan bread, baked in a (preferably round) pan for a perfectly fluffy texture and a flavorful soft crust.
    5 from 1 vote
    Print Recipe Pin Recipe
    Prep Time 15 minutes mins
    Cook Time 45 minutes mins
    Resting time (1st time 1 hour, 2nd time 1 hour) 2 hours hrs
    Total Time 3 hours hrs
    Course Bread
    Cuisine Bosnian
    Servings 6
    Calories 379 kcal

    Equipment

    • 1 preferably round, 10-12 inch (22-25cm) pan

    Ingredients


    • 2 tablespoons active dry yeast
    • 2 tablespoons sugar
    • 4 cups all-purpose white flour, plus a little more you can exchange ⅓ with whole wheat
    • 2 teaspoons salt
    • 1.3 cups lukewarm water (approximately) volume may vary
    • 1-2 egg yolks
    • (Optional) 2-3 tablespoons (30-45 g) butter, divided

    Instructions
     

    • Activate Yeast. Combine yeast and sugar with a few tablespoons of warm, and let it activate (10-15 minutes or until the mixture bubbles up).
    • Knead. In a large bowl, combine flour, yeast mixture, salt, and (if using) 1 tablespoon of butter. Start adding water and knead the ingredients together. Knead for a few minutes until you have a cohesive, elastic dough that's slightly sticky.
    • Rest 1st Time. Cover the bowl with a kitchen towel. Let the dough rise in a warm spot for 1 to 2 hours, or until it doubles in size.
    • Knead Again. Punch the dough, then knead it for an additional few minutes, shaping it into a ball again. You can do this directly in the bowl, or transfer to a working space. (Dust lightly with flour to avoid sticking.)
    • Rest 2nd Time. Transfer the dough ball to an oiled pan. Let it rise again for about 45-60 minutes. At the very end heat oven to 475°F (245°C).
    • Brush. Brush the bread with the egg yolk on all sides.
    • Bake. Lower temperature to 400°F (200 °C) and place the pan inside. Bake for 35-45 minutes. Lower the temperature or cover with foil if needed. Turn the pan 180° once during the baking.
    • Rest 3rd Time. Soak a clean kitchen towel in cold water, and wring it out well. ((Optional) Smear the butter generously on all the bread's sides.)Transfer hot bread onto the towel, wrap it up, and place it in a plastic bag. Leave for 20 minutes, then serve
    • Serve warm or at room temperature with anything and everything (think stews, spreads, meza, jam, etc.).
      Slice tepsijaš using a serrated knife.
      Store by wrapping the bread in a clean, dry kitchen towel, and keep it in a bag, breadbox, microwave, or in the oven for up to 2 days. Avoid refrigerating as it dries it out.
      We're not fans of freezing homemade bread! However, wrapped in a plastic wrap it should last for 1 month in the freezer. Thaw at room temp, and then warm it up in the oven.

    Video

    Notes

    • Serving and Nutritional Information 
    Nutritional information was calculated for 6 servings (and is only an approximation).
    However, serving size is just a suggestion and can vary based on your appetite. If you're making sandwiches, you’ll likely need less; if it's served alongside other dishes, you might want more.

    Nutrition

    Serving: 1of 6Calories: 379kcalCarbohydrates: 68gProtein: 11gFat: 6.46gSaturated Fat: 3.14gMonounsaturated Fat: 1.9gTrans Fat: 0.155gCholesterol: 72mgSodium: 813mgPotassium: 135mgFiber: 3.3gSugar: 2.87gVitamin A: 200IUCalcium: 28mgIron: 4.12mg
    Tried this recipe?Let us know how it was!

    More Recipe 💙

    • Sideways photo of pindjur in a bowl with a spoon and vegetables in the background.
      Pindjur (Pinđur) Spread - Easy Homemade Balkan Relish with Red Peppers and Tomatoes
    • Closeup of a stuffed pepper.
      Best Classic Baked Stuffed Peppers with Ground Beef and Rice (Punjene Paprike)
    • Red pot with soup, a ladle and a soup bowl with soup on a gray background (spoon and kitchen towel also included).
      Beef Noodle Vegetable Soup [Instant Pot, Stovetop]
    • Black pan with two eggs and ground beef around which is a kitchen towel, all on a wooden table.
      Poached Eggs with Ground Meat (Čimbur)

    Chocolate Walnut Marzipan Squares

    Aug 16, 2016 · 3 Comments

    Chocolate Walnut Marzipan Squares: a unique take on an old favorite.

    Chocolate Walnut Marzipan Squares: a unique take on an old favorite. 

    Chocolate Walnut Marzipan Squares: a unique take on an old favorite.

    Authentically, marzipan is made with almonds.

    But I only eat fresh, almonds in one piece.

    Back in the day there was this glue called Karbofix. We used it for arts and crafts in school.

    It came in a tall, round box not unlike a box for face cream. When you opened it, there was a tidy blob of white glue, and a small place for a spoon used to scoop out the glue and smear it on paper. The glue smelled like almonds.

    To this day, when I smell either my stomach moves upwards. Ground almonds then are out of the question.

    But why should marzipan be too?

    There are other nuts out there after all. Walnuts were the first thought. Chocolate walnut marzipan was the second.

    The walnut is synonymous with the Balkans. It's the most frequently used nut here. From holiday baklavas, roses, poached apples, to an everyday 45-min chocolate biscuit cake, we use it fanatically.

    Why not? It's worthy of adoration.

    The walnut is crunchy. Tart. The tongue runs the top of the mouth at the first meeting, placing the flavor. You sense a pinch of oil. Oil with real, good fat. There is some sweetness, too, fully accented when combined with sugar. It's substantial. That's what I love about it.

    It provides all its best qualities to these squares. Chocolate walnut marzipan squares are tough, but soft. After a few seconds in your mouth they become creamy, and allow chocolate to take over for that last flavor before the next bite.

    I hope you'll like these as much as I.

    chocolate-marzipan-with-walnuts
    Chocolate Walnut Marzipan Squares: a unique take on an old favorite.
    Chocolate Walnut Marzipan Squares: a unique take on an old favorite.
    Chocolate Walnut Marzipan Squares: a unique take on an old favorite.

    Chocolate Walnut Marzipan Squares: a unique take on an old favorite.

    Chocolate Walnut Marzipan Squares

    Aida
    5 from 1 vote
    Print Recipe Pin Recipe
    Prep Time 20 minutes mins
    Cook Time 10 minutes mins
    Total Time 30 minutes mins
    Course Dessert
    Servings 25

    Ingredients
      

    MARZIPAN:

    • 14 ounces petit beurre biscuit or a similar biscuit
    • 16 ounces walnuts
    • 14 ounces white sugar
    • 9 ounces butter sliced

    CHOCOLATE TOPPING:

    • 9 ounces dark chocolate chips or broken pieces
    • ½ cup milk
    • 1 tablespoon butter

    Instructions
     

    • Grind petit beurre (or similar biscuit) into coarse flour. Grind walnuts as well.
    • Place sugar in a deep pot and cover with 16 tablespoons of water. Cook on low and stir frequently until it boils. Continue boiling for exactly 2 minutes, and remove off heat.
    • Separately, combine dark chocolate (broken up or in chips) with milk and butter in another pot. Melt on low and stir frequently. When it melts remove off heat.
    • Pour ground biscuit into the boiling water and mix thoroughly with a spatula. Slice the butter in, and continue mixing. Finally, add the walnuts, and stir once again until the mass is completely combined.
    • Transfer the marzipan mass into a 12x18 inch pan, and use your palms to spread it evenly in the pan (be careful not to burn your fingers).
    • Pour the chocolate topping over it and also spread evenly over the entire marzipan. Leave aside to cool down. Cut into approximately two inch squares.

    Notes

    If unable to find petit beurre biscuits, good substitutes are: Lorna Doone cookies, Gamesa, Marie. If you can't find any of those animal crackers are your last resort.
    You'll get approximately 50 cookies this way. Serving size is about 2.
    Tried this recipe?Let us know how it was!


    Grated Beet and Carrot Salad [Five Ingredients, Ten Minutes]

    Aug 9, 2016 · 6 Comments

    A bowl of carrot and beet salad, a beet, carrots and fork on the side.

    Grated beet and carrot salad is an incredibly refreshing and vibrant salad you can make in under ten minutes. This simple salad accompanied with a light vinaigrette is an ode to nourishment and returning to salad basics. Shall we?

    A bowl of carrot and beet salad, a beet, carrots and fork on the side.


    [feast_advanced_jump_to]

    Background

    Grated beet and carrot salad celebrates the natural sweetness of these two root vegetables. Accented with a simple vinaigrette, carrots combined with beets create a great balance of flavors.

    While carrots bring in a crisp, slightly peppery note, beets offer an earthy sweetness. It's a match made in taste heaven where each ingredient has a chance to shine.

    Did we mention you'll love the light vinaigrette made with just oil, lemon juice, and a touch of salt? It perfectly complements these robust flavors, without overwhelming them.

    Why This Salad Works

    • Nutritional powerbomb! Beets are rich in folate, manganese, and nitrates, which support heart health and improve circulation. Meanwhile, carrots are high in vitamin A, essential for eye health, and provide antioxidants that help protect the body from free radicals.
    • A feast for the eyes! Can we talk about how beautiful this salad looks? The vibrant reds and oranges of this salad make it as visually stunning as it is delicious! It's an eye-catching addition to any family dinner or casual lunch with friends.
    • Fresh ingredients all the way! Grated beet and carrot salad is all about using fresh, organic ingredients like firm, richly colored beets, crisp, bright orange carrots, and a vinaigrette made with high-quality olive oil and freshly squeezed lemon juice.

    Ingredients

    Here are the ingredients for today's grated beet and carrot salad.

    Carrots, beet, seasonings, lemon and oil on a table, overhead photograph.
    • Beets: fresh beets.
    • Carrots.
    • Oil: preferably a high-quality olive oil, but sunflower or avocado oil will work too.
    • Salt (and optionally pepper).
    • Lemon juice.
    • (Optional) Vinegar.

    Instructions

    The instructions for the grated beet and carrot salad couldn't be easier.

    • Step 1. Peel and grate carrots and beets.
    • Step 2. Whisk vinaigrette ingredients.
    • Step 3. Combine everything and cool for a little bit. Serve.

    Handling

    • Store in the fridge, in an airtight container for up to a few hours.
    • Don't heat or freeze.

    More Salad 💙

    We are crazy about salads! Here are a few we cannot recommend enough!

    • A fork holding red pepper salad above a plate on a marble table.
      Roasted Red Pepper Salad [With Garlic and Olive Oil]
    • Russian Salad or Salad Olivier
    • Bowl with carrots and apple, and carrot and apple and a spoon on a table.
      Grated Apple and Carrot Salad [Two Ingredients, Ten Minutes]
    • Shopska Salad

    Thoughts?

    If you make today's grated beet and carrot salad and like it, please consider leaving a ⭐️⭐️⭐️⭐️⭐️ (5-star) rating. This will help others find the recipe more easily!

    You can also leave a comment, I read EVERY one! Finally, if IG is more your thing, consider tagging us @balkanlunchbox.

    Prijatno, Dobar Tek, and Bon Appetit!

    A bowl of carrot and beet salad.

    Grated Beet and Carrot Salad

    Aida
    A delightful mix of earthy beet sweetness, crisp carrot pepperiness, and a bright lemon vinaigrette.
    5 from 1 vote
    Print Recipe Pin Recipe
    Prep Time 10 minutes mins
    Total Time 10 minutes mins
    Course Salad
    Cuisine Bosnian
    Servings 4
    Calories 145 kcal

    Ingredients
      

    • 1 beet large
    • 4-5 carrots large

    Vinaigrette

    • 1 tablespoon lemon juice substitute with vinegar, or do ½ tablespoon of each
    • 3.5 tablespoons oil vegetable, avocado or olive oil; avoid coconut oil
    • salt to taste
    • (Optional) pepper to taste

    Instructions
     

    Grate the ingredients

    • Peel and grate carrots and beets.

    Make the vinaigrette

    • Combine all vinaigrette ingredients in a small bowl. Whisk them until integrated.

    Combine

    • Combine vegetables and vinaigrette. Mix well until integrated. (Optional) Leave in the fridge for a couple of hours.

    Handling

    • Store in the fridge for up to a few hours. Don't reheat or freeze.

    Notes

    • Tips
    Leaving the salad to rest in the fridge for an hour or two makes the taste even better.
    Be careful while handling the beet as the color will spew all over clothes, hands, and counters. 

    Nutrition

    Serving: 1of 4Calories: 145kcalCarbohydrates: 9.5gProtein: 1gFat: 12g
    Tried this recipe?Let us know how it was!

    Recipe 💙

    • A ladle holding bean soup above the blue bowl, on an orange background.
      High Protein Balkan Bean Soup (Visokoproteinski Grah/ Visokoproteinski Pasulj)
    • A glass bowl full of stuffed peppers.
      21+ Pepper Recipes
    • A hand holdling a fork with scallion salad above a black bowl filled with salad on an orange background.
      Scallion Salad with Sour Cream (Lukmira) [2 Ingredients, 5 minutes]
    • Four photographs of different stews in one pin.
      14+ Best Stew Recipes

    Chicken and Veggie Salad

    Aug 2, 2016 · 3 Comments

    Chicken on a bed of shredded cabbage, mixed with summer favorites (corn, cucumbers and tomatoes), and topped with grated cheese and your favorite dressing.

    Chicken on a bed of shredded cabbage, mixed with summer favorites (corn, cucumbers and tomatoes), and topped with grated cheese and your favorite dressing. 

    Chicken on a bed of shredded cabbage, mixed with summer favorites (corn, cucumbers and tomatoes), and topped with grated cheese and your favorite dressing.

    You're in for a treat. We don't do al lot of salads, or 30-minute recipes together. Today we'll do one that's both.

    I heard about this salad from my picky niece. She's 17. I remember I was picky too, at 17. What I remember from that period is if the food didn't taste absolutely delicious, I wouldn't touch it.

    This chicken salad, then, had potential. What sealed it was finding out my brother in law liked it too. For him to ask for a salad meant it had to have great substance.

    I probably mentioned this. Regional obsession for meat here is unparalleled. Let me give you just one example: a lot of people in the Balkans eat lamb on biweekly basis.

    Lamb as in delicious, but quite heavy, red meat. Biweekly as in every 10-15 days.

    Although, veal takes the crown in the meat popularity contest. It's in everything. Sauces, stews, pies and barbecue. I'm half expecting to come across a veal baklava one of these days.

    Poultry, while omnipresent, isn't well-liked. It's tolerated.

    (This classification of meat adoration applies little bit more to men than women. Dad, you may remember, didn't consider dinner a complete meal without red meat. I can't tell you how many times I saw him raid the fridge after eating a chicken dish. Lately it seems I've picked up his preferences.)

    Even though both my niece and brother in law liked this salad, I still needed a third sign before coming anywhere near it.

    The third sign came in the shape of shredded fresh cabbage. I cannot begin to describe to you the joy I feel when eating fresh or fermented cabbage. It's directly proportional to saddness I feel when eating lettuce.

    As shredded cabbage is this salad's base, it directly impacts the freshness and the feel of the salad. The cabbage is topped with corn, peppers, cucumbers, tomatoes, and finally chicken. Final touch comes in the form of grated cheese, and optionally, your favorite dressing.

    The chicken plays a great part in this recipe. I have to say, I more than tolerated it. I devoured it.

    For the first time in my life, I understand what is meant when people say that protein makes all the difference in a salad. (In my case, it has to be meat protein.) Chicken transferred it from the appetizer to main course category in a hot minute.

    Thinking of a salad for lunch? This is it.

    chicken-salad-salata-od-piletine
    Chicken on a bed of shredded cabbage, mixed with summer favorites (corn, cucumbers and tomatoes), and topped with grated cheese and your favorite dressing.

    Chicken Salad

    Aida
    5 from 1 vote
    Print Recipe Pin Recipe
    Prep Time 15 minutes mins
    Cook Time 15 minutes mins
    Total Time 30 minutes mins
    Servings 4

    Ingredients
      

    • 2 tablespoons oil
    • 6 chicken breast filets or 3 chicken breasts
    • ½ tablespoon seasoned salt
    • ½ teaspoon pepper
    • 1 cup corn
    • ½ cabbage head
    • 2 to matoes
    • 2 cucumbers
    • 1 red bell pepper
    • 1 yellow bell pepper
    • 2 ounces yellow cheese Gouda, Edam or mild Cheddar
    • Yoghurt or ranch dressing
    • Optional ½ head lettuce

    Instructions
     

    • Dice chicken. Heat up oil in a large skillet over medium. Add chicken and seasonings. Fry 10 minutes or so, until the chicken is finished. Meanwhile, place corn in a smaller pot, add water and bring to a boil. Drain and wash under cold water.
    • Once the chicken and corn are ready, let them cool off for a few minutes before adding to the salad.
    • Shred cabbage and place in a large salad bowl. (If you're using lettuce, chop it finely and add now.) Dice tomatoes, cucumbers, and peppers. Mix well. Top with chicken and corn, and mix again.
    • Grate cheese on top of the salad. Serve along your favorite dressing. (Ranch or yoghurt are recommended.)

    Video

    Tried this recipe?Let us know how it was!

    Hajj Ćevap: Mushroom and Veal Sauce (Bosnian Boss Sauce, Hadžijski Ćevap)

    Aug 1, 2016 · 5 Comments

    Hand holding a wooden spoon with food above the bowl on a marble table.

    Hajj Ćevap, or mushroom and veal sauce (hadžijski ćevap), is a mouthwatering, traditional Bosnian dish. It involves simmering veal (or beef) alongside vegetables, followed by baking it in a water bath. Shall we?

    Hand holding a wooden spoon with food above the bowl on a marble table.
    [feast_advanced_jump_to]

    Background

    Although ćevap usually stands for famous grilled sausages, it's also the name of several veal sauces. They usually have an adjective in front of the name, so you'll easily recognize them. (Remember sitni (miniature) ćevap?)

    Another example is today's hajj ćevap (hadžijski ćevap), we jokingly translated as the "boss sauce." This traditional Bosnian dish consists of a veal sauce (beef works too!) with a delicious veggie combo, simmered and then baked in a water bath.

    If you were wondering, hajj is a pilgrimage to Mecca that financially able Muslims are required to make. However, hajj was out of the question for most Bosnian Muslims back in the day. The trip was expensive and far away.

    Completing the hajj, and becoming a 'hadžija,' was synonymous with being wealthy. Furthermore, over time the term became slang for boss in the Balkans.

    The definition moved across borders. So, someone from Serbia who visited Jesus' grave in Jerusalem back in the day was also called hadžija, as they too had to be well-off to complete the pilgrimage.

    Our hajj ćevap is quite the boss sauce in its own right. For example, it's made from expensive ingredients like veal. The process to make it is unique. And when it comes out of the oven, in individual bags, it's as if you're opening a gift.

    And that's pretty boss, if you ask us!

    Ingredients

    Here's what you need to make this veal and mushroom sauce (hajj ćevap, hadžijski ćevap):

    Nine ingredients in different bowls on a white background: peppers, tomatoes, onions, mushrooms, veal, oil, butter, heavy cream, tomato and seasonings.
    • Veal: although veal is the preferred meat for this dish, you can also use top round, sirloin, or beef chuck. Dice it as small as possible.
    • Butter: no substitutes.
    • Oil: sunflower, vegetable, avocado, or coconut. Avoid olive oil.
    • Onion: yellow or white onion. Avoid red onion.
    • Peppers: bell peppers, Italian sweet peppers, or Balkan roga and babura peppers.
    • Mushrooms: portobello or cremini. (If you test it with other ones, let us know!)
    • Tomatoes: Roma, or tomatoes on the vine. Avoid cherry tomatoes as you'll have to skin them.
    • Seasonings: black pepper, sugar, salt, or stock powder.
    • Heavy Cream: regular heavy cream, no substitutes.

    Instructions

    Below are the easy steps for making

    Six photographs, two by two, of a black pan with different ingredients inside (meat, onion, butter, oil, mushrooms, etc.).

    Step 1. Simmer ingredients (butter, onion, meat, peppers, mushrooms, tomatoes, seasonings), by adding them to the pan with a few minutes in between each.

    Six photographs, two by three, of the sauce packed in parchment paper, and transferred to a pot to be baked.

    Step 2. Make "bags" with sauce by placing sauce and heavy cream in parchment paper pieces, and wrapping them up with twine. Finally, place them in a pan with hot water for a water bath, and bake.

    Handling

    Hand holding a spoon with food above the bowl.
    • Serve: serve by placing a 'bag' with the sauce in a bowl or a plate. Preferably serve with, or over, a side such as mashed potatoes, polenta or porridge, rice, quinoa, etc.
    • Store: open all the remaining bags, and then combine the sauce in an airtight container (discard the bags), and transfer the sauce to the fridge for up to 24 hours. (Don't keep it past that time as you have dairy in the form of heavy cream.)
    • Reheat: reheat using your preferred method.

    Other Recipes

    Here are some more delicious recipes from Bosnia and Herzegovina:

    • Soup in a silver bowl with a lid, a kitchen cloth, two slices of bread, a lemon wedge and a spoon.
      Okra Soup: Creamy Chicken Soup with Okra (Bosnian Bey's Soup, Begova Čorba)
    • Quarter of a burek pie on a plate on gray background.
      Burek
    • dagara, tagara, lamb stew, veal stew, lamb and veal stew, veggie stew | balkanlunchbox.com
      Oven Baked Lamb Chop, Beef and Vegetable Stew (Dagara, Tagara)
    • Bowl of klepe in traditional plating, on a gray background.
      Klepe: Bosnian Ravioli or Manti-Style Beef Dumplings [From Scratch, No Baking Powder]

    Thoughts?

    If you make today's Bosnian boss sauce: mushroom and veal sauce (hadžijski ćevap) and like it, please consider leaving a ⭐️⭐️⭐️⭐️⭐️ (5-star) rating. This will help others find the recipe more easily!

    You can also leave a comment, I read EVERY one! Finally, if IG is more your thing, consider tagging us @balkanlunchbox.

    Prijatno, Dobar Tek, and Bon Appetit!

    Hand holding a wooden spoon with food above the bowl on a marble table.

    Hajj Ćevap, Mushroom and Veal Sauce

    Aida
    Hajj ćevap or hadžijski ćevap is a delicious traditional Bosnian veal (or beef) and a veggie (onions, peppers, mushrooms) dish simmered and then baked in a water bath.
    5 from 2 votes
    Print Recipe Pin Recipe
    Prep Time 30 minutes mins
    Cook Time 1 hour hr 15 minutes mins
    Total Time 1 hour hr 45 minutes mins
    Course Main Course
    Cuisine Bosnian
    Servings 6
    Calories 1560 kcal

    Equipment

    • 6 pieces (12x12 inches, or 30x30 cm) baking paper or foil
    • 6 pieces of twine, each approximately 25-inches (60cm)

    Ingredients


    • 3 tablespoons butter
    • 1 tablespoon oil vegetable, sunflower, canola, or avocado
    • 1-2 yellow onion(s) large, diced or grated
    • 16-20 ounces veal (or beef) diced into smaller squares; if beef, use sirloin, top round, or beef chuck
    • 2-3 bell peppers diced, yellow or red; or sweet Italian peppers, roga peppers, or babura peppers
    • 10-12 ounces portabello mushrooms diced, or cremini
    • 1-2 tomatoes peeled and diced, with juice, or canned
    • ground pepper to taste
    • 1 teaspoon sugar
    • 2-3 tablespoons stock powder or Vegeta, or bouillon
    • 6-8 ounces heavy cream
    • (Optional) parsley and paprika

    Instructions
     

    Simmer Vegetables and Meat

    • Heat oil and butter in a larger pan over medium. Add onion and stir. Simmer for about 5 minutes, then add veal. Stir and simmer for 3-5 minutes, until the meat has slightly browned. Add bell pepper and stir. After a few more minutes add mushrooms, tomatoes and spices. Mix well, and simmer another 10 minutes.
    • Heat oven to 450°F (220°C).

    Make Sauce "Bags"

    • While the meat and veggies are simmering, take baking (parchment) paper (or foil) and cut out 6 squares that are approximately 12x12 inches (30x30cm) in length. Then take some twine and cut out 6 pieces that are approximately 25 inches (60cm) in length.
    • Transfer veggies and meat to your working area. Take one piece of parchment paper and transfer ⅙ of the sauce in the middle of it. (Approximately 1-2 ladles of sauce.) Follow with 2 tablespoons of heavy cream. Create a 'bag' or a 'sack' (or a "Hershey kiss") by taking the opposite ends of the parchment paper and lifting them up until they meet, and any remaining sides until the sauce is in the bottom of the sack. Squeeze the sides so none of the sauce can come out. Take the twine and tightly wrap it around the 'bag' making a bow.

    Bake in Water Bath

    • Place the bags into a deep baking pan. Fill it up with hot water about half the height of the bags. (You're essentially making a water bath.) Bake for 30 minutes.
    • Lower temperature to 390°F (200°C). And bake an additional 40 minutes. Keep the level of water by adding more hot water if necessary. Turn the pan around at least once during the baking.
    • At this time you can make a side of mashed potatoes, polenta, rice or other.

    Serve

    • Serve by placing a 'bag' with the sauce in a bowl or a plate. Each person should unwrap their bag on their own. Store by opening all the remaining bags and combine the sauce in an airtight container (discard the bags), and transferring the sauce to the fridge for up to 24 hours. (Don't keep it past that time as you have dairy in the form of the heavy cream.) Reheat using your preferred method.

    Video

    Notes

    Nutritional information is a rough estimate. 

    Nutrition

    Serving: 1of 6Calories: 1560kcalCarbohydrates: 58.2gProtein: 77.6gFat: 115gSaturated Fat: 60.2gPotassium: 29mgFiber: 4.9gSugar: 25.7g
    Tried this recipe?Let us know how it was!

    More Recipe 💙

    • Meaty Minestrone Soup: Vegetable Soup with Ground Beef
    • A pan with risotto on a cutting board and a wooden spoon in the pan on a gray background.
      Leek Risotto Recipe with Ground Beef
    • Bowl (white) with risotto and veggies with a fork in it, two pieces of toast and a glass with yogurt on gray marble background.
      Ground Beef Risotto [With Vegetables, One-Pan, 1 Hour or Less]
    • Three pieces of quiche in front of a jug and pan.
      Vegetarian Crustless Spinach and Cheese Quiche (2 Versions)

    Easy Vegetable Rice [Frozen or Fresh Veggies]

    Jul 19, 2016 · 22 Comments

    A bowl of rice overhead, with a spoon inside.

    Easy vegetable rice is a risotto-like, creamy yet fluffy, side dish everyone loves. You can make this one-pot dish with fresh or frozen veggies (or a combo), and pair it with anything! Shall we?

    A bowl of rice overhead, with a spoon inside.
    [feast_advanced_jump_to]

    Background

    Vegetable rice is an easy, comforting dish. What makes our vegetable rice different from other rice and veggie recipes out there is its risotto-like quality.

    This fluffy, soft, flavorful rice goes great with anything. You can serve it with rissoles, veal roast, medallions, even satarash.

    Alternatively, it's a great standalone dish. We often dive into vegetable rice with just a slice of homemade bread.

    However you decide to make it, we promise you that this Balkan-inspired rice dish will be on your rotation quite often!

    Why This Recipe Works

    • Ease: With minimal ingredients, and straightforward prep, this vegetable rice is great for busy weeknights, or first-time cooks.
    • Adaptability: Having a simple recipe means you can adjust the taste completely to your liking with spices, vegetables, meat, and/or other proteins.
    • Tradition: Vegetable rice is one of those quintessential Balkan comfort sides everyone wants the recipe for.

    Ingredients

    Here are the ingredients for Balkan-inspired vegetable rice:

    Ingredients for veggie rice, overhead: rice, veggies, seasonings, butter, oil and broth.
    • Rice. Use short-grain white rice for this dish, (like the Italian Arborio). Rinse out lightly. Avoid other types of rice.
    • Oil and/ or Butter. Vegetable oil, butter, or a combination to start the rice up. Substitute with most oils.
    • Broth or Bouillon. Vegetable, chicken, or beef broth act as catalysts to deepen the flavor of vegetable rice. When in a pinch, substitute with bouillon or Vegeta.
    • Fresh or Frozen Veggies. Carrots, peas, and potatoes are our favorites. Substitute or add in turnips, sweet potatoes, squash, broccoli, onions, peppers, and/ cauliflower.
    • Seasonings. Salt, pepper, and a pinch of parsley finish off the dish perfectly.

    Instructions

    Here are a simple few steps to make vegetable rice.

    Two photographs, side by side, of the rice being prepared in a pot.

    Step 1. Heat the oil on high. If using fresh veggies, simmer them now. Add rice, stir, and simmer for a few minutes.

    Two photographs, side by side, of the rice being prepared in a pot, water added.

    Step 2. Add broth (or water and bouillon), seasonings, and (if using frozen) veggies. Mix everything well. Cover halfway, bring to a boil, and lower the heat.

    Two photographs, side by side, of the rice being prepared in a pot, butter added, covered.

    Step 3. Cook until the rice is soft and the liquid is almost evaporated. Turn the stove off, add butter, and cover completely. Let sit for 5 minutes.

    Variations

    A fork holding rice with veggies.
    • More herbs... Adding herbs like rosemary or dill will intensify the flavor.
    • Cheese... Adding some feta on top transforms the dish into a protein-infused standalone meal.
    • Nuts... Although not as common, adding finely chopped walnuts adds a nice texture to the dish.

    Recipe FAQs

    What veggies pair with rice?

    Potatoes, carrots, peas, peppers, onion, garlic, parsnip, turnip, squash, broccoli, cauliflower, zucchini, eggplant and more.

    Are rice and veggies a healthy dinner?

    Yes. Especially when a protein side is added.

    Can I substitute with other types of rice?

    As our vegetable rice dish draws on its risotto-like quality to deliver an incredible taste, your best bet is to stick to short-grain rice.

    What to Serve with Vegetable Rice

    Here are a few ideas on what to serve the rice with.

    • Meatballs in Bechamel.
    • Salad Olivier.
    • Eggplant Veal Bake.
    • Balkan Mini Fried Breads (Uštipci).

    Handling

    Here are a few handling recommendations for this rice dish.

    • Serving: Serve vegetable rice warm alongside a protein.
    • Storing: Place leftover rice in an airtight container. Keep in the fridge for up to 2 days. After this time, the quality of rice and veggies starts to deteriorate.
    • Heating: Reheat using your preferred method. Add a few teaspoons of water or broth if it feels dry.
    • Freezing: We're not fans of freezing food, but if you plan to, let the vegetable rice cool down completely. Transfer to the freezer-safe containers for up to 1 month. Thaw and then reheat.

    Thoughts?

    If you made our fresh vegetable rice and liked it, please consider giving it a ⭐️⭐️⭐️⭐️⭐️ (5-star) rating. This helps others find the recipe more easily!

    Also, feel free to leave a comment (I read each one!), and don't forget to tag a photo #balkanlunchbox, or us @balkanlunchbox, on IG.

    Prijatno, Dobar Tek, and Bon Appetit!

    A bowl of rice overhead, with a spoon inside.

    Vegetable Rice

    Aida
    Simple Balkan-style risotto-like rice with veggies! Fluffy, flavorful, and versatile.
    5 from 1 vote
    Print Recipe Pin Recipe
    Prep Time 5 minutes mins
    Cook Time 25 minutes mins
    Total Time 30 minutes mins
    Course Side Dish
    Cuisine Bosnian, Croatian, Serbian
    Servings 4
    Calories 282 kcal

    Ingredients
      

    • 3 teaspoons oil any type works
    • 1 cup short-grain white rice like Arborio
    • 4 cups broth (chicken, veggie, or beef broth) substitute with stock, or a bouillon dissolved in water, or 1-2 tablespoons Vegeta dissolved in water
    • Salt and pepper to taste
    • 1 tablespoon butter
    • 1 cup frozen or fresh veggie mix carrots, peas, and potatoes work best, other options include peppers, onions, turnips, or squash; if using fresh chop finely

    Instructions
     

    • In a small, deep pot heat oil on high. Add rice, simmer, and stir for 2-3 minutes. (If using fresh veggies, you can add them now as well.)
    • Add frozen veggies (if using them), broth (or water with bouillon), and seasonings. Stir well. Bring to a boil (about 10-15 minutes). Cover ½ of the way with a lid, lower the temperature down, and cook for another 10 minutes. (That's approximately 20-25 minutes of cooking. Use your stove as guidance.)
    • When there is still a little bit of water left on top (about the thickness of one finger), turn the heat off. Add butter and stir well. Cover the pot all the way and leave for 5 minutes.
    • Serve vegetable rice warm alongside a protein.
      To store, place leftover rice in an airtight container. Keep in the fridge for up to 2 days. After this time, the quality of rice and veggies starts to deteriorate.
      Reheat using your preferred method. Add a few teaspoons of water or broth if it feels dry.
      If you plan to freeze the dish, let the vegetable rice cool down completely. Transfer to the freezer-safe containers for up to 1 month. Thaw and then reheat.

    Video

    Nutrition

    Serving: 1of 4Calories: 282kcalCarbohydrates: 49gProtein: 5gFat: 7gSaturated Fat: 3gMonounsaturated Fat: 2gCholesterol: 8mgSodium: 1079mgPotassium: 116mgFiber: 3gSugar: 3gVitamin A: 2570IUVitamin C: 1mgCalcium: 14mgIron: 1mg
    Tried this recipe?Let us know how it was!

    More Recipe 💙

    • A silver pan full of stuffed zucchini cups on a gray background, with a red kitchen towel and spoon.
      Stuffed Zucchini with Ground Beef and Rice (Punjene Tikvice)
    • A bowl with risotto and a fork in it and vegetables in the background on a white honeycomb background.
      Easy Vegetable Risotto (Sataraš sa Rižom) [Rice Satarash]
    • A bowl with rice pudding on a table.
      Sutlijaš: Balkan Rice Pudding (Sutlija, Riža na Mlijeku)
    • Rice and chicken in a sheet pan, overhead.
      Easy Baked Chicken Over Rice Casserole (Chicken Thighs and Drumsticks) [4 Ingredients, 1 Pan]

    Knedle: Balkan Plum Dumplings (Knedle sa Šljivama)

    Jul 18, 2016 · 17 Comments

    A fork holding half of a dumpling knedla on a white plate, with one and a half knedle in the background.

    Plum dumplings (knedle sa šljivama), are a traditional Central European, Eastern European, and Balkan delicacy usually, but not always, served as dessert. These scrumptious potato dumplings are filled with plums, breaded, and sprinkled with sugar or cinnamon. Shall we?

    A fork holding half of a dumpling knedla on a white plate, with one and a half knedle in the background.
    [feast_advanced_jump_to]

    Background

    Plum dumplings, or knedle, are soft, golf-ball-sized dough rounds filled with juicy plums, boiled, and lightly fried in golden breadcrumbs. A final sprinkle of sugar, vanilla, or cinnamon completes the dish.

    Their origins trace back thousands of years to the Alps. Meanwhile, today these incredible dumplings can be found throughout Central, Eastern, and Southeastern Europe. (They made their way to the Balkans over a hundred years ago!)

    In conversation, "knedle" is usually assumed to be referring to "knedle sa šljivama" or plum dumplings. However, you can fill knedle with all kinds of ingredients. Apricots, Nutella, and biscuits are just some of the endless options.

    Here are some of the names plum dumplings go by:

    • Knedle (Bosnia and Herzegovina, Croatia, Montenegro, Poland)
    • Okruglice (Croatia)
    • Gomboce (Serbia)
    • Gombóc (Hungary)
    • Cmoki or Knedli (Slovenia)
    • Knedlíky (Czech Republic)
    • Galuste (Romania)
    • Knödel (Germany and Austria)

    Plum dumplings do take a while to prepare, so arm yourself with patience. On the other hand, if you do choose to make them, our clear and detailed recipe will guide you every step of the way.

    Ingredients

    Below are the ingredients for plum dumplings (knedle sa šljivama). While most of our recipes have ingredients that can easily be substituted, plum dumplings are not as forgiving. Please read this section carefully for important tips.

    Overhead photo for ingredients for plum dumplings on a wooden table (bread crumbs, flour, butter, plums, potatoes, egg, oil, sugar, salt).
    • Potatoes: Potatoes are the key ingredient for this recipe, more important than even the plums! Choosing the right potato can make the difference between plum dumplings turning out perfectly, or being hard as a rock.

      Look for potatoes that are higher in starch (like Russet) as they have a lower water content. (These are known in the Balkans as 'stari krompir/ krumpir' translated as 'older potatoes.' These are the potatoes with rough, brown skin that come in later in the season.)

      If you have the time, it's best - but not required - to cook potatoes with the skin on. In this case, choose potatoes that are roughly the same in size so that they cook at the same rate.

      An alternative to Russetts is an all-purpose potato such as Yukon Gold.

      If your only choice is a waxy potato (reds, fingerlings) at least try to mix them with starchy potatoes, and cook them with the skin on. However, we don't recommend this option! Plum dumplings take effort, so it's better to wait for the right potatoes.
    • Plums: look for smaller, sweet, dark purple plums with yellow or purple insides. The best kind of plum for knedle sa šljivama is the small European or Italian plum (lat. prunus domesticus).

      If you can only find large plums, cut them in half, or even quarters, depending on their size.

      Additionally, the plums should be ripe, but not overly ripe. It's best if they're sweet and on the soft side, but not "squishy." Also, their insides shouldn't be "oozing" out as this can cause dumpling disintegration.
    • Flour: all-purpose flour (regular white flour) works best. An alternative is the European "sharp" flour, but it is by no means necessary.

      Cooking knedle sa šljivama is extensive and this is why we haven't tested different kinds of flour to make them. If you do, would you be so kind as to share your results with us in the comments?
    • Butter: regular unsalted butter is fine. Substitute with salted butter or lard.
    • Salt: regular table salt. Substitute with sea salt or Himalayan salt.
    • Egg: regular chicken egg.
    • Oil: vegetable, sunflower, avocado, or coconut oil. Avoid olive oil.
    • Bread crumbs: regular bread crumbs. Avoid panko bread crumbs.
    • Sugar: regular white granulated sugar. Substitute with vanilla sugar or brown sugar.
    • (Optional) cinnamon.

    Instructions

    Here are the instructions for making plum dumplings (knedle sa šljivama). The process is straightforward, but it takes practice.

    Six photographs, two by three, of the preparation process (cooking potatoes, pitting the plums, and mashing potatoes).

    Step 1. Cook the potatoes.

    Step 2. Prepare the plums.

    Step 3. Cool and mash the potatoes.

    Four photographs, two by two, of dough being made for plum dumplings.
    Four photographs, two by two, of the dough prepared for knedle dumplings on a table.

    Step 4. (Not pictured) Heat the water.

    Step 5 and 6. (Parallel to water heating up.) Make the dough for plum dumplings.

    Four photographs of making knedle dumplings, a plum stuffed with sugar and then the dough stuffed with the plum and dumpling formation.

    Step 7. Stuff/ form plum dumplings.

    Six photographs of making the plum dumplings.

    Step 8. Cook plum dumplings.

    Step 9. Add bread crumbs and sugar.

    Variations

    • In some regions, knedle are a savory dish. In Poland, for example, they're consumed along with sour cream.
    • Instead of plums you can use apricots, dried, fresh and/ or frozen berries, cheese, chocolate, coconut, Nutella, nuts, biscuits, and more.

    Handling

    Here are some pointers on serving, storing, reheating, and freezing plum dumplings (knedle sa šljivama).

    Serving: Serve plum dumplings warm or hot. (Some individuals like to eat them cold also.) The serving size is up to you, however, 2-3 plum dumplings seem to be a good volume for most people. On the other hand, serving size can be very individual. (We know people who will eat 10 in one sitting.)

    If going for a savory moment, you can add a dollop of sour cream on top. Sour cream on plum dumplings is a Central European thing though. In the Balkans plum dumplings (knedle sa šljivama), are a dessert about ninety percent of the time.

    Storing: Store plum dumplings (knedle sa šljivama) in an airtight container in the fridge for up to 3 days. (Discard after this time as the potato will become gummy and hard.)

    Reheating: Reheat using your preferred method, or eat cold. Only reheat as many plum dumplings (knedle sa šljivama) as you will eat. You can reheat them in a baking pan in the oven, a frying pan on the stovetop, or the microwave.

    Freezing:  Making plum dumplings is intensive, so we recommend making two batches at once and freezing one of them. Alternatively, you can halve the batch and then freeze one, and cook the other half.

    So if you decide to freeze plum dumplings (knedle sa šljivama), do it after you shape the dumplings, but before boiling. After you form them, transfer the dumplings onto a tray.

    First freeze them on the tray for 10-15 minutes to prevent sticking, and then take the tray out, transfer them to freezer bags (or freezer-ware), and return to the freezer. You may have to do this in batches.

    Thawing/ reheating: once you are ready to eat them, take plum dumplings out of the freezer and put the pot with the water to boil. The rest of the instructions are the same.

    Expert Tips for Plum Dumplings (Knedle sa Šljivama)

    This is a quick recap of the most important tips to make plum dumplings (knedle sa šljivama) perfect each time.

    • Look for starchy potatoes!
    • Preferably, cook potatoes with the skin on!
    • Boil water ahead of time!
    • Drop the plums into boiling water immediately after forming them!
    • Never leave the pit inside the plum!
    • Always use a potato masher!
    • Cool the potatoes completely before making dumplings!
    • Have a few plums more than necessary, just in case!
    • Make a double batch and freeze one!

    Potato Recipes We 💙

    • A bowl with potato and carrot soup, a spoon, bread, salt and pepper on a gray background.
      Simple Potato Soup Recipe [Stovetop, Few Ingredients]
    • Overhead photo of a pie in a black pan and a hand holding a piece of the pie above.
      Hash Browns Potato Pie (Kljukuša)
    • Moussaka in a pan.
      EASY Serbian Ground Beef Potato Moussaka Casserole
    • Cast iron pan filled with yellow stuffed peppers and a kitchen towel on a gray background.
      Easy Vegetarian Stuffed Peppers with Potatoes [Oven Baked, No Rice, Gluten-Free, and Tomato Sauce-Free]

    Recipe FAQs

    What are the best potatoes for knedle?

    Knedle sa šljivama (plum dumplings) love starchy potatoes like Russetts.

    In the Balkans, this type of potato is known as 'stari krompir/ krumpir' (old potato). Old or starchy potatoes are lower in water content, they come later in the season and have a rough, brown skin. This makes them perfect for dumplings.

    Waxy potatoes are thirsty and require too much flour to be able to be manipulated into shapes. This ultimately leads to rubbery, tasteless knedle dumplings.

    Which fruit are Slovenian, Croatian, Bosnian, and Serbian dumplings filled with?

    Balkan dumplings (also known as knedle, okruglice, gomboce or cmoki), are usually filled with plums. Apricots come in second.

    Lately, however, dumpling specialty shops have been popping up in the region. They offer unusual fillings like Nutella, sour cherries, cream cheese, nuts, raspberries, and even ice cream.

    Thoughts?

    If you make today's knedle sa šljivama (plum dumplings) and like them, please consider leaving a ⭐️⭐️⭐️⭐️⭐️ (5-star) rating. This will help others find the recipe more easily!

    You can also leave a comment, I read EVERY one! Finally, if IG is more your thing, consider tagging us @balkanlunchbox.

    Prijatno, Dobar Tek, and Bon Appetit!

    (Recipe by K. Mandić-Šaponjić)

    A fork holding half of a dumpling knedla on a white plate, with one and a half knedle in the background.

    Balkan Plum Dumplings (Knedle sa Šljivama)

    Aida
    Plum dumplings, known as knedle sa šljivama (and also as gomboce, cmoki, knedli), are a delicious Balkan treat! These potato dumplings are filled with plums, breaded, and topped with sugar or cinnamon.
    5 from 2 votes
    Print Recipe Pin Recipe
    Prep Time 1 hour hr
    Cook Time 2 hours hrs
    Total Time 3 hours hrs
    Course Dessert
    Cuisine Bosnian, Croatian, Macedonian, Montenegro, Serbian, Slovenian
    Servings 10
    Calories 564 kcal

    Ingredients


    • 3 pounds Russet or another starchy potato, older potatoes (stari krompir); avoid waxy potatoes
    • 2 teaspoons salt for water
    • 30-35 plums you'll use 28-33, but have more just in case; look for smaller, ripe but not overly; if large ones are the only option, halve them
    • 5 tablespoons butter soft or melted
    • 13-14 ounces white flour plus a little more
    • 1 egg
    • 1 teaspoon vegetable oil or avocado, coconut oil
    • 5-7 ounces bread crumbs volume is an approximation
    • 5-7 ounces white sugar volume is an approximation

    Instructions
     

    Cook the Potatoes

    • Fill a large pot with water and add potatoes. You can peel and dice them beforehand. However, if you have time, cook them with the skin on. (If using waxy potatoes - which we don't recommend - you must cook them with the skin on.)
    • Add salt. Bring to a boil on high. Lower the temperature to medium and cook until potatoes are fork-tender.
    • Cooking may take anywhere from 15-45 minutes. Potatoes with the skin may cook a bit longer. (However, if you're cooking potatoes for over an hour, consider making a different dish because there's a high possibility that knedle won't come out well.)

    Prepare the Plums

    • Meanwhile, pit the plums but leave them intact. Start by taking one plum and cutting it lengthwise on one side. Cut it enough to get the pit out but leave the plum in one piece. (If the plums you're using are large, you can cut them in half, or quarters.) Discard the pits.
    • (Also, if your plums are organic, check for plum fruit moths.)

    Cool and Mash the Potatoes

    • Strain the potatoes. (If they have skin on, dip them in cold or iced water, just long enough to be able to hold them while you peel their skin off with a knife. Avoid keeping potatoes in cold water for too long.)
    • Transfer peeled potatoes to a large bowl and mash manually using a potato masher. (Don't use an electric mixer!) Mash them very well until the texture of the mashed potatoes is smooth and crumb-free.
    • Once the right consistency is achieved, cover the bowl with a kitchen towel and leave aside to cool for up to 1 hour. (Potatoes have to be completely cool before they're mixed with flour so they don't 'soak up' more flour than necessary.)

    Heat the Water

    • About 15 minutes before making the dough for plum dumplings, fill up a large pot with water about ⅔ of the way up. Cover the pot and bring to a rolling boil on high.
    • (If you're making a double batch, or want to finish faster, use two pots with water.)

    Make the Dough for Plum Dumplings

    • (Parallel to water heating up.) Dust the working area with plenty of flour. Add mashed potatoes, egg, and butter. Then add more flour to the ingredients and start making the dough. Lightly press and pat the mixture, and continue adding flour little by little, until it forms into a large soft ball that's on the rough side.
    • The total amount of flour will depend on how "thirsty" your potatoes are. Adding a little bit at a time allows you to have more control over the dough. (This is why it's important to choose starchy potatoes!) Good dumpling dough feels wet, elastic, soft, and a little bit sticky, while at the same time dry enough to be manipulated into a small ball with a plum inside. (It shouldn't be too dry!)
    • Divide the dough into two loaves. Work each loaf a little bit more, and stretch each into a baguette-like formation. At this point, cut each loaf into (approximately 15) one-inch (about 2 cm) slices/ dumpling rounds.

    Stuff/ Form Plum Dumplings

    • Take a plum, and using a small teaspoon fill it up with sugar, and transfer onto a dumpling round. As the dumpling dough is sticky, wet your hands with only a few drops of water, or powder it with just a pinch of flour to prevent the dumplings from sticking to your hands. (You may have to repeat this in between every, or every other dumpling.)
    • Lift the dumpling edges until they meet on top of the plum. Pinch them until the hole is closed and the plum is safely secured inside the dough. Then roll the dumpling in between your palms until you're left with a smooth, golf-sized dumpling ball with no openings.

    Cook Plum Dumplings

    • Drop each dumpling into the boiling water immediately after making it. Don't overcrowd the pot! (Depending on the size of your pot you'll boil no more than 8-10 dumplings at a time, if that many.) This recipe is for 28-33 dumplings, so adjust the speed of you making the dumplings with their boiling.
    • The dumplings will at first sink to the bottom of the pot. Once they boil, they'll rise to the top. It may take anywhere from 15-20 minutes, even a little longer, for the first batch of plum dumplings (knedle sa šljivama) to come up. (Consequent batches take shorter.) Stir the water occasionally to prevent the dumplings from clumping together. Do it carefully so the plum dumplings don't fall apart.
    • Once each dumpling rises to the top, transfer it to a flat surface until you're ready to fry it in bread crumbs.

    Finish off with Bread Crumbs and Sugar

    • In a large pan, add oil and heat it on high. Lower to medium and add breadcrumbs. Simmer for 2-3 minutes, or until bread crumbs turn slightly brown (this takes very little time, so be on the lookout). Meanwhile, prepare a bowl with sugar, and set it aside.
    • Transfer plum dumplings to the pan with the bread crumbs. (You'll have to do this in batches too.) Roll them in the pan for a quick moment, until each dumpling is covered in bread crumbs on all sides.
    • Afterward, transfer the dumpling into the bowl with sugar and roll it so it's covered in sugar. Alternatively, transfer the dumplings onto a flat surface and sprinkle with the sugar (and/ or vanilla and cinnamon).

    Handling Plum Dumplings

    • Serving: Serve plum dumplings warm or hot. (Some individuals like to eat them cold also.) The serving size is up to you, however, 2-3 plum dumplings seem to be a good volume for most people.
      If going for a savory moment, you can add a dollop of sour cream on top. Sour cream on plum dumplings is a Central European thing though. In the Balkans plum dumplings (knedle sa šljivama), are a dessert about ninety percent of the time.
      Storing: Store plum dumplings (knedle sa šljivama) in an airtight container in the fridge for up to 3 days. (Discard after this time as the potato will become gummy and hard.)
      Reheating: Reheat using your preferred method, or eat cold. Only reheat as many plum dumplings as you will eat. You can reheat them in a baking pan in the oven, a frying pan on the stovetop, or the microwave.
      Freezing:  Making plum dumplings is intensive, so we recommend making two batches at once and freezing one of them. Alternatively, you can halve the batch and then freeze one, and cook the other half.
      So if you decide to freeze plum dumplings (knedle sa šljivama), do it after you shape the dumplings, but before boiling. After you form them, transfer the dumplings onto a tray.
      First freeze them on the tray for 10-15 minutes to prevent sticking, and then take the tray out, transfer them to freezer bags (or freezer-ware), and return to the freezer. You may have to do this in batches.
      Thawing/ reheating: once you are ready to eat them, take plum dumplings out of the freezer and put the pot with the water to boil. The rest of the instructions are the same.

    Video

    Notes

    • Preparation and Cooking Time
    Total preparation and cooking time is a rough estimate! Some factors are out of your control. (The time it takes for potatoes to cook and cool, the interaction between potatoes and flour, your experience, etc.) Set aside at least 3 hours to be safe, but be prepared for the process to take longer. 
    • Serving Size and Nutrition Information 
    Serving size is individual. Some people eat 2, some eat 10 in a sitting. It was calculated based on 3 plum dumplings. 
    • Ingredient Notes
    Potatoes: starchy potatoes only! They're the difference between quality knedle and knedle hard as a rock. An alternative is an all-purpose such as Yukon Gold. 
    Plums: look for smaller, sweet, dark purple plums with yellow or purple insides. Ripe but not overly ripe!  The best kind of plum for knedle sa šljivama is the small European or Italian plum (lat. prunus domesticus). If you can only find large plums, cut them in half, or even quarters, depending on their size. 
    Flour: all-purpose flour (regular white flour) works best. An alternative is the European "sharp" flour, but it is by no means necessary.

    Nutrition

    Serving: 3dumplingsCalories: 564kcalCarbohydrates: 114.6gProtein: 10.6gFat: 8.4g
    Tried this recipe?Let us know how it was!

    More Recipe 💙

    • Stuffed cabbage on a spoon in a copper pot.
      Sarma: Best Traditional Balkan Stuffed Sour Cabbage Rolls
    • ajvar, chutney, pepper chutney, eggplant chutney, balkan spread, balkan dip ajvar, red pepper and eggplant dip, pepper dip | balkanlunchbox.com
      Ajvar
    • A spoonful of baked sauerkraut.
      Baked Sauerkraut (Podvarak)
    • Three pieces of pie on top of each other.
      Phyllo Cheese Pie (Pita Sirnica or Cheese Burek)
    • « Go to Previous Page
    • Page 1
    • Interim pages omitted …
    • Page 12
    • Page 13
    • Page 14
    • Page 15
    • Page 16
    • Go to Next Page »

    Primary Sidebar

    Aida and Aleksandra of Balkan Lunch Box, standing together.

    Welcome! I'm Aida, creator of Balkan Lunch Box, food blog about traditional and contemporary Balkan cuisine. My sister Aleksandra helps me.

    Learn more about me →

    As seen on

    Popular

    • Three biscuits on a gray background, one being halved with a fork.
      Čupavci: Balkan Lamingtons [One Hour]
    • Closeup of four wafers.
      Balkan No Bake Wafer Cake (Oblatne, Oblande)
    • Old Fashioned Goulash with Beef and Mushrooms
    • Stewed apple in a clear bowl, on the table.
      Stewed Stuffed Apples in Syrup (Tufahije)
    • Soup in a silver bowl with a lid, a kitchen cloth, two slices of bread, a lemon wedge and a spoon.
      Okra Soup: Creamy Chicken Soup with Okra (Bosnian Bey's Soup, Begova Čorba)
    • ajvar, chutney, pepper chutney, eggplant chutney, balkan spread, balkan dip ajvar, red pepper and eggplant dip, pepper dip | balkanlunchbox.com
      Ajvar
    • Moussaka in a pan.
      EASY Serbian Ground Beef Potato Moussaka Casserole
    • Closeup of a stuffed pepper.
      Best Classic Baked Stuffed Peppers with Ground Beef and Rice (Punjene Paprike)
    • Quarter of a burek pie on a plate on gray background.
      Burek
    • Rice and chicken in a sheet pan, overhead.
      Easy Baked Chicken Over Rice Casserole (Chicken Thighs and Drumsticks) [4 Ingredients, 1 Pan]

    Favorite Salads

    • A bowl of carrot and beet salad, a beet, carrots and fork on the side.
      Grated Beet and Carrot Salad [Five Ingredients, Ten Minutes]

    Latest & Greatest

    • 11 Favorite Winter Soups
    • White bowl with a blue border filled with a bean soup.
      11 Favorite Fall Soups
    • Closeup of a bowl of soup, and a spoon holding a handful. .
      15 Soups For The Soul
    • A pin depicting poached eggs on a bed of ground beef.
      21 Best Ground Beef Recipes


    Footer

    ↑ back to top

    About

    • Privacy Policy
    • Accessibility Statement

    Newsletter

    • Sign Up! for emails and updates

    Contact

    • Contact

    Copyright © 2014 - 2025 Balkan Lunch Box

    Rate This Recipe

    Your vote:


    A rating is required
    A name is required
    An email is required