• Skip to primary navigation
  • Skip to main content
  • Skip to primary sidebar
  • Balkan Recipes
  • About BLB
  • Nav Social Menu

    • Facebook
    • Instagram
    • Pinterest
    • RSS
menu icon
go to homepage
subscribe
search icon
Homepage link
  • Recipe Index
  • About
    • Facebook
    • Instagram
    • Pinterest
    • RSS
    • YouTube
  • ×
    Balkan Lunch Box > Blog

    Jam Crescent Cookies

    Jan 2, 2019 · 10 Comments

    Perfect three ingredient crescents (margarine, eggs, and flour) filled with jam and baked. Classic combo for the win!

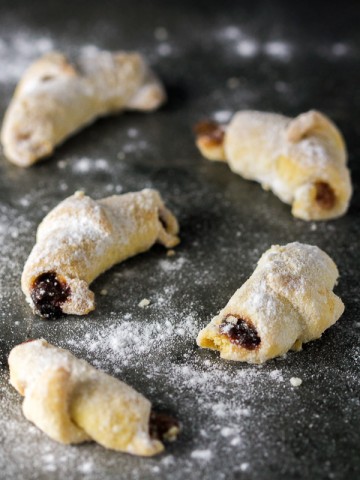
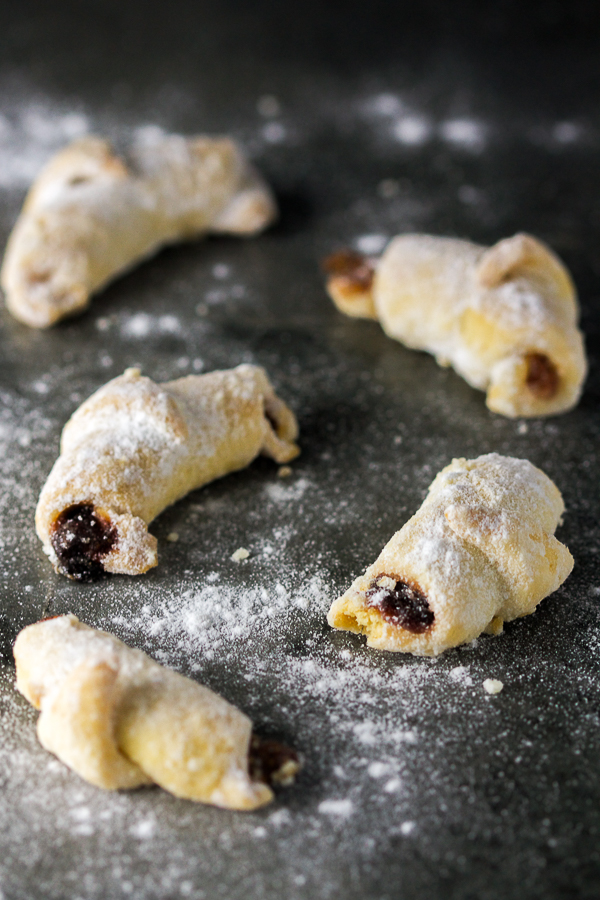
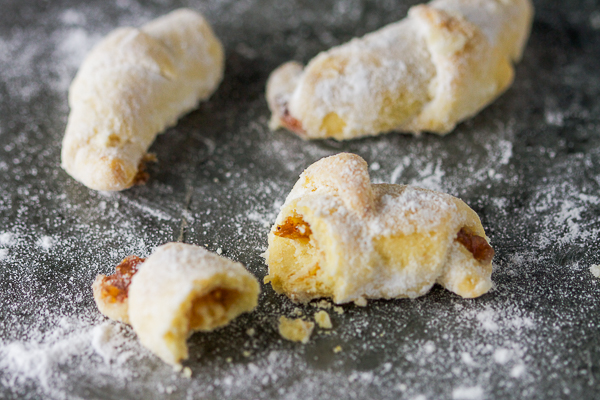
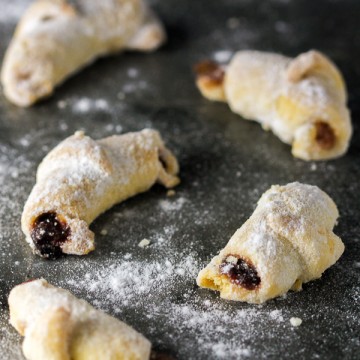
    Perfect three ingredient jam crescent cookies (butter, eggs and flour) filled with the preserve of your choice, then baked. The result is a buttery soft crumble-in-your-mouth perfection. Happy New Year!

    perfect cookie filled with jam and baked. Classic combo for the win!

    Dry cookies? Not so!

    What we are doing here falls under the category of "dry cookies."

    I find "dry" to be a misnomer, but because there are so many softer and more moist cookies on the repertoire for the holidays these jam crescent cookies (and most butter cookies), get unfairly labeled.

    Honesty is this blog's policy. Honestly? These crescents are a bitch to make!

    Generally, I’m no fan of chocolate-free cookies. But these cookies are so soft, so full of moisture, they become a part of your mouth as soon as you start to eat one. They're succulent, buttery and soft. They're not dry for a second.

    The butter does wonders for the dough, confectioner's sugar coats them just right and a generous splash of jam fortifies the sweetness.

    Plus, the batch is so big (72 cookies), they're worth spending an afternoon on (with a pause).

    These keep well. You can leave them on a terrace or in a cool place for a few weeks and they'll still be fresh.

    And they're a great present too. Just pull out a tin box, fill it up, and put a bow on top.

    Perfect three ingredient cookie (batter, sugar and flour) filled with jam and baked. Classic combo for the win!

    Butter Dough? Ugh!

    The point of difficulty for these jam crescent cookies is the dough.

    Typical butter dough that is. If you've made any type of butter cookies you know what I'm talking about! Butter and flour have to leave their baggage behind and make friends. Really close friends if the cookies are to succeed.

    This is hard to achieve at first.

    Butter has to be room temperature. Definition of room temperature (for cookie making butter) means soft enough to swoop the knife or mixer through with ease.

    You also have to be patient. The dough has to rest in the fridge for hours. Then it has to adjust to the room temperature after being taken out and before all that cookie work. Thus that pause in preparation. (Meaning, you won't be eating these cookies today.)

    You could, of course, read through Smitten Kitchen's elaborate article on techniques for an easier way to make butter cookie dough.

    I'd say reading her post is a smart thing to do.

    It's also the one thing I forget every time I am about to make these. My cookies are an elaboration. Hers cut to the chase. I've tried analyzing my forgetfulness. Maybe I'm scared to do them differently because they work so well the old fashioned way.

    As for you, whichever way you do the dough, these jam crescent cookies are worth it.

    Our Jam Crescent Cookie Originator 

    Upon arriving to the US, we discovered a small community of Bosnian immigrants that lived in the DC area.

    Like us, they left one life in exchange for another. Like us, some lived through the war, and still crossed the street apprehensively observing high points around them. They looked suspiciously at the hills. They flinched at flashes of glass as windows opened. This is the kind of walking you learn when snipers are around, and snipers abounded in Sarajevo during the early nineties.

    Others spent time elsewhere during the war, but were asked to leave their second homes behind once the war was over. European countries like Germany were giving money to Bosnian refugees to send them back to their burned out cities so they could start building again. However the US still had a refugee program through which people could apply to come to the promised land. Many did.

    And that’s how there appeared a big mélange of Balkan people in, and around Alexandria, Va.

    We took to each other quickly. These friendships were our lifelines in those years. Generations separated into their own comfortable rhythms, but we all shared the music, cultural idiosyncrasies and jokes no one else could understand.

    And we shared our sweet language, which as the years passed kept dividing and growing that we had to cling on to it like spurned lovers. Those words, those accents, those sounds we owned so well, suddenly sounded foreign. English, in its unassuming and sneaky way, started to show up in our sentences until some completely abandoned the old language in favor of the new.

    One of the families we became friends with was a couple with two daughters. Both daughters took after their mother and were beautiful. Lanky but soft, possessing ivory complexion and dark, dark hair, they resembled princesses from Russian fairy tales.

    One was my age, and for a while we were close friends. The older was a few years ahead of us and had a disability that determined she would not be able to participate in all of life’s experiences.

    But their mother, oh boy, the world rarely sees an unstoppable figure like her. She was the one who pulled the most. As a teenager, I found her overbearing. It was as if she hung above us like an umbrella, just waiting for the world to hurl itself down on us. And in those years we wanted to hurl ourselves onto the world instead.

    That woman created things into reality when and where she could. And when she couldn’t, she relied on her endless imagination to bend the world to her will. She did this for both daughters, especially the older one.

    Results were fantastic. A fully able person had not experienced even half of what this young woman did, all thanks to her mom.

    The mom did all this (to us seemingly) effortlessly and with humor.

    This dark, heavy, relieving humor is specific for Bosnia. It’s our therapy. Brutally honest. It assesses the culture with no reservations. It boils down mentalities into basic of generalizations. It’s truthful. It shows potential for potential.

    You know when you laugh things become a little easier. Suddenly perfections become imperfections, and imperfections are perfect the way they are. Dark humor is Bosnian wabi-sabi. Suddenly you don’t envy anymore. Suddenly there is sunshine where there ain’t any sunshine.

    Suddenly, life is good.

    And life was good. We made it good. We picked up the pieces. We rebuilt. Day by day, year by year, we became as essential (important even?) part of DC metro like generations of immigrants before us.

    One couple opened up a restaurant. We hung out there, celebrated NYE, July 4th, and Halloween. There was finally a place to buy pita. A place to buy the well-known Vasina cake. A place to sit down and talk, cry and laugh. And send the boss to hell in proper Balkan slang (by telling him to go screw his mother), and then hear about a new job opening.

    We celebrated most holidays together. And although as a young adult I was running away from traditions and to parties of my own, secretly I enjoyed attending these. There was a feeling of familiarity, of being around people who genuinely wanted you to succeed and saw a part of their own success in your growing up.

    The food at these parties was indescribable.

    Usually there were so many of us at least one huge table would have to hold the entire spectrum of entrees. I feared at some point one of these tables would break under the heaviness and kill someone. Still not sure how this was avoided.

    You could eat anything there – from pitas, salads, to cakes, schnitzels, strudels and baklavas – and the hostess would even pack up a few things for you to take home.

    Each time. Every time. Every hostess.

    In all that opulence though, my favorite were the jam crescent cookies made by my friends’ mom.

    For every occasion she’d come with a present for everyone. Sometimes this was a lighter for the ladies who still smoked, that flickered a small penis as they reached to light their cigarettes. Sometimes everyone got a stuffed ballerina toy.

    But often, she brought along these jam filled margarine crescents. I don't think she knew, but for me they were the beginning and the end of every celebration.

    Perfect three ingredient cookie (batter, sugar and flour) filled with jam and baked. Classic combo for the win!

    She gave mom the recipe before mom moved back to Sarajevo. Since then, these crescents are a regular rotation at our holiday table.

    Every time I eat them, I am reminded of those early years in the US. And I'm reminded of this time when we went to NYC together, just the women and girls except our disabled friend who had travelled somewhere with her father.

    While we were doing the regular Manhattan tourist-y things, the mom kept on walking behind the group, turning around frequently. Later that night, at the hotel, for the first and only time, I heard her say anything direct about it all. "I keep walking and looking to see where she is to make sure she crosses the street safely."

    I started to understand her in that moment. But I fully understood her only several years later, when I couldn't fall asleep because I was listening to someone's breathing to make sure they were still alive.

    Jam crescents are a happy occasion now. They are a tribute to a wonderful woman, and her family that keeps on growing.

    And the fantastic folks I met along the way and of becoming an adult in between two worlds, in a small community that grew large. A community that held each one of its children in a tight cocoon until we were ready to spread our wings.

    We've all flown further than we ever imagined.

    Perfect three ingredient cookie (batter, sugar and flour) filled with jam and baked. Classic combo for the win!

    Perfect three ingredient crescents (margarine, eggs, and flour) filled with jam and baked. Classic combo for the win!

    Jam Filled Butter Cookies

    Aida
    Perfect three ingredient jam crescent cookies (butter, eggs, and flour) filled with jam and baked. Classic combo for the win!
    5 from 1 vote
    Print Recipe Pin Recipe
    Course Dessert
    Servings 24

    Ingredients
      

    • 16 ounces butter room temperature
    • 2 egg yolks
    • 1 egg
    • 3 tablespoons sour cream
    • 3 tablespoons baker's yeast
    • Zest from 1 lemon
    • 22-24 ounces white flour plus more to work the flour
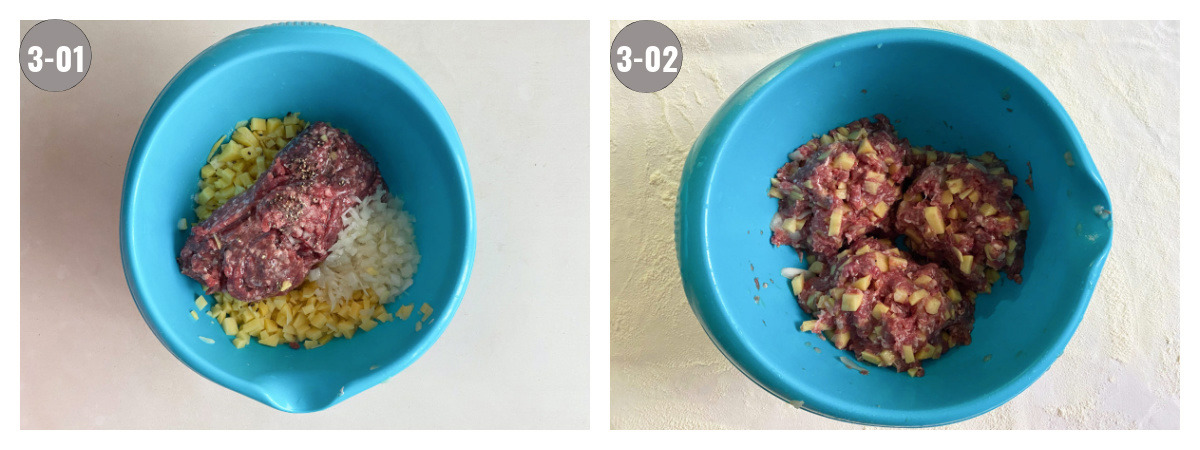
    • 12-14 ounces jam plum, fig, rose hip or other
    • 14-16 ounces confectioner's powdered sugar
    • 1 tablespoon vanilla powder or ½ tablespoon extract

    Instructions
     

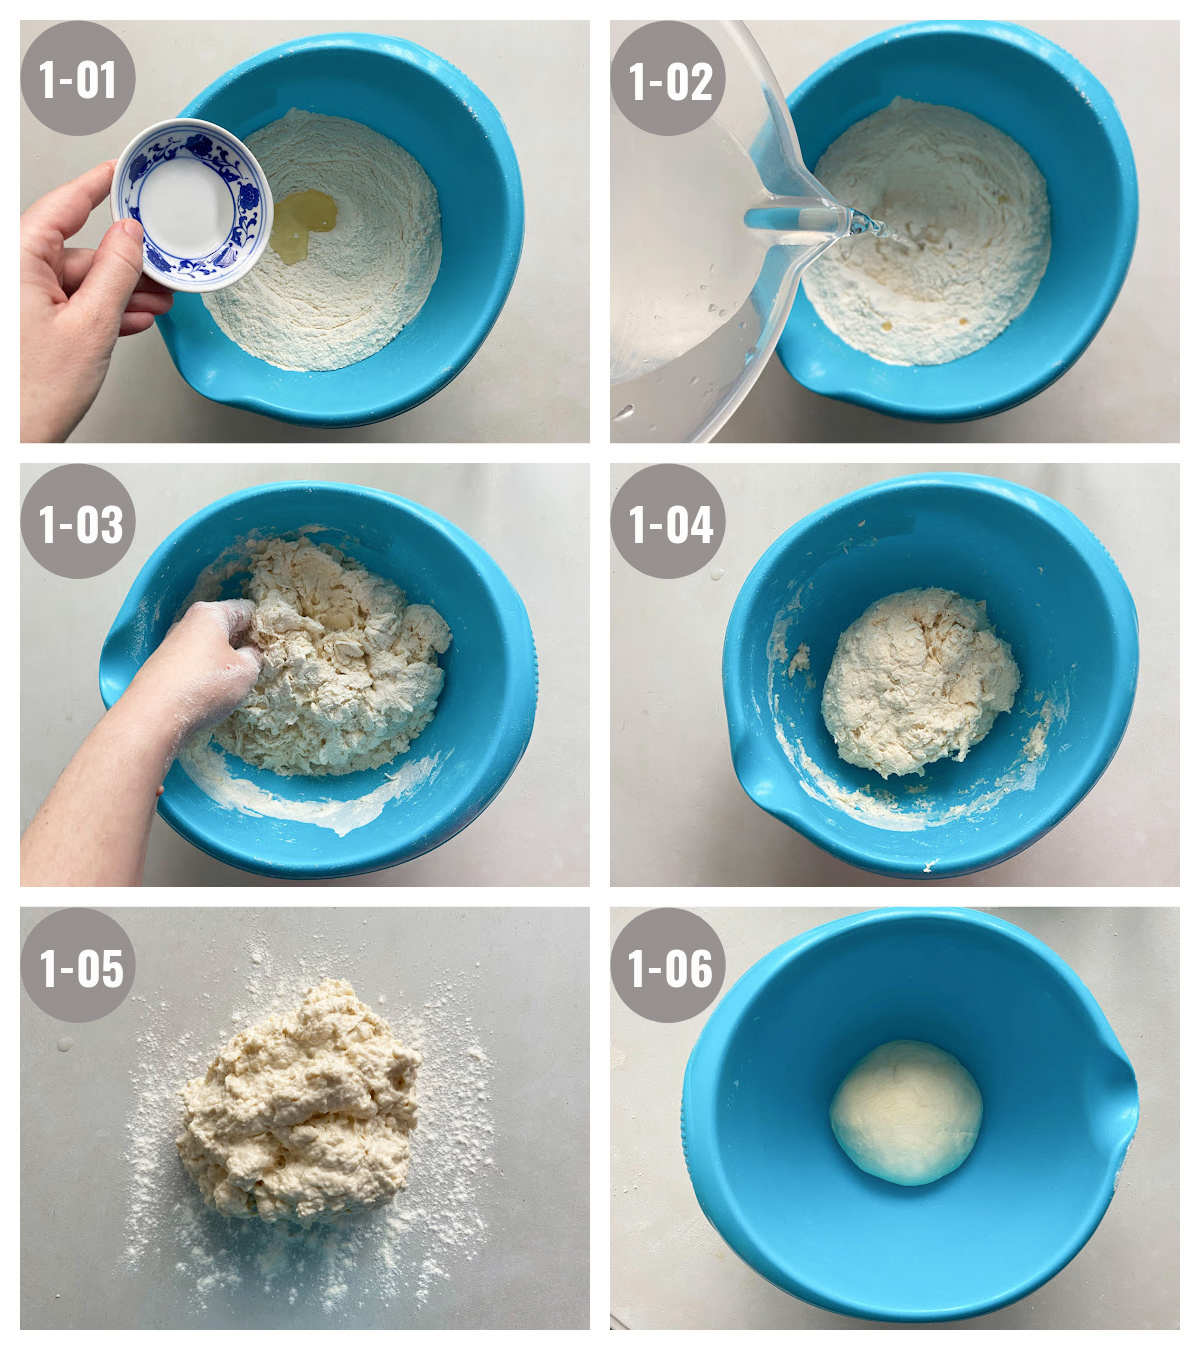
    • In a large mixing bowl place butter, egg yolks, egg, sour cream, baker's yeast, lemon zest and vanilla. With a hand mixer (set to the lowest setting and gradually increasing) mix until completely integrated. Remove mixer.
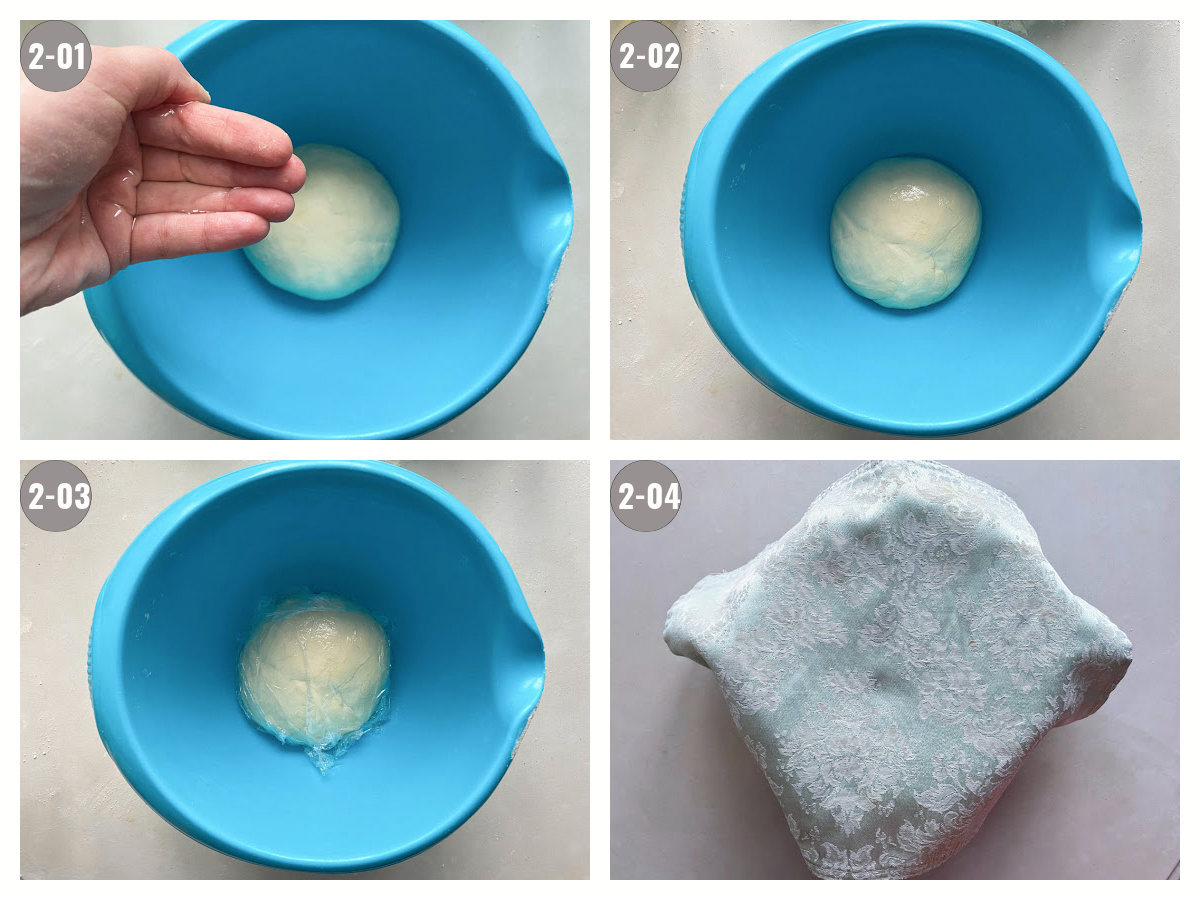
    • Continue kneading with your hands while adding the flour in batches. The dough will be hard to work with, but keep mixing to the best of your ability, and adding flour in between. (It takes patience and about 20 minutes.) When the dough is hard, buttery and the thickness of an ear lobe, it's ready to rest. Divide into three equal parts. Knead each part a few more minutes. Cover and transfer to the fridge. Leave for 4-6 hours (preferably overnight).
    • Take the dough out of the fridge and let rest until it's room temperature (45 to 60 minutes).
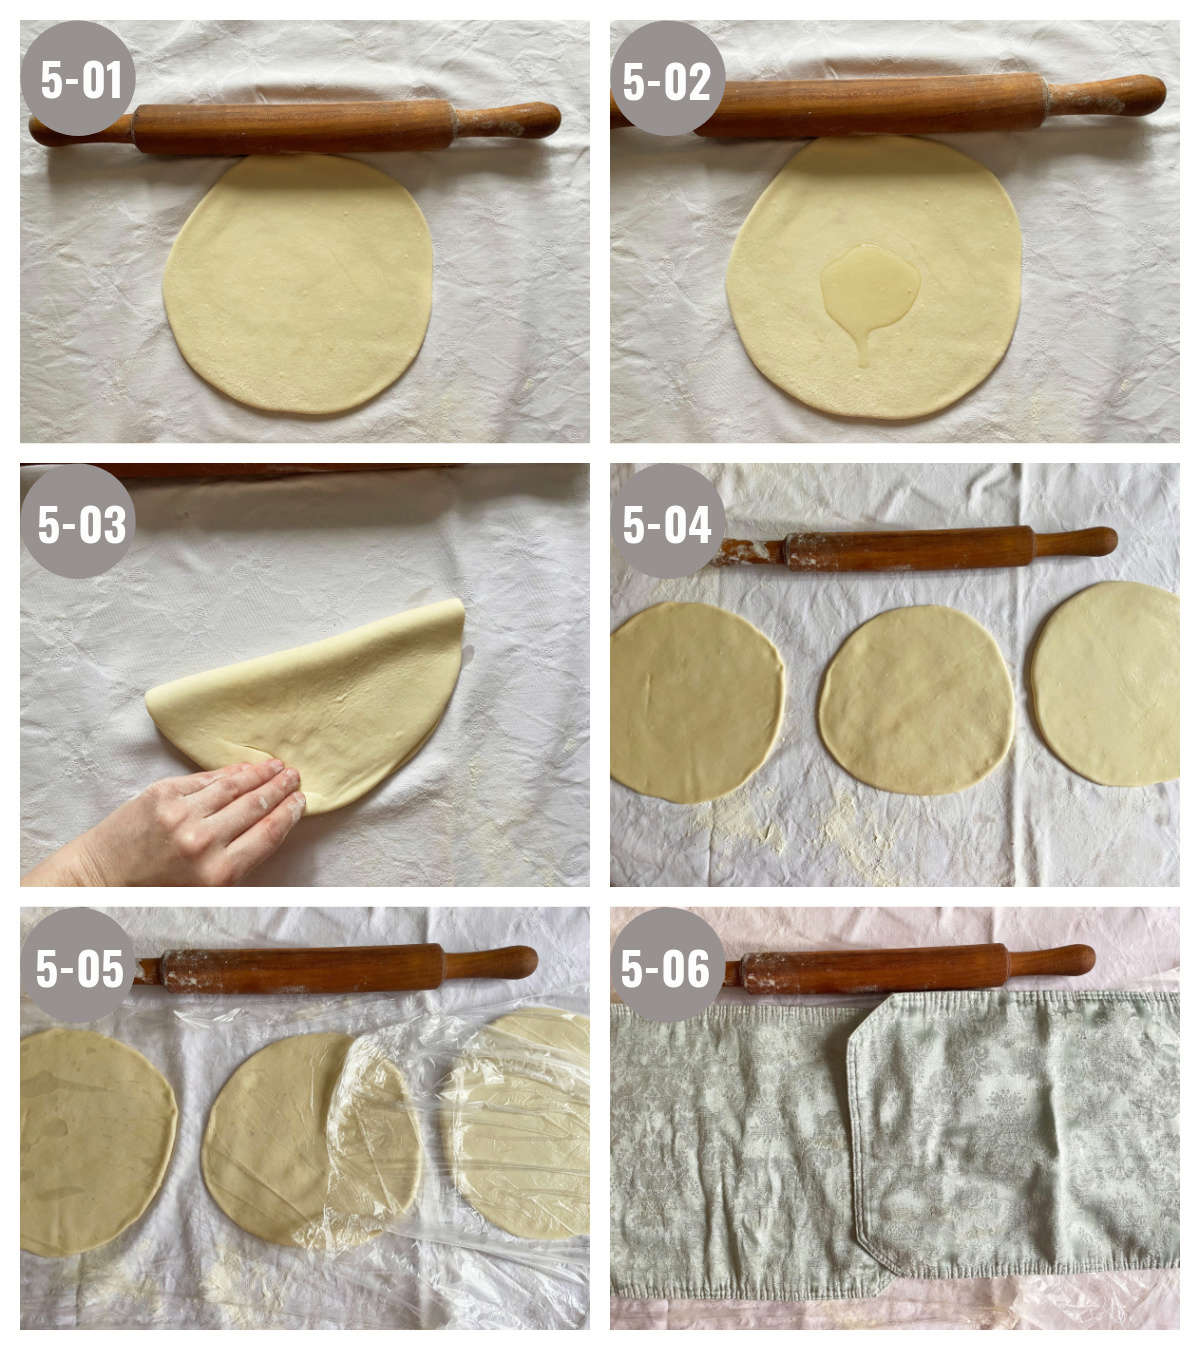
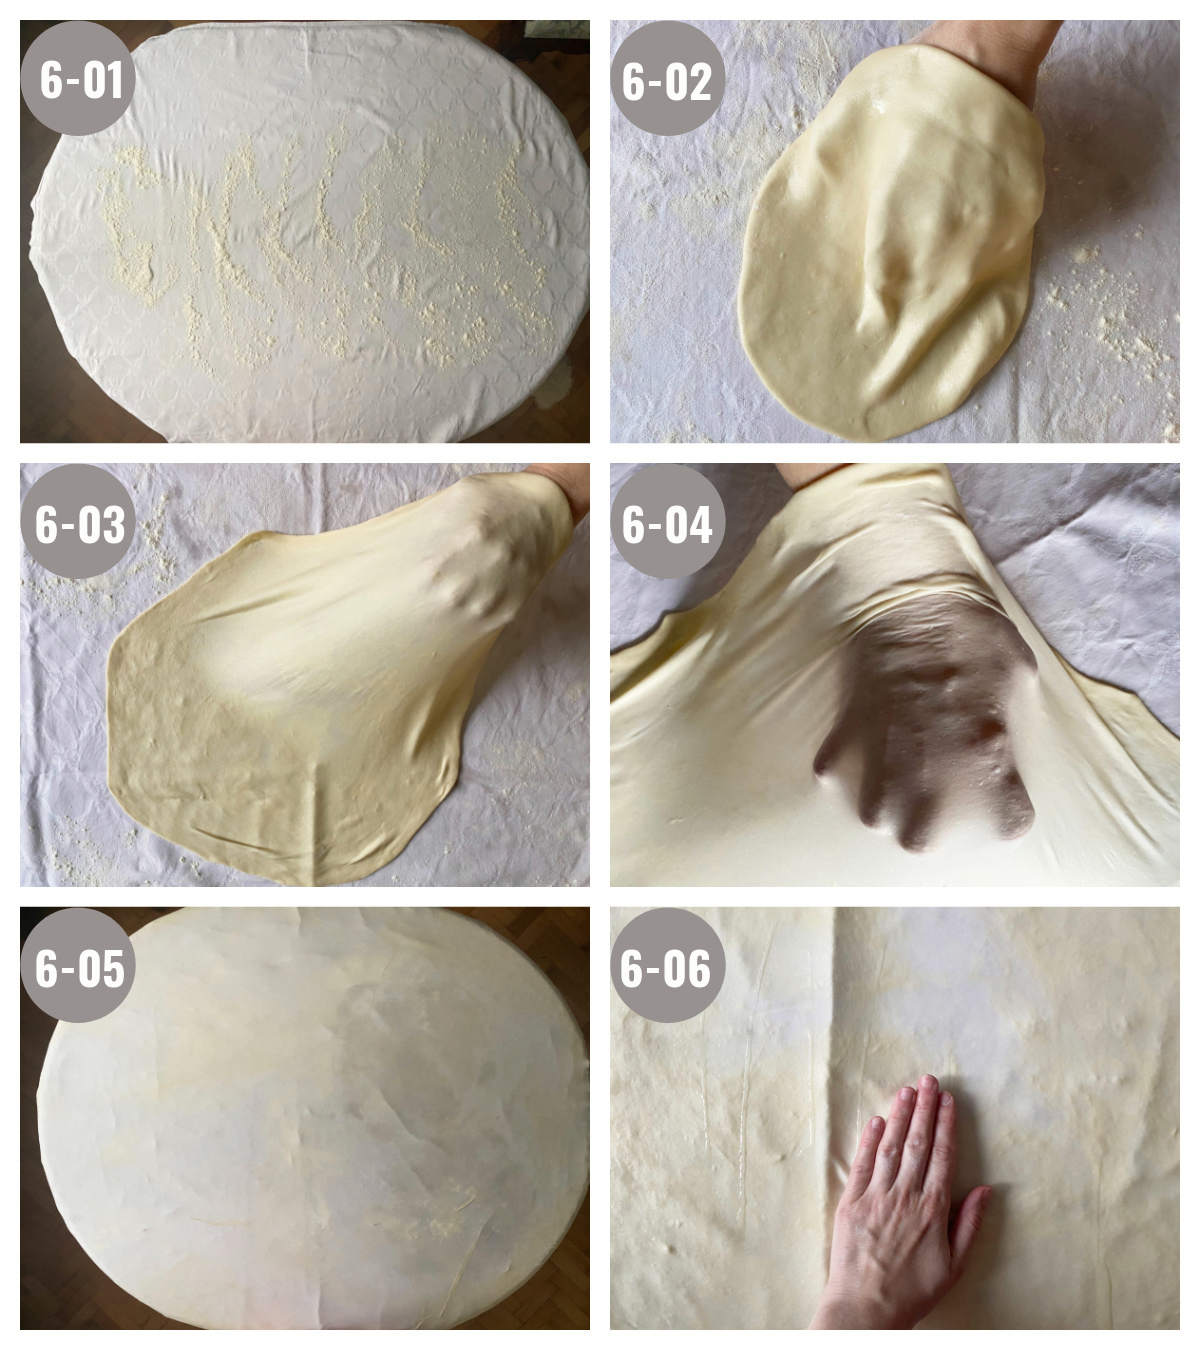
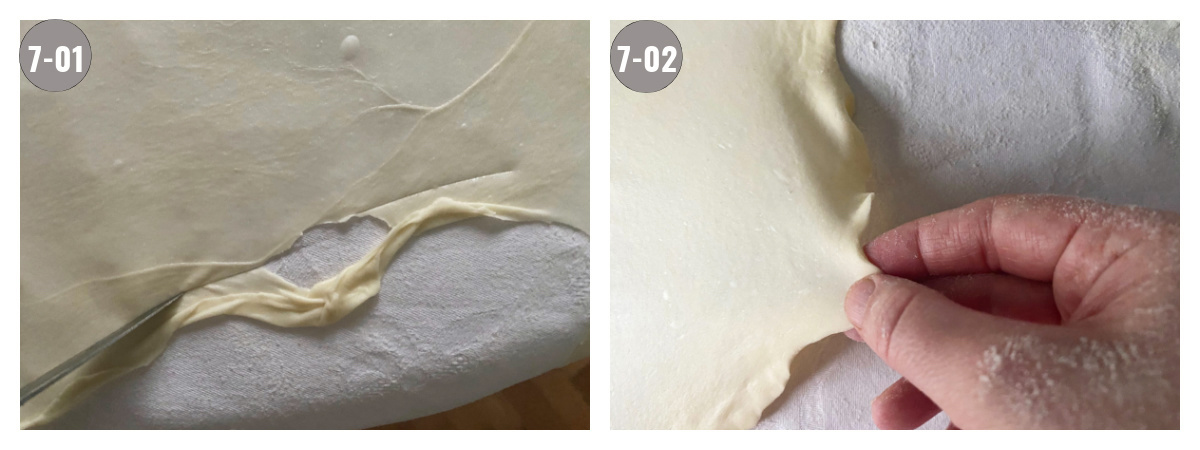
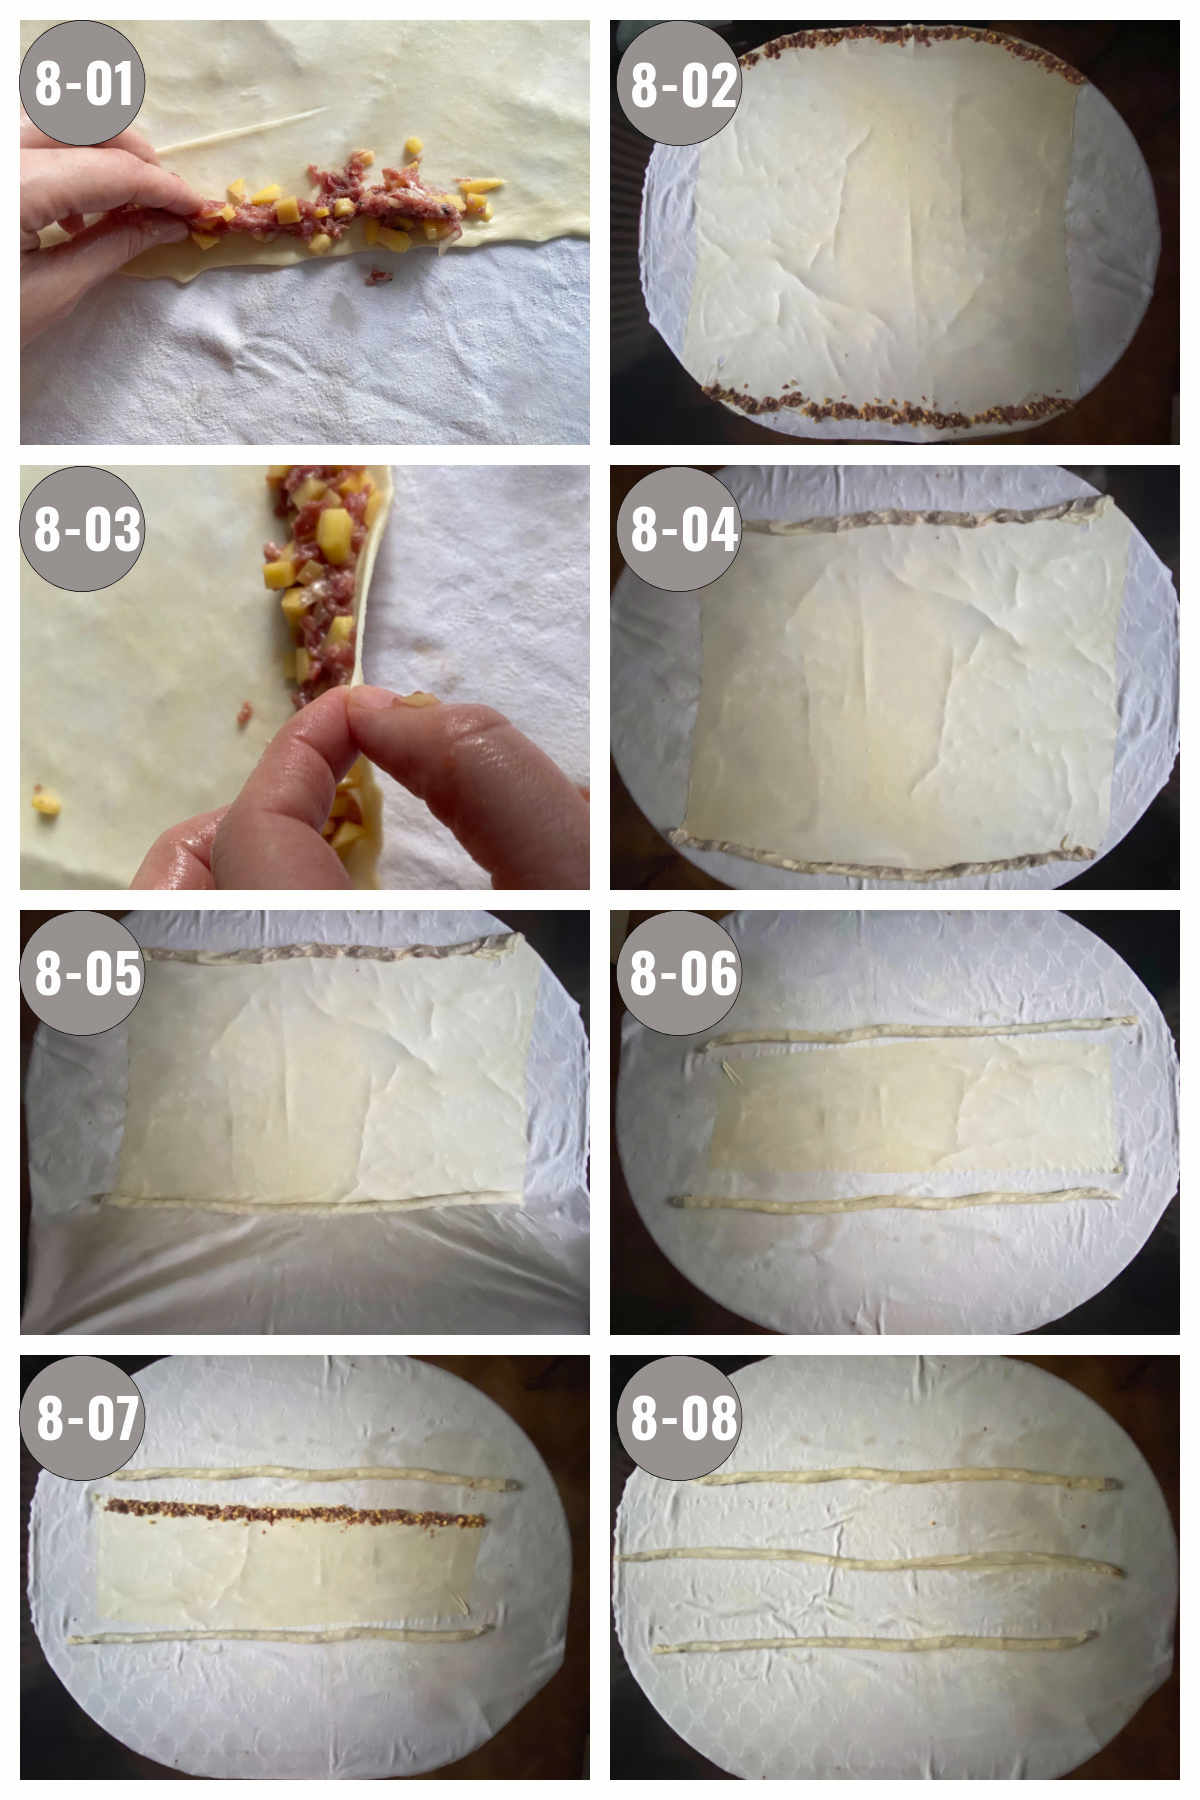
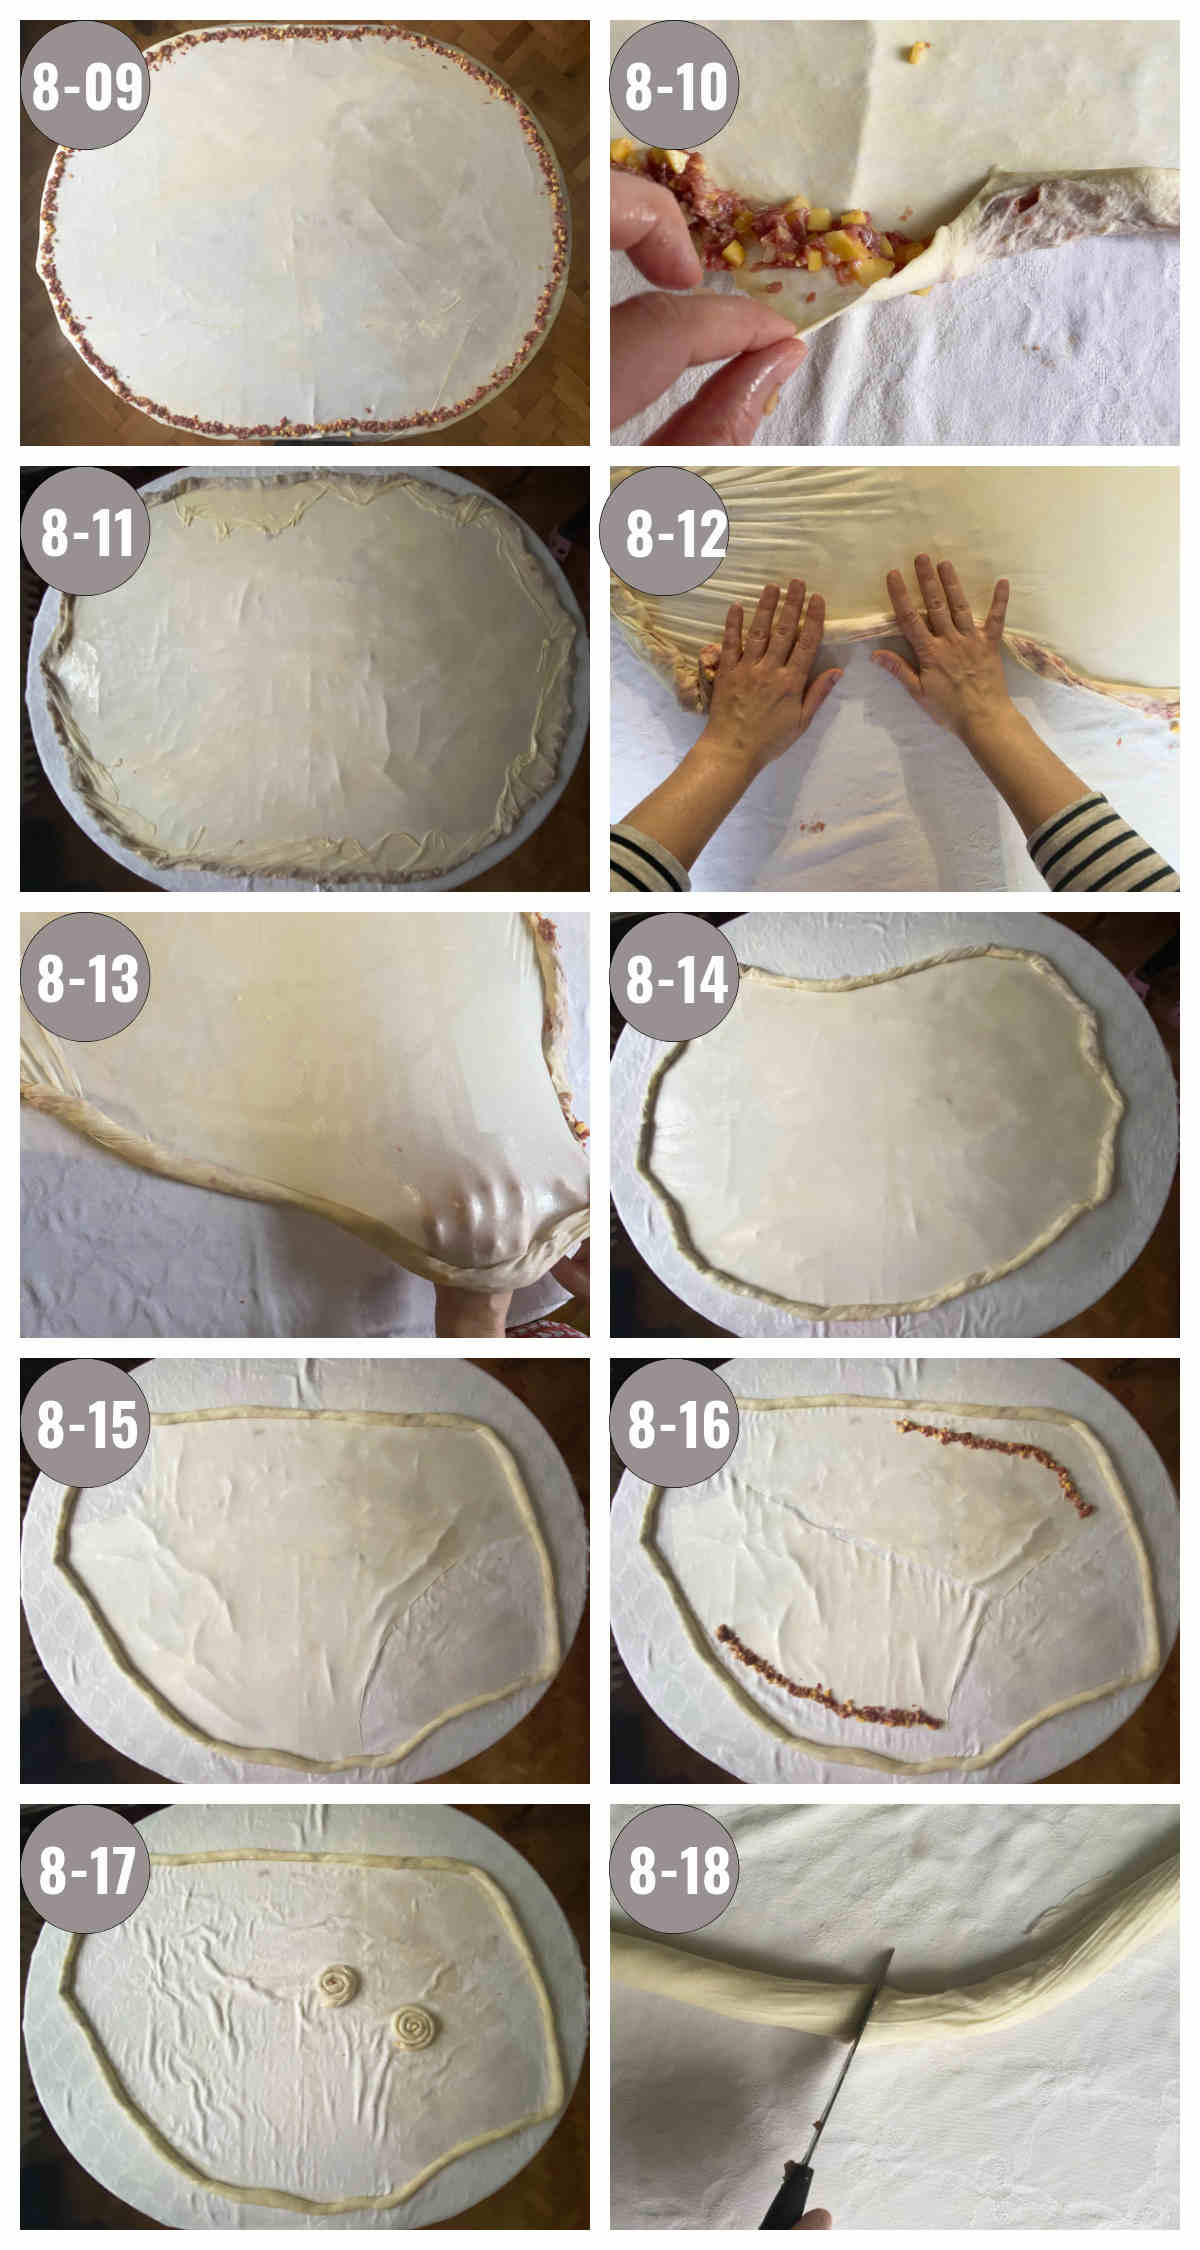
    • Sprinkle a generous amounts of flour on your working area. Divide each dough piece into three (you'll end up with 9 dough pieces total). Take the first smaller piece and work it with your fingers for a minute. Finally, roll it out with a rolling pin until it's round and of the thickness of about 2 pennies stacked together. Cut into eight slices. Put a teaspoon of jam on the thicker end of each slice. Roll each slice from the thicker to the thinner part making sure the jam stays inside. (Some of the jam will come out during baking.) Heat oven to 425°F.
    • Repeat step 4 for remaining dough.
    • Take a baking pan and cover with parchment paper. Place crescents onto it leaving some space in between each. (You'll probably have to bake in batches. Do not bake two pans of crescents at the same time in the same oven!)
    • Lower temperature to 350°F.  After 20 minutes turn the pan around. Keep checking the crescents and if they start to turn golden yellow, cover with foil. (They burn fast, so check often!) Depending on your oven it will take between 30-40 minutes in total to bake one batch.
    • Take out and leave to cool for 20-30 minutes.
    • Carefully transfer baked crescents into a large bowl filled with confectioner's sugar. Roll them around until they're covered on all sides. Transfer to a tray or a cookie box.

    Video

    Notes

    You can substitute with margarine, but butter is preferred.
    Measurements yield 72 crescents (8x9). Serving size is about 3 cookies.
    Total time to make is about 2 hours total.  However the dough needs to settle in the fridge for at least 4 hours, preferably overnight, and then adjust to the room temperature for a period of time before cookie formation. Finally, there is a wait period between cookies cooling off and being dusted with confectioner's sugar.
    Keep in a cool place for up to a couple of weeks.
    Tried this recipe?Let us know how it was!

    Puffed Rice and Cornflake Bites

    Dec 13, 2018 · 5 Comments

    puffed rice, cornflakes, corn flake bites | balkanlunchbox.com

    Extra-crunchy puffed rice and cornflake bites congealed with chocolate. I promise, you'll never look at cereal the same way.

    Crunchy puffed rice and cornflake bites soaked in chocolate, you'll never think of cereal the same way. 

    I'm usually not a fan of combining many flavors.

    This may surprise you, but I also don't jump at the opportunity to try new food. When I was young I was such a picky eater, no one would have predicted I'd run a food blog. (That and you know, there was no internet when I was a young child.)

    But recently mom made a few different types of energy-bar like bites. She didn't advertise them. Instead, she left them hanging out on her counter for a few hours.

    A wise woman! She knew I'd eventually come snacking.

    I tried them and loved them. Specifically, I loved these cornflake and puffed rice bites.

    Could not be simpler to prepare too! (Such a plus, especially come December!)

    Rice puffs and crushed caramelized sugar are combined with crushed cornflakes, and then the mass is divided in half. Each half is drenched in a different type of chocolate, mixed until integrated, formed into small bites, and set to stiffen for a few hours.

    The result are these crunchy, (real) chocolate infused energy-bar inspired bites. I called them puffed rice and cornflake bites, but you can call them whatever you want.

    I'm warning you though: these are not health bars! They're a dessert. A dessert so crunchy, and melt-in-your-mouth chocolate-y you'll eat ten before you realize it.

    (If you're looking for a protein fix you're better off checking out the recipe index for protein bombs such as the veal roast or chicken liver sauce.)

    You've been asking for more videos, and we've been obliging. When you get to our recipe index, each recipe that's been filmed has a "VIDEO" designation next to it.

    puffed rice, cornflakes, corn flake bites | balkanlunchbox.com

    Meanwhile, check out some of the food we're making in the upcoming week: 

    CRESCENTS - Simplest crescents filled with jam. Milk infused dough, rolled out and stuffed with a jam of your choice, then baked. A perfect way to treat your family on a Sunday morning. (Kiflice)

    BALKAN LAMINGTONS (SCRUFFIES) - What brownies are to the English speaking world, are Coconut Chocolate Dessert Squares aka Scruffies (known as čupavci) to the people in Balkans, and are a form of Balkan Lamingtons. These busy, spongecake-like squares (first they swim in chocolate, and then drape themselves in coconut), are made in under an hour. And take even less time to eat. (Čupavci)

    HASH BROWN PIE - If you love hash browns, you’ll adore this hash brown potato pie. Finished in 60-min or less, topped with sour cream and minced garlic, it’s a pie unlike any other! (Kljukuša)

    FRIED MINI BREADS - Make yours a perfect bite with these savory pastries with a hundred names: Balkan fried mini breads. (Peksimeti)

    CHEESY MEAT CASSEROLE - Meat and cheese pasta casserole: another in a series of one-pan, under an hour recipes. Chewy and soft, you get all the necessary ingredients in this one, your carbs and proteins. Just add a salad for some greens. (Zapečeni makaroni)

    BOSS SAUCE  - Gratifying mushroom and veal sauce: first simmered with tomatoes, peppers and onions, garnished with a drip of heavy cream, and then baked in foil (parchment paper) using a water bath. (Hadžijski ćevap)

    P.S. By the way, Aleksandra and I had the pleasure of meeting Marwah, BLB’s first, and possibly favorite, reader! She was lovelier than we could imagine.

    Puffed Rice and Cornflake Bites
    puffed rice, cornflakes, corn flake bites | balkanlunchbox.com
    puffed rice, cornflakes, corn flake bites | balkanlunchbox.com

    Puffed Rice and Cornflake Bites

    Aida
    Extra-crunchy puffed rice and cornflake bites congealed with chocolate. I promise, you'll never look at cereal the same way.
    5 from 2 votes
    Print Recipe Pin Recipe
    Prep Time 30 minutes mins
    Total Time 30 minutes mins
    Course Dessert
    Calories 153 kcal

    Ingredients
      

    • 2 ounces granulated sugar
    • 1 ounce walnuts ground
    • 1.5 ounces cornflakes
    • 1.5 ounces puffed rice
    • 7 ounces white chocolate
    • 7 ounces dark baking chocolate

    Instructions
     

    • In a small pan, heat sugar over medium while stirring continuously. As it starts to melt and darken bring temperature down to low, and stir faster. Once the sugar is completely melted and honey-colored, pour onto a piece of parchment paper and let cool (about 15 minutes).
    • Carefully break sugar into larger pieces. Cover with parchment paper and hammer with a meat tenderizer. Add walnuts and mix.
    • In a large ziplock bag combine sugar and walnuts with cornflakes. Seal the bag pushing the air out. Use a rolling pin to crush the ingredients even more.  Add puffed rice, seal and shake the bag until the mixture integrates.
    • Divide the mixture evenly into two medium mixing bowls.
    • Make a bain-marie by filling one large pot ½ with water and bringing it to a boil on high. Place a smaller pot (or an unbreakable mixing bowl) inside the larger pot making sure half of the smaller pot is subdued in boiling water. Add white chocolate to the small pot. Stir chocolate while it melts. Once melted, remove small pot and pour chocolate over the crunchy mixture in one bowl leaving 1-2 tablespoons of chocolate aside. Mix ingredients thoroughly.
    • Use a teaspoon to form small balls/ bites. Transfer each onto parchment paper.
    • Repeat steps 5 and 6 for dark chocolate. In total, you will get about 40 pieces/ bites (20 of each color).
    • With a fork use the remaining melted chocolate to decorate the bites of a different color (white on black, and black on white). Leave all bites in a cool place for 4 hours to stiffen.
    • Transfer to a container and keep in a cool location for up to 5 days.

    Video

    Notes

    *If bain-marie is too complicated you can simply microwave the chocolate until it melts, or melt it over low temperature. Bain-marie prevents burning so it's preferable, however you do whatever is easier for you.
    **These are tasty! So, think about making two batches at once!
    VARIATIONS: Gluten-free: use gluten-free cornflakes, chocolate and puffed rice.

    Nutrition

    Serving: 2BitesCalories: 153kcalCarbohydrates: 15.6gProtein: 2.5gFat: 8.8gSaturated Fat: 4.6gCholesterol: 2mgSodium: 24mgFiber: 1.5gSugar: 8.9g
    Tried this recipe?Let us know how it was!

    Oven Baked Lamb Chop, Beef and Vegetable Stew (Dagara, Tagara)

    Dec 3, 2018 · 3 Comments

    dagara, tagara, lamb stew, veal stew, lamb and veal stew, veggie stew | balkanlunchbox.com

    Dagara a lamb and beef vegetable stew carries a legend that a wise woman once saved her husband from a curse with this decadent broth. Renowned for its richness, each layer of ingredients adds a new dimension of taste. Shall we?

    A clay pot with a lamb chop, and carrot stew, a spoon, and bread on a gray purple background.
    [feast_advanced_jump_to]

    Background

    Dagara (tagara) is a comforting and hearty stew. It achieves a depth of flavor from the variety of vegetables, including potatoes, Romano beans, and carrots that are stewed alongside tender meats.

    It's a dish similar to Bosnian pot stew, except, the meat is first seared on the stovetop and then stewed in the oven with veggies. Not only is this stew exceptionally delicious, but it also comes with an intriguing backstory.

    Once upon a time, in the small town of Ključ (Bosnia and Herzegovina), there lived two best friends, Meho and Haso.

    Meho and Haso had known each other since birth. They were inseparable. What Meho did, Haso did too. They even got married around the same time.

    One evening, Meho's wife cooked a delicious, nameless meal. It was a hearty warm stew filled with the freshest vegetables and succulent meats. Haso loved it so much, that right away he asked for the recipe, so his wife too could make this amazing dish.

    Meho exploded! Years of hidden resentment came out.

    He was furious that Haso imitated him his entire life. It's not that they did things together. It's that Meho did something, and Haso had to do it too. It had to stop!

    Haso was shocked! How could Meho, a friend so great he could not help but emulate, be so cruel? He grabbed his wife and left, cursing Meho to "only eat dagara (tagara) with cows from this day on!"

    After he cooled off Meho tried to smooth things over, but Haso wouldn't hear of it! As a result, Meho started having nightmares about Haso's curse. He finally confided in his wife.

    This wise woman quickly solved the dilemma by naming her nameless meal dagara (tagara). This way Meho would still get to eat dagara, even if he did end up eating with the cows.

    (Oh and dagara (tagara) also came to be the name for the clay pot in which the dish is baked!)

    Ingredients

    • Veal or Beef Cutlets: sirloin and chuck also work.
    • Lamb Chops or Lamb Ribs.
    • Potatoes: Yukon gold or Russett.
    • Green beans: flat Romano green beans are preferred, but the round ones will work too.
    • Garlic: a few cloves or a smaller garlic head are your options.
    • Onion: a large yellow or white onion works. Avoid red onion.
    • Peppers: bell peppers work great, especially red and yellow. Substitute with local green or yellow babura peppers, Italian sweet peppers, or bull's horn red peppers.
    • Seasonings: stock powder, Vegeta, or bouillon cube are the best choice, together with salt and pepper.
    • Oil: most oils, ghee, or lard will work. Avoid olive oil.
    • Butter.

    Instructions

    Here are our instructions for making dagara (tagara), our lamb and beef vegetable stew.

    Eight photos, two by two, of ingredients being layered in a clay pot (meat, potatoes, onion, garlic, etc)

    Step 1. Preheat oven. Season meat.
    Step 2. Sear meat.
    Step 3. Layer meat and veggies in a clay pot, bakeware, or a baking pan.
    Step 4. Bake.

    Recipe FAQs

    What vegetables are good in a stew?

    Almost all vegetables are good in a stew!

    There is no wrong way to make a stew, but it's easier to start with root veggies like carrots, potatoes, radishes, turnips, etc. Garlic and onion are always a great way to begin stewing, while tomatoes add a certain acidity and a nice juice to any broth.

    In the beginning, stay away from leafy greens and cruciferous veggies until you get a good handle on stews. These are nice additions but should be added at the end of cooking, as they tend to turn to mush.

    What's the best meat to use in stews?

    While almost every meat works in stews, red meat works best. Due to its texture and taste, red meat adds a certain heartiness to a stew.

    Which country eats stew?

    People from every country in the world have at least one stew in their cuisine. Stews are as old as the fire itself.

    Why are stews healthy?

    There is a saying in the Balkans that every day one needs to eat something with a spoon. This is something people adhere to religiously.

    Stews aid gut health and immunity. They keep you warm and cool you down. They're the most perfect food containing an incredible amount of micronutrients and macronutrients in one bowl.

    Additionally, you don't need a lot of ingredients to make the perfect broth. Sometimes even the scraps will work. This is why stews are beloved.

    Handling

    Serving: Eat as warm as you can handle! Serve with homemade bread, pogacha, or mini fried breads. A side salad is nice too!

    Storing: Store in the fridge in an airtight container for up to 3-4 days.

    Reheating: Reheat using your preferred method. Add a little bit of broth or hot water if needed.

    Freezing: Cool down completely, then transfer to an airtight container. Freeze for up to 2 months, but beware that some of the taste will be lost. Let thaw at room temp, then reheat.

    Other Stew Ideas

    If you're a broth person, you'll love some of our Balkan stews.

    • Silver bowl with a lid filled with a spoonful of the sauce, a lemon wedge, and a slice of bread on gray background.
      Stewed Okra (Bamija, Bamya)
    • Two hands holding a bowl of stew.
      Veal Stew with Potatoes "Dive Bar Style"
    • Red pot with stew and a ladle full of stew, pot lid, and a basket with sliced bread on gray background.
      BEST Instant Pot Cabbage and Beef Chuck Soup (Kupus Kalja, Slatki Kupus)
    • Two hands holding a bowl and a spoon on a gray background.
      Flat Beans Stew (Boranija)

    Thoughts?

    If you made lamb chop, beef and veggie stew and liked it, please consider giving it a ⭐️⭐️⭐️⭐️⭐️ (5-star) rating. This helps others find the recipe more easily!

    Also, feel free to leave a comment (I read each one!), and don't forget to tag a photo #balkanlunchbox, or us @balkanlunchbox, on IG.

    Prijatno, Dobar Tek, and Bon Appetit!

    dagara, tagara, lamb stew, veal stew, lamb and veal stew, veggie stew | balkanlunchbox.com

    Lamb, Beef and Vegetable Stew (Dagara, Tagara)

    Aida
    Delicious lamb and beef vegetable stew. Known as dagara (tagara), the dish was invented by a wise wife to save her husband from a curse. (Read the text for a fun background story!)
    5 from 2 votes
    Print Recipe Pin Recipe
    Prep Time 20 minutes mins
    Cook Time 1 hour hr
    Total Time 1 hour hr 20 minutes mins
    Course Main Course
    Cuisine Bosnian
    Servings 6
    Calories 614 kcal

    Equipment

    • 1 clay pot, glassware, or baking pan if using an unglazed clay pot, soak it ahead of time

    Ingredients


    • 4-6 beef or veal cutlets smaller, alternatively use chuck, round, or sirloin, cut into chunks
    • 1 pound lamb ribs or chops you'll have 3 pounds of meat in total (about 1.5 kilograms)
    • 2-4 tablespoons stock powder or Vegeta, or 2-3 crushed bouillon cubes
    • salt and black pepper to taste
    • Oil for searing and seasoning
    • 4 potatoes large, Russet, or Yukon gold; peeled and quartered
    • .5-1 pound green beans preferably flat green beans, ends cut off
    • 5-6 whole garlic cloves peeled
    • 1 yellow or white onion large, quartered
    • 3-4 bell peppers large, or local babura or Italian sweet peppers, or bull's horn peppers; deseeded, and quartered
    • 2 tablespoons butter sliced
    • 2-3 carrots large, peeled, cut into sticks
    • (Optional) 1-2 cups boiling water

    Instructions
     

    • Preheat oven to 480°F (250°C). Season meat with 1 tablespoon of oil, salt, and black pepper. Let it sit for 5 minutes. (You should have about 3 pounds of meat in total)
    • Heat plenty of oil in a frying pan over high heat. Once it's sizzling, brown meat on each side for approximately 2-4 minutes per side. (You may have to do it in batches. Later batches will need less time as the oil gets hotter.) Remove meat from the pan, and pour the remaining oil into the pan you plan to use for baking (a clay pot is preferred, but use what you have).
    • Layer ingredients in the pot in the following order: onion, garlic, meat, peppers, potatoes, carrots and beans. Top with butter. Optionally add one to two cups of boiling water. Cover tightly with a lid, or foil (pierce it in a few places so some of the steam can escape). Bake for 30 minutes.
    • Lower heat to 390°F (200°C) and bake an additional 30-45 minutes.
    • Serve with homemade bread. Store in an airtight container in the refrigerator for up to 3-4 days. Reheat using your preferred method, or in the oven at 300°F (150°C) for 10-15 minutes. Add liquid if necessary. Reheat only once! Freeze up to 2 months after it cools down completely, in an airtight container. Thaw at room temp, then reheat (once!). Some taste will be lost.

    Video

    Notes

    • Nutrition Info
    Nutritional information is an approximation. 
    • Video
    Water was not added in the video, but as of lately, we've been adding it for extra stew. 

    Nutrition

    Serving: 1of 6Calories: 614kcalCarbohydrates: 33.9gProtein: 54.7gFat: 27.9gSaturated Fat: 9.3gCholesterol: 199mgSodium: 792mgFiber: 6.1gSugar: 6.1g
    Tried this recipe?Let us know how it was!

    More Recipe 💙

    • Rapidly fast walnut bites (cookies).
      Walnut Cookies (Orašnice)
    • Piece of pie on a blue plate, a napkin and a pan with pie in the back, on a gray background.
      Meat Pie Recipe with Ground Beef (Ćoravi Burek)
    • Black pan with two eggs and ground beef around which is a kitchen towel, all on a wooden table.
      Poached Eggs with Ground Meat (Čimbur)
    • Cast iron pan filled with yellow stuffed peppers and a kitchen towel on a gray background.
      Easy Vegetarian Stuffed Peppers with Potatoes [Oven Baked, No Rice, Gluten-Free, and Tomato Sauce-Free]

    Burek

    Nov 27, 2018 · 40 Comments

    Quarter of a burek pie on a plate on gray background.

    Burek is a mouth-watering Balkan phyllo dough pie with a filling. Today, we're sharing our family recipe for Bosnian burek. This amazing dish is prepared with homemade phyllo stuffed with meat and potatoes. Shall we?

    Quarter of a burek pie on a plate on gray background.
    [feast_advanced_jump_to]

    Warning

    Like the famous Balkan pepper spread ajvar, burek from scratch also takes time to learn and make.

    If this is a refresher for you, jump to the recipe card! (And we'd love to hear your burek tips in the comments!)

    There is no fast burek recipe if you want to make phyllo from scratch. However, if short on time, see our burek made with store filo that everyone's raving about.

    To make it easy on you, in this article you'll find many great burek tips. If in doubt, read all of it.

    Background

    Burek, or pita, is a pie made with phyllo dough. Think layers of parchment paper-thin, flaky dough, stuffed with delicious fillings, shaped into different forms. And then baked.

    Why should you learn to make burek? Because it's the tastiest Balkan food!

    More importantly, learning to make burek from scratch also teaches you how to make phyllo dough from scratch. Phyllo dough is the foundation for many Balkan dishes like pies and baklava.

    Additionally, it's found in many international dishes, like strudels, rolls, tarts, and more.

    As challenging as making phyllo dough looks, all it really is is regular dough stretched into really thin sheets.

    Doesn't look so scary now, does it?

    Equipment

    Here are the non-ingredient ingredients to make phyllo dough making easy.

    1. Spacious Working Space. A long dining table or an island work best. Look for something that's at least 3x3 feet. And make sure you can walk all the way around it. (It's ok if you don't have it, and if you can hardly turn around in your kitchen. Plenty of grandmothers worked with minimal space; some even on the floor, on small tables called 'sinija.' Work with what you have.)

    2. A Cotton Tablecloth. This tablecloth is to be used only for dough making. It should cover all of your working space. (Look for 100% cotton.) It's there to protect it and make it easier to stretch the dough. After each use, shake the tablecloth outside, and then wash, dry, iron, and store it for the next time.

    3. Saran Wrap and 3-4 Clean Kitchen Towels. Once the kneading is done, the dough has to rest. You'll be wrapping it in saran wrap and then kitchen towels. (Resting allows the gluten to work its magic so you can stretch the dough easily.)

    4. (Optional) Oklagija Rolling Pin. We used to religiously recommend the local thin, wooden, long rolling pin called okagija. However, if you cannot find or make oklagija, you can use the regular rolling pin. In this case, you'll be stretching more with your hands. Below are detailed instructions for both options.

    5. (Optional) A Round Pan. If you can, find a round pan with a diameter of 13-15 inches (34-38 cm). These pans are fantastic for that round spiral burek shape everyone loves. If you cannot find one, rectangular pans, even sheet pans work. You'll just shape the burek differently. Tips are below.

    Ingredients

    Phyllo dough ingredients for burek:

    A bowl with flour, measuring cup with water, and two plates with salt and oil on a gray background.
    • Flour: regular white flour works best. Always open and use a brand new bag of flour when making phyllo dough! (Buy a couple of 2lbs/1kg bags.)

      Avoid flour substitutions. We haven't experimented with other kinds. If you have, please let us know in the comments!
    • Oil: vegetable or sunflower oil works well. (If you're opting for a healthier version like coconut oil, it should always be in a liquid state.)
    • Butter: sometimes butter is mixed with oil. (Old school burek was made exclusively with butter.)
    • Salt: regular salt is fine. Avoid coarse salt.

    Filling ingredients for Bosnian burek:

    Ingredients for burek in an assortment of plates and cups on a gray background (oil, seasonings, water or mineral water, onion, ground meat, potato.
    • Meat: Bosnian burek is made with either ground beef (preferably ground twice), or a lean cut of beef (think shoulder steak, rump roast, tri-tip roast, sirloin, even veal, etc). If you can choose, go for the second option, and finely dice (really important!). The pieces should be tiny.

      Substitute with ground pork (not diced pork!), if you eat it. Avoid poultry. Although chicken is fine for some types of burek, Bosnian burek is primarily a beef pie.
    • Potatoes: Russett or Gold Yukon are fine. In general, you can use most types of potatoes for this pie. Dice small or grate them. If you opt for grating, squeeze out extra liquid before mixing the stuffing.
    • Onion: white or yellow onion, diced small or grated.
    • Seasonings: while salt and pepper are foundational basics for burek, people also use Vegeta (1 tbsp), 1 bouillon cube, or stock powder (1 tbsp) often.

    3. Topping and additional ingredients for Bosnian burek:

    • A few tablespoons of butter (or oil), melted in water until hot.

    Instructions

    Below are burek making instructions, with step-by-step photographs of the entire process. (More detailed written instructions and the video are in the recipe card.)

    Step 1: Kneading phyllo dough

    Six photos (2x3), of dough and ingredients poured into a blue bowl.

    In a bowl combine flour, salt, and oil. Add water gradually, and knead ingredients into a ball for 2-3 minutes. Now knead vigorously for at least 10 more minutes (15 is even better), or until the ball is smooth with the consistency of an earlobe.

    Step 2: Resting the dough the first time

    Four photos (two by two) of phyllo dough made in a blue bowl.

    Dab dough in oil generously. Cover first with saran wrap (cling wrap), then with a kitchen towel. Leave in a warm space for 1 hour.

    Step 3: Stuffing preparation

    Two photos, side by side, of blue bowl with meat and other ingredients in it, on a gray background.

    In a bowl mix all filling ingredients together. Then divide into three portions.

    Step 4: Dividing and resting the dough again

    Eight photos (two by four) of the dough ball being divided into three pieces and dabbed with oil.

    Flour working space. Take the dough ball, divide it into three equal parts, and knead each for 2-3 minutes. Shape into small balls, dab with oil, and cover with saran wrap and a kitchen towel. Let rest for 15 minutes or longer.

    Step 5: Rolling out and resting the dough the third time

    Six photos (two by three),  of dough being made next to a rolling pin on a white cotton sheet background.

    Flour working space. Take one ball and punch it gently to flatten it. Roll it out with a rolling pin until it's about 10-12 inches (25 cm) in diameter. Dab with oil on all sides, and cover with saran wrap and a kitchen towel. Repeat for the other two balls. Let rest for 15 minutes or longer.

    Step 6: Choosing a stretching method

    Choose whether to stretch the dough with a long thin rod rolling pin called oklagija, or your hands and a small rolling pin.

    Method 1 - stretching the dough with hands

    Six photos, (two by three) of the dough being stretched on a table.

    Flour working space. Lift one of the flattened dough balls and let it weigh itself down on all sides. Dab with oil. Transfer to the working space and stretch on the left and right sides.

    Now start stretching with the tops of your knuckles. Gently lift the dough from underneath and pull it toward yourself, little at a time. Walk around the dough as you do this so it's equally thin everywhere. (If you've done the first steps well, the dough should be super stretchy and easy to expand.)

    As you are stretching it, shape the dough into either an approximation of a rectangle or a circle (look at the stuffing methods). It is finished when it's the thinness of the cigarette paper everywhere. Avoid rips and holes as much as you can. Pinch together if it happens.

    Method 2 - stretching the dough with the oklagija rolling pin (see the video!)

    Flour working space. Take one flattened dough and roll it out until it's the thickness of a few stacked pennies. Dab with oil and drape over the rolling pin so it hangs evenly.

    Let it weigh itself down on both sides. Turn 45 degrees on the rolling pin, and let it weigh itself down on these two sides as well.

    Start stretching the dough with your knuckles as much as the dough will go. Work ends and middle equally. Try to avoid rips as much as you can. (If you've done the first steps well, the dough should be super stretchy and easy to expand.)

    Gently transfer the dough to your working area and stretch it out as much as it will go. Dab oil as necessary, 2-3 tablespoons at a time. Finally, shape the dough into either an approximation of a rectangle or a circle (look at the stuffing methods).

    Step 7: Handling dough edges (ends)

    Two photos side by side of the dough being cut with a knife and another one of the finger pulling it.

    As the edges of the dough are thicker than the rest, cut them off with a knife, or further thin them out by lifting and stretching them with the tops of your fingers.

    If the dough has stretched over your table and is hanging, you can gently rip the dough ends, being careful not to rip too much dough with it.

    Step 8: Choosing a stuffing method

    The two most common ways to stuff the dough involve what we call a circle or a rectangle (our wording). (There are many more ways!) The rectangle is a little easier, while the circle is tastier.

    Method 1 - stuffing burek phyllo dough the easier way (the rectangle)

    Eight photos (two by four) of the dough being stretched in a table and stuffed.

    Get the filling and set it nearby. Dab the dough with 2-3 tablespoons of oil. Get batches of filling and line the two long edges of the rectangle with the filling. Stuff it evenly (about the thickness of 2-3 fingers). Use ⅓ filling for one side, and ⅓ for the other. Now cover the stuffing with dough ends.

    Lift the tablecloth slightly on one end, and the dough with the stuffing will roll toward the middle. Stop at about ⅓rd of the way. Do the same with the opposite side. You should end up with two rolled-up sides, and some dough in the middle.

    Cut the dough in the middle and stuff it with the remaining stuffing. You'll end up with three long stuffed dough pieces. (Some like to have the two rectangle ends meet, but we find it's too much dough. That's why we cut out that rectangle in the middle and stuff it.)

    Method 2 - stuffing burek phyllo dough the tastier way (the circle)

    Ten photographs (two by five) of burek being stuffed and rolled on a table covered with cotton cloth.

    Get the filling and set it nearby. Grab batches of filling and line the dough ends with it (the thickness of about 2-3 fingers), all around the dough, about 2 inches (2-3cm) away from the ends (or more if the dough is hanging off the table).

    Starting at any point lift the end of the dough and cover the filling all around the dough. If necessary, dab with oil again (2-3 tablespoons). Start rolling the stuffing into the dough.

    Roll the dough with the filling away from yourself, then pull it back toward yourself with your knuckles. (The same pulling method as before.) Do this for the entire circle so that all areas are equally stuffed and rolled.

    After a few "circles" the dough will tear. Keep on rolling until most of the middle is torn. (You can cut it out with a knife now, and stuff and roll the middle part as well.) You will be left with one big hula hoop-shaped stuffed dough.

    Step 9: Shaping burek phyllo dough (spiral, rounds, or columns)

    Preheat oven to 450°F (220°C).

    Shape the burek into a spiral, small rounds, columns, or a combination. (There are many more choices, these are just a few.)

    Four photos (two by four) of the burek being stuffed into a black round pan into a spiral on a white background.

    Spiral: generously grease a round baking pan. Starting in the middle, circle the burek around itself until you fill the pan up. (If you have more burek left over, make small rounds and bake them in a different pan.) Dab it with oil on top, then bake.

    Four photos (two by two) of a hand shaping burek rounds.

    Rounds: instead of making one large spiral, make a small one (we call these "zvrk" or rounds), and cut it. Proceed to make rounds until you use up all the stuffed dough. Transfer to a generously greased pan and dab the burek with oil on top evenly.

    Columns (not pictured): generously grease a rectangular pan, and using the stuffed dough, line the pan up and down, as if you're drawing parallel lines out of one big line. Dab the burek with oil on top evenly.

    Repeat the previous steps for the remaining 2 dough balls

    Step 10: Baking burek

    (Not pictured!) For a regular burek lower temp to 400°F (200°C) and bake for 30-40 minutes.

    For a more blushed burek, bake at 450°F (220°C) for 10-15 minutes, then lower the temperature to 400°F (200°C) for another 20 minutes. (More tips in the baking section below.)

    Step 11: Spraying with the topping

    Two photographs side by side, one of a oil mixture to spray the burek with, and the second with the burek being sprayed with the mixture.

    Before the burek is done, melt butter in water (or heat oil in water). When the burek is finished, spray it generously with the mixture. Cover with a kitchen towel and let rest for at least 20 minutes.

    Tips for Baking Burek

    Regular Oven: These are basic oven guidelines. As you gain experience you'll adjust to taste.

    1. Bake burek for 30-40 minutes at 400°F (200°C), or
    2. For the "blush" effect, bake at 450°F (220°C) for 10-15 minutes, then lower it to 400°F (200°C) for 20-25 minutes.

    Tip: you may, or may not have to use foil or parchment paper to protect it from burning. If in doubt and the pie is blushing too much, cover it.

    Peka or Sač: Hands down, the best tasting burek comes from baking it under the sač or peka.

    Also known as "the bell," this is a specific iron (or ceramic) type of lid with a rim. This rim holds coal or hot firewood so that sač is essentially "buried" under fuel. The pan is placed underneath the sač, and is heated this way for about 30 minutes.

    Consequently, food made this way is baked and cooked at the same time. As you can imagine, this preparation method makes the food incredibly flavorful.

    Wood Stove: After peka, a stove heated on wood is the next best thing. There is something about that "smokey" feel to burek that makes it unbelievable!

    Stone/ Brick/ Masonry Oven: This type of stove is also excellent for baking burek. If you have it, definitely give it a try, and write your experience in the comments!

    Tips For Tear-Free Phyllo Dough

    The biggest issues people come up against when making phyllo dough have to do with elasticity. They are:

    1. Tearing (ripping), and
    2. The inability of the dough to stretch, or roll out.

    Therefore, here are a few tips to help the phyllo dough process go smoothly.

    1. Use a Brand New Bag of Flour. Use a brand new bag of flour each time you make a burek. The brand is irrelevant, but flour freshness is a must. We can't scientifically explain it yet; however, phyllo dough made from flour that's been sitting in an open bag (a tin, or a box) tears easily and is nearly impossible to roll out.

    2. Knead For At Least Good 10 Minutes. (The most important tip!) Once you first form your dough ball, knead it for an additional 8-10 minutes. (Time it if you must.) If you can knead it for 15 minutes, that's even better. Put your entire strength into kneading. The more you knead in the beginning, the better the flour will fuse, and the easier and more elastic will the dough be later on. Good signs that you're done: no flour on the sides of your bowl, plus a smooth dough ball.

    3. Add Water to Flour Slowly. First mix the flour, salt, and oil together in the mixing bowl. Then add a little bit of water at a time as you're kneading. Continue this process until you use up all the water. Adding water gradually lets you work the ingredients better. It will also allow you to eye exactly how much water you need. (More? Less?)

    4. Make a Softer, Wetter Dough. Make the phyllo dough "wetter" by adding a little more water than you would as you work the flour. At first, the dough will be stickier. As you work it, it'll firm up but stay smooth and soft. As a result, this smoothness makes it easier to stretch out later. If it's way too sticky (watery almost), dust small amounts of flour back in as you're kneading until you reach the right consistency (of an earlobe). (Remember, when adding more water, add it while the flour is still somewhat dry. It's hard to add water in when you already have a ball shaped.)

    5. Find the Oil Balance. Each time the dough is ready to rest, dab it with oil generously on all sides. Also, once you start stretching the dough, you can dab oil into the dough a couple of times. But find the balance! Your burek shouldn't be swimming in grease.

    6. Let the Dough Rest. (Second most important tip!) The dough needs to rest for 90 minutes at least! (Exact timing is in the recipe card.) In fact, if you can rest it longer, go for it. As an example, you'll notice that the last dough piece you're working with is the easiest to stretch, and most elastic, with minimal rips. That's because it's rested well. (Yes, you can get away with less time. In this case, however, that first kneading really needs to be 15 minutes.)

    7. Free Your Hands. Take off any jewelry, bracelets, gloves, watches, and anything else that is on your hands and arms (up to your elbows). Moreover, it's best if your nails are short too (not essential though).

    8. Stretch With the Top of Your Hands. Stretching the dough with the top of your hands and knuckles is better than using the tips of your fingers. That is to say, when stretching out the dough it'll seem as if you're using your fingers the least.

    9. Warmer Room Temperature. Working in a slightly warmer space seems to help out with elasticity. Not a sauna, mind you, just a couple of degrees warmer.

    10. Patience Time and Experience. Give yourself time to stretch. Don't try to show off. Just focus on stretching the phyllo dough and balance the sides out. In time, as you gain experience, you'll instinctively know what to do next. Once you hit this spot, the dough will stretch almost on its own.

    Handling Tears and Rips

    Naturally, phyllo dough will start to break at some point, or you'll have to cut it, and wrap the filling inside.

    On the other hand, you're probably wondering how to handle rips while you're still stretching the dough.

    • Large rips, tears, and holes:

    If burek phyllo dough starts tearing and having holes at the start of the process, or is otherwise challenging to stretch, 90% of the time it's because a) the flour isn't from a fresh bag, or b) the dough hasn't rested enough.

    1. Flour problems? If you were able to stretch some of the dough, salvage what you can, stuff it, and bake. We won't tell!
    2. Otherwise, toss it in the garbage and start again. No shame in that!
    3. The dough hasn't rested enough? In this case, leave the following dough ball to rest for 15-30 minutes longer, then try stretching again.
    • Small rips and holes

    If very small, ignore them! Work around them, and be careful not to make them bigger.

    Meanwhile, pinch bigger holes together or dust them with flour to prevent them from growing. Again, work around them as much as you can.

    Storing, Serving, Reheating

    Serving: burek usually tastes best after it rests for 20 minutes when you take it out of the oven. However, how you want to serve burek is completely up to you! You can eat it hot, or cold, by itself, or alongside a salad or soup. (It goes fantastically with the Russian salad.)

    Storing: store the burek in the fridge for up to 3-4 days. Wrap it well, in saran wrap or foil, or place it in Tupperware. When ready to eat, consume it cold, at room temperature, or reheat it based on your preference. (Insider tip: burek can actually stay in the (turned off!) oven overnight, but just that first night. Cover it with saran wrap or a kitchen cloth.)

    Reheating: for the best, crunchy, fresh taste, reheat in the regular oven for a few minutes at 300°F/ 150°C. If you prefer the softer, chewier texture, heat it in the microwave.

    Freezing, Unfreezing Burek

    Burek pie in a pan on a gray background.

    Freezing Burek

    There are two ways to freeze burek, before and after you bake it. It's best to freeze burek rounds as they easily fit into freezer ware, and ultimately, the freezer.

    If freezing raw burek, do it right after you stuff it. Similar to freezing Bosnian klepe dumplings, layer burek rounds on a tray separately, and freeze for 15 minutes first (to keep them from getting stuck together). Then dust with flour, place in freezer ware, and return to the freezer.

    If freezing baked burek, (we recommend this way) let them cool down completely before placing them in freezer ware, but don't spray them with the topping before freezing.

    Burek can last up to a few months this way.

    Unfreezing Burek

    1. Raw burek rounds: take them out of the freezer, and freezer ware, and leave them at room temperature for 15-20 minutes. Separate them if they are stuck together, place them in an oiled pan, then follow the recipe card for baking instructions.
    2. Baked burek rounds: take them out of the freezer, and freezer ware about 2-3 hours before you plan to bake them, and leave them at room temp. When ready, heat oven to 400-450°F (200-220°C). Separate burek rounds if they are stuck together, and place them in an oiled pan. Heat them for about 15 minutes, and then follow the recipe card for topping instructions.

    Burek FAQs

    Is burek Bosnian or Turkish?

    Originally Turkish, burek was brought over to the Balkans during the Ottoman Empire. Currently, many Balkan countries consider burek theirs. In reality, it's a shared dish with some regional differences.

    What is burek eaten with?

    Savory burek tastes best with a glass of plain cold yogurt or buttermilk and a simple tomato salad. It's versatile though! You can eat it for breakfast, lunch, and dinner, pair it with soups and (fresh or fermented) salads, or eat it by itself.

    Do you eat burek hot or cold?

    Both! Some people like to eat burek hot, just as it comes out of the oven. Others love it best the following day when it's cold. And then there are those that like it in between.

    Is burek good for weight loss?

    No. There is nothing about burek that says weight loss. You shouldn't even think about burek in those terms. Burek is a delicacy you make and eat, not something to punish yourself with.

    Is burek sweet or savory?

    Both. Burek is a phyllo dough pie with different fillings. The fillings determine whether it's sweet or savory. The exception is Bosnia and Herzegovina where only the meat phyllo pie is called burek, and the remaining pies are called based on their filling.

    How long does burek last in the fridge?

    Wrapped well in saran wrap, foil, or Tupperware, burek can last up to 3-4 days in the fridge. The sooner you eat it, the better. If you decide to warm it up (some like it cold), you're better off with the oven than the microwave. (Oven heating gives it a crunch, while the microwave softens it.)

    What is phyllo dough made of?

    Phyllo dough is usually made with flour, water, oil, salt, and (sometimes) a pinch of vinegar or an egg.

    What are the different names for phyllo dough?

    Phyllo dough also goes by:
    filo dough or fillo dough,
    filo pastry or fillo pastry,
    and finally, just filo or fillo.

    In Balkan cuisine, phyllo goes by:
    jufka,
    kora (pl. kore),
    vučeno testo (tijesto), or
    tanko testo (tijesto) za pitu.

    More Pies

    • Here's an unusual, layered ground beef pie you'll like. Similar great taste plus a quicker method!
    • And also a layered spinach pie is definitely one of our favorites. Layer upon layer of spinach mixed with soft cheese, and wonderful phyllo in between.
    • Not a fan of spinach? Try our cheese pie instead!

    Thoughts?

    If you make today's burek, and like it, please consider leaving a ⭐️⭐️⭐️⭐️⭐️ (5-star) rating. This will help others find the recipe more easily!

    You can also leave a comment, I read EVERY one! Finally, if IG is more your thing, consider tagging us @balkanlunchbox.

    Prijatno and bon appetit!

    Quarter of a burek pie on a plate on gray background.

    Burek

    Aida
    Detailed recipe for burek, delicious Balkan phyllo dough pie with a filling. (Specifically, this is the typical Bosnian burek stuffed with meat and potatoes.) You can use this phyllo dough recipe for any type of burek (pie or pita).
    5 from 10 votes
    Print Recipe Pin Recipe
    Prep Time 1 hour hr 20 minutes mins
    Cook Time 40 minutes mins
    Resting Time 1 hour hr 30 minutes mins
    Total Time 3 hours hrs 30 minutes mins
    Course Main Course
    Cuisine Bosnian, Croatian, Kosovo, Macedonian, Montenegro, Serbian, Slovenian
    Servings 4

    Equipment

    • Working space (A table, island, or a space that's at least 3x3 feet (1m x 1m), with room to walk around it.)
    • 100% Cotton tablecloth (Larger than your working space, to protect it, used only for dough making. Clean and ironed.)
    • Rolling Pin (Long and thin if you plan to use it exclusively, or a regular baking pin if you want to use your hands more.)
    • Saran wrap (Plastic or cling wrap.)
    • 3-4 Kitchen towels (Clean and fresh.)
    • 2 Round pans sized approximately 10-inches and 15-inches in diameter (or 27cm and 38cm). (Rectangular pans are fine too. Play around with sizes.)
    • An apron
    • Baking pans (Preferably a round one that's about 13-15 inches (34-38cm) in diameter, plus a rectangular one.)

    Ingredients


    Dough (Jufka):

    • 21-22 ounces all-purpose flour, plus more for dusting regular white flour works best, use a brand new bag
    • 1-1.5 teaspoons salt
    • 3 tablespoons sunflower or vegetable oil or coconut oil (fluid), or butter (melted)
    • 12.5-13.5 ounces warm water approximation, it may be a little more
    • more oil few ounces for greasing the dough throughout

    Filling (stuffing):

    • 18 ounces ground beef or finely diced beef
    • 20-22 ounces Russet or yellow potatoes peeled, diced or grated (juice squeezed), weighed after dicing
    • 1 yellow onion medium, grated or minced
    • 1 teaspoon salt
    • 1 teaspoon pepper
    • 1 tablespoon vegetable or sunflower oil or coconut oil (fluid)
    • 1-2 ounces warm water

    Topping:

    • 3 tablespoons butter or oil
    • 2 cups water

    Instructions
     

    Preparation

    • Wash your hands and arms up to the elbows. Take off all hand jewelry (rings, bracelets, watches, etc.), and tie up your hair. Finally, get your apron on.

    Kneading phyllo dough

    • In a large mixing bowl combine flour, salt, and oil. Start working the flour into dough by adding a little bit of water at a time, and kneading the ingredients. Keep adding water slowly while you fold, press, knead, push and punch the mixture (just as if you were making bread or pizza) for about 2-3 minutes.  It’s best if the dough is a little wetter to the touch (stickier), at first. This is achieved by adding more water into the flour at first. (Avoid making a dough ball, and then adding more water to soften it.) Once you form a cohesive, messy, wetter, dough ball with your ingredients, wash and dry your hands.
    • Now continue to knead the dough ball vigorously, with all your strength, for an additional 8-10 minutes, even 15 minutes if you can. (Time it if you must!) You can knead it in the bowl, or on a working space dusted with flour. As you work it, the dough will firm up but stay smoother overall. If it’s too sticky, dust small amounts of flour back in as you knead, until you reach the right consistency.
    • The ease of the remaining process depends on how well you do this first part. Well kneaded dough ball will be smooth, elastic, and have the consistency of an earlobe. 

    Resting the dough the first time

    • Once you achieve the right consistency, dab the dough ball with oil generously, on all sides. Cover in saran wrap, and then with a kitchen towel. Leave it to rest for at least 60 minutes in a relatively warm space.

    Stuffing preparation

    • In a large bowl, combine the filling ingredients. Mix well with your hand until integrated. Divide the stuffing into 3 parts, one for each dough ball (the big dough ball gets divided in the next step). You can leave it in the same bowl, or in separate ones.

    Dividing and resting the dough again

    • Uncover and transfer the dough ball onto your working space. Cut it into three equal parts. (You can weigh them if you wish.) Lightly dust them with flour and knead each for 2-3 minutes. Shape each part into a smaller dough ball, and place it on a tray.
    • Dab the balls with oil generously. Again, cover each first with saran wrap, then with a kitchen towel. Finally, leave them to rest for at least 15 minutes.

    Rolling out and resting the dough the third time

    • Uncover the first dough ball. Transfer it to the working space lightly dusted with flour. Punch it gently to flatten it a bit. Then take the rolling pin and roll it out until it's about 10-12 inches (25 cm) in diameter. Repeat this with the other two balls.
    • You can leave the flattened dough balls on the working space or place each on a separate tray. Dab each with oil on both sides. Once more, cover with saran wrap and then a kitchen towel. Let them rest for the final 15 minutes in a warm space.

    Choosing a stretching method

    • This is the time to choose whether you'll stretch the dough with the long rolling pin (as demonstrated in the video below), or the short rolling pin and your hands (as demonstrated in photographs in the article). If stretching with the rolling pin, you'll need the super thin, long rod type of rolling pin called oklagija. A regular short, fat, rolling pin will not work for this method.

    Method 1 - stretching the dough with hands

    • Dust your working space generously. Gently lift the first flattened dough ball. Let it hang for a few seconds so that it weighs itself down and stretches. Do this for all sides by moving the dough with your fingers like a steering wheel. Now transfer it to your working space and dab it with 1-2 tablespoons of oil (or butter). (If the dough has rested well, it will immediately stretch a lot.)
    • Take a hold of the dough on the left and right edges. Spread your arms gently, stretching the dough further in the process. Then do the same on the top and bottom sides. You'll now have a big circular dough shape that's thinner on the inside and a little thicker on the outside edges. You can lightly lift it, and wave the dough in a motion similar to draping the tablecloth over the table to stretch it further. Now continue to stretch it with your hands.
    • Move your hands (knuckle side up) under the dough gently, and continue stretching it by pulling it toward yourself. Pull in slow movements, and walk around the table (and the dough), pulling it on all sides a little bit at a time. Stretch the dough little by little, by walking in circles several times. It should be equally thin everywhere by the time you're done. The middle of the phyllo and the sides should be equally stretched.
    • Continue to stretch until the dough is of the thinness of cigarette paper. Additionally, if at some additional point(s) during stretching you feel the dough needs more oil, dab it in again, 2-3 tablespoons at a time. Finally, as you're spreading the dough, shape it into a large rectangle or a circle.
    • Try to avoid rips and holes as much as you can. If they do happen, work around them, or try to patch them by lightly pinching them together. (If the dough keeps ripping in a big way, read the article. You may have to start over!)
    • Note: if the dough has rested enough and you kneaded it well in the first steps, it's possible it will stretch even several inches beyond the table.

    Method 2 - stretching the dough with the oklagija rolling pin

    • Transfer one flattened dough ball onto the working space and roll it out with oklagija until it's (approximately) the thickness of a couple of stacked pennies, and the size of a huge pizza. Lightly dab with 2-3 teaspoons of oil (or melted butter), and drape over the middle of the rolling pin. To do this, dust the rolling pin with flour and position it in the middle of your dough (as if you were measuring its diameter). Then drape one side of the dough over the rolling pin, and lift everything up. The dough should hang equally on both sides.
    • Let the dough weigh itself down on the rolling pin for several seconds. Now turn the dough around 45 degrees and let it weigh itself down on this side as well. Then, slowly and carefully start stretching the dough even further with the tops of your hands (knuckles), as far as it will go. Work ends and the middle equally, and move towards where the phyllo is thicker, so you can thin it out.
    • Try to avoid rips and holes as much as you can. If they do happen, work around them, or try to patch them by lightly pinching them together. (If the dough keeps ripping in a big way, read the article. You may have to start over!)
    • Gently transfer the dough to your working area and continue stretching it out as much as it'll go. The dough should now be coming close to the thinness of cigarette paper and the size of a super large circle (or an ellipse). If at some point(s) during stretching the dough needs more oil (or butter), dab it in again, 2-3 tablespoons at a time. (The dough needs to be well-oiled, but not "swimming" in oil at all times.) Finally, shape the dough into either an approximation of a rectangle or a circle (look at the stuffing methods).
    • Note: if the dough has rested enough and you kneaded it well in the first steps, it's possible it will stretch even several inches beyond the table.

    Handling dough edges (ends)

    • As the dough edges are thicker than the rest of the dough you'll have to take care of this. One way to get rid of the ends is cutting them off with a knife. Only cut about 1 inch or 2 cm all around the dough. (Discard the ends, or combine them with the next dough ball.)
    • Another option is to stretch the ends. Lift the ends as you walk around the dough, and stretch them carefully, with your fingers.
    • If the dough has stretched over your table and is hanging, you can gently rip the dough ends, being careful not to rip too much dough with it.

    Choosing a stuffing method

    • While there are many ways to stuff a burek, the most commonly used ones are what we call the rectangle, and the circle. (This is our wording.) The rectangle involves filling up two sides across from each other, and then lifting the tablecloth to let the dough with the filling roll inside. It is easier, but the burek is thicker, and slightly less tasty this way.
    • The circle method involves stuffing dough ends all around, and rolling the filling inside as you, again, walk around the dough in a circle. The phyllo ends up being even thinner and tastier. It takes a little more effort, but it's worth it.

    Method 1 - stuffing burek phyllo dough the easier way (the rectangle)

    • Dab the dough with 2-3 tablespoons of oil.
    • Get the filling and set it nearby. Grab batches of this filling with your hands and line the edge of one long side of the rectangle with the filling, about 2 inches (2-3 cm) away from the dough's end. Stuff it evenly. (The filling should be the thickness of about 3-4 fingers.) You should use ⅓ of the filling for this side. Now, starting at the end of any of these two rectangle sides lift the end of the dough and cover the filling completely.
    • At this point, slightly lift the tablecloth, and the dough will roll with the stuffing inside. (Give it a little assistance with your hands, if needed.) Once it reaches ⅓ of the way, go to the other side and repeat. You should have two rolls of dough with a dough rectangle in between them.
    • Cut the dough rectangle in the middle and stuff and roll it with the remaining stuffing. You'll end up with three long stuffed dough pieces. (Some like to have the two rectangle ends meet, but we find it's too much dough. That's why we cut out that rectangle in the middle and stuff it.)
    • Now form the stuffed dough into the shape of choice. (See below!)

    Method 2 - stuffing burek phyllo dough the tastier way (the circle)

    • Dab the dough with 2-3 tablespoons of oil.
    • Get the filling and set it nearby. Now grab batches of this filling with your hands and walk around the dough lining the dough ends with the filling. Stuff it evenly, about 2 inches/ 3cm (or more if the dough is hanging off the table) away from the dough edges. (The filling should be the thickness of about 2-3 fingers.) Starting at any point, lift the end of the dough and cover the filling completely. Do this for the entire dough circle, covering all the filling.
    • Start rolling the filling and the dough together. Essentially, you're rolling the dough with the filling toward the middle of the circle for a few inches and then pulling it back toward yourself carefully. (For best results use the same method as before, pulling with the tops of your hands.) Do this at the same pace all around the circle, so that all areas are equally stuffed and rolled. (What you don't want is to roll one side completely, and the other one not having enough dough so the filling is exposed.)
    • After a few rounds of rolling the entire dough, it will tear in the middle, or it will have several rips and tears. Keep on rolling the dough until most of the middle is torn. (Alternatively, you can cut it with a knife.) When you decide that all the circle's ends have had about the same amount of dough you can cut the remaining middle dough part out. (You can stuff this part, discard it, or roll it in on a thinner end of your burek.) You should now be left with a large hula hoop-shaped dough stuffed with filling.
    • Now form the stuffed dough into the shape of choice. Start by making a cut anywhere. (See below!)

    Shaping burek phyllo dough (spiral, rounds, or columns)

    • Preheat oven to 450°F (220°C).
    • Shapes most often used for burek are a big spiral, small spirals or rounds, and columns. You can also do a combo.
    • Spiral: generously grease a round baking pan. Starting in the middle, circle the burek around itself until you fill the pan up. (If you have more burek left over, make small rounds and bake them in a different pan.) Dab it with oil on top, then bake.
    • Rounds: instead of making one large spiral, make a small one (we call these "zvrk" or rounds), and cut it. Proceed to make rounds until you use up all the stuffed dough. Transfer to a generously greased pan and dab the burek with oil on top evenly.
    • Columns: generously grease a rectangular pan, and using the stuffed dough, line the pan up and down, as if you're drawing parallel lines out of one big line. Dab the burek with oil on top evenly.

    Repeat the previous steps for the remaining 2 dough balls

      Baking burek

      • If wanting to play it safe, lower the temperature to 400°F (200°C) and bake the burek for 30-40 minutes. (Turn the pan 180° about halfway through baking.) If it starts to blush too much on top, cover the burek with baking paper for the remainder of the baking.
      • If you prefer a burek that's more "blushed," continue baking at 450°F (220°C) for 10-15 minutes, then lower the temperature to 400°F (200°C) for the remainder of the baking. (You can turn the pan about 180° at this point.) If it starts to blush too much, cover the burek with baking paper for the remainder of the baking.
      • As each oven is different, always rely on your experience. If it's blushing too much, cover the burek with parchment paper and lower the temp. If it's not baking fast enough, up the temperature.

      Adding the topping

      • A few minutes before the burek is done baking, in a small pot heat up butter and water together. (Butter should melt in hot/ boiling water!) Once the burek is finished, sprinkle it very generously with the water and butter mixture. Then, cover it with a kitchen cloth, and leave it to rest for about 20 minutes.

      Serving, storing, reheating, freezing

      • See notes for detailed information.

      Video

      Notes

      • Recipe Notes:
      If you want an easier, quicker recipe for burek, take a look at our burek with store-bought phyllo recipe. This recipe is for those individuals who want to learn the old-school way of preparing burek. 
      If this is your first time making burek, or you're a beginner, you’ll benefit from reading the accompanying article. Don't be discouraged if your first burek doesn't come out well. This is not a beginner's technique.
      If you plan to make burek more than once, take notes. Every oven is different, every rolling pin is different, and every palate is different. Once you have the basics down, everything else becomes a testing ground for your individuality. Burek is as yours as you make it!
      • Video:
      The video demonstrates making burek with the method of going in a circle and making small rounds of burek. Ingredient volumes were different as well. (More in the article.)
      • Burek Volume Information:
      With this volume you'll get about two round pans worth of burek (15-inch and 10-inch in diameter). You can play around with shapes of burek and sizes of your pans. If you make small rounds you'll get about 7-9 rounds for each dough ball (about 21-27 with this volume).
      The number of servings will depend on how hungry you are. With this volume you can have between 4 VERY generous servings to 6 pretty good ones. 
      • Stuffing and Stretching:
      Shown here are the methods that we like the best. They are by no means the only methods. Burek can be stretched and stuffed in many different ways. In fact, in any one Balkan region, you can encounter several different techniques.
      (Even in our own family everyone does it differently!) 
      • Can I divide or double the ingredients? 
      You can double or divide the amount of ingredients. If you double the ingredients it’ll take more time, and be a little harder to knead.
      Don’t be rigid when you divide or double. For example, you still may need more or less water, and definitely less salt if doubling.
      • Nutrition Information: 
      Because it is difficult to assess the serving size, we didn't include nutrition information for this recipe. 
      • Ingredients:
      Butter: can be used instead of, or mixed with, oil. The taste will be heavier, but some prefer it. 
      Other fillings: although only meat pie is considered burek in Bosnia, in other Balkan regions all pies are called burek. The preparation process is exactly the same, but the fillings can be made with other ingredients (cheese, spinach and cheese, pumpkin, etc.). You can use this burek phyllo dough recipe with any of these fillings.
      Meat: Bosnian burek is made with either ground beef (preferably ground twice), or a lean cut of beef (think shoulder steak, rump roast, tri-tip roast, sirloin, even veal, etc). If you can choose, go for the second option, and finely dice (really important!). Substitute with ground pork (not diced pork!), if you eat it. 
      Seasonings: salt and pepper to taste are the best options. Substitute with one crushed bouillon cube or 1 tablespoon of Vegeta. 
      • Tops of fingers or hands? 
      When it comes to stretching the dough, once you get some experience you'll naturally decide if it's easier for you to do one or the other. The point is to stretch the dough with minimal breakage. How you do this is up to you.
      • Tear-Free Phyllo Dough Tips: 
      1. Knead for at least 10 minutes;
      2. Let the dough rest in between steps
      3. Use a brand new bag of flour each time;
      4. Add water slowly as you knead/ make dough 'wetter;'
      5. Stretch with the top of your hands; and
      6. Free hands of jewelry, watches, long nails, etc.
      More tips in the article!
      • Handling Rips and Tears: 
      Pinch smaller holes and tears together, or add a little bit of flour over them. (Eventually, the dough will have to be cut, or will rip on its own anyway.) 
      If large tears happen salvage what you can, and throw away the rest of the phyllo dough. Then read the article for tips for the next time. 
      • Serving/ Storing/ Reheating/ Freezing:
      Serving: it goes great with salad and/or soup, and plain yogurt. 
      Storing: if planning to eat burek within 24 hours, it can stay in the (turned off!) oven overnight, but just that first night. Cover it with saran wrap or a kitchen cloth.
      Reheating: for the best, crunchy, fresh taste, reheat in the regular oven for a few minutes at 300°F/ 150°C. If you prefer the softer, chewier texture, heat it in the microwave.
      Freezing and unfreezing directions are in the article. 
      Tried this recipe?Let us know how it was!

      More Recipes to 💙

      • Moussaka in a pan.
        EASY Serbian Ground Beef Potato Moussaka Casserole
      • Closeup of four wafers.
        Balkan No Bake Wafer Cake (Oblatne, Oblande)
      • Bowl with soup, spoon, two cups of juice, bread and a kitchen towel on a dark background.
        Instant Pot Bean Soup with Sausage (Pasulj or Grah) [No Soak]
      • Closeup of a stuffed pepper.
        Best Classic Baked Stuffed Peppers with Ground Beef and Rice (Punjene Paprike)

      Meringue Cake (Španski Vjetar)

      Sep 18, 2018 · 16 Comments

      meringue cake, cream cake, meringue cream cake, pavlova, pavlova cake, meringue cream cake | balkanlunchbox.com

      Meringue cake is the perfect marriage between (Pavlova-like) crunchy-but-soft egg white based cake and smooth filling made with whipped cream, butter, egg yolks and hazelnut. If you learn to make one cake in your entire life, make it this one!

      meringue cake, cream cake, meringue cream cake, pavlova, pavlova cake, meringue cream cake | balkanlunchbox.com

      I mentioned this already.

      Back in the day worth of a dessert was measured by the cost of its ingredients.  Number of eggs. Grams of walnuts. Sugar.

      Expensive was the cake with lots of eggs - so it had to stand the test of time. Prove itself. This unwritten rule is why certain sweets were made only on special occasions. 

      In many households this is still the case. Eggs are more available of course, but walnuts hold their ground.

      If I had a garden I’d say fuck you to leafy greens and plant a walnut. My cooking philosophy is similar.

      It took me a long time to prepare food well. So I don’t care about making avocado ice cream. Robert Greene’s advice to writers is to write classics or to write entertaining books. There is no third option.  Apply this rule to anything and you’ll succeed.

      This is why on Balkan Lunch Box the focus is - almost always - on classics. It's how you learn to make good food.

      Same with baking. Get a few oldies under your belt. That’s the whole trick.

      Making food is a compound interest endeavor. Everything you make gets stored somewhere. Morsels of knowledge pop up at the most opportune time.

      So if you’re investing the time learn the most important thing.

      meringue cake, cream cake, meringue cream cake, pavlova, pavlova cake, meringue cream cake | balkanlunchbox.com

      THE ONLY TWO CAKES YOU NEED TO KNOW HOW TO MAKE: CHOCOLATE WALNUT CAKE AND MERINGUE CAKE

      I am no Martha, but for a food blogger I bake decently. I slay two classic cakes.

      Here’s the thing tho. I learned everything by first making good dough for bread. 

      (Which, when conquered, will help you make strudel, pizza and phyllo for pies, pastries and crescents. You can then move to intricacies like sweet and savory dumplings.)  

      This shouldn’t even make sense as these two cakes are not exactly flour based.

      The first cake I’m talking about is the chocolate and walnut cake. It’s the walnut cake my mom makes for everyone’s birthday. The recipe is several generations old. Mom learned it from grandma. Grandma watched great-grandma do it.

      This cake is a traditional dessert. Three layers of - mainly eggs, sugar, chocolate and flour - cake plus three layers of frosting and filling - of the same material as cake plus lots of butter - for the grand finale.

      It’s the prototypical regional chocolate walnut cake recipe. I know this because when we shared it in Balkan food groups on FB almost everyone who commented said the same thing: it was the cake their grandmother made.

      You’re almost obligated to love it.

      My (very close) second cake is today’s meringue cream cake. This meringue cream cake is sort of like Pavlova…

      …if Pavlova had babies with a billionaire.

      Salivating yet?

      meringue cake, cream cake, meringue cream cake, pavlova, pavlova cake, meringue cream cake | balkanlunchbox.com

      MERINGUE CAKE… MERINGUE DESSERT…

      Meringue is what we call an egg-white based dessert. It’s what you get when you whisk the hell out of egg whites (along a pinch of salt and lots of sugar) and dry them in the oven. At low temperatures, over long period of time. 

      (Not all meringue is made this way. Italian meringue way, for example, asks that simple syrup be added to egg whites.)

      Crunchy and chewy. Soft and hard. Dessert and a dessert base. Meringue is fundamentals of desserts. 

      Making a meringue dessert means creating mini snow mountains. As you whisk, the egg whites will transform from liquid into foam. As you continue, they’ll stiffen.

      There are two levels of stiff: soft and hard peaks.

      Soft peaks (called so due to resembling soft mountain peaks) are achieved as egg whites first turn from liquid to solid. This is the moment to add sugar. In How to Cook Everything Mark Bittman explains that sugar helps eggs retain moisture while cooking so “it’s less likely to fall and leak water.”

      (Confectioner’s sugar is recommended. But we use the regular, granulated kind for this meringue  cake with no problems.)

      Hard peaks happen after a few more minutes of whisking. (A mixer will prevent you from injuring your hand.) Sugar dissolves. Peaks become stiffer. The substance becomes translucent and glazed.

      Bittman says you’ll recognize hard peaks “when you remove your whisk, it [the mixture] will not fall over.” Another way to test for meringue hard peaks is to take the mixer out and flip the mixing bowl upside down. Everything should stay in the bowl.

      Now on to Pavlova.

      You’ve probably heard the name. Pavlova is the best known type of meringue dessert. (A delicate, delicious one!) Few layers of meringue are filled with cream. Then topped with fruit for dramatic effect.

      Named after Anna Pavlova, this meringue evokes silhouette of a ballerina dress as it moves through space.

      Today's meringue cake is better than Pavlova.

      meringue cake, cream cake, meringue cream cake, pavlova, pavlova cake, meringue cream cake | balkanlunchbox.com

      WHAT MAKES THIS MERINGUE CAKE BETTER?

      Do me a favor before reading the rest of this article. Scroll down to watch the video! It’s worth a thousand pictures.

      This meringue recipe is different than what you're used to. But you'll get used to it fast.

      (Sidebar: do you ever wonder what happens to egg yolks left over after meringue is made?  If you do, then today’s meringue cake will pacify the OCD demons.)

      When the whisked-into-submission egg whites are drying in the oven, we turn to the egg yolks. (Well, just ahead of that we whip some whipped cream and leave it to cool.)

      Egg yolks are mixed (with sugar) over a water bath. When they reach the desired consistency, flour and milk are added in.

      After processing the yolks, we remove them from heat and add butter in. Later, we combine  them with whipped cream. Half of it is further enriched by ground walnuts.  (What else! Wait, hazelnuts work too.) The other half is the frosting.

      Then these reconfigured egg yolks and egg whites make love.

      The result is a meringue cake intertwined with layers of soft filling for the softest, melt-in-your-mouth, taste you’ve experienced.

      It's easy to get used to better. 

      meringue cake, cream cake, meringue cream cake, pavlova, pavlova cake, meringue cream cake | balkanlunchbox.com

      HOW TO NAIL MERINGUE EVERY TIME

      Three things work for me.

      1. The most important skill in nailing meringue each time is patience. Enthusiasm is great. Experience is better. (You might fail even after at first making perfect meringue several times. Patience will get you through the failure.)
      1. How is the weather today? Hot? Or worse, humid? Don’t bother! Air-conditioning doesn't help. Wait for a cooler day.
      2. Like baklava meringue is dried, not baked. This means low temperatures. This means a long time.  (Don’t overdo it either. I've heard of famous chefs drying meringue overnight at 60°C. You don’t have time for that shit. One to two hours at 130°C-150°C will do just fine.)

      Questionable advice I’ve read includes keeping the utensils and mixers clean. Is it a common occurrence to prepare food with dirty utensils? (Message to the one person in the world that doesn’t clean their equipment before baking/ cooking/ handing food: you're disgusting. Stop it!)

      Another advice I don’t always agree with is to add sugar incrementally in between mixing. For this meringue cream cake I add it in just one somewhat slow swoop between soft and hard stiff phases and have never had a problem.

      Meringue has became this worshipped and feared dessert du jour. (The way cupcakes, froyo and macaroons used to be.) But there is room neither for devotion nor terror here.

      Meringue is a good dessert. Nothing more nothing less. You don’t need special powers. You can make great meringue just as you are in this moment.

      Trust me.

      THIS MERINGUE CAKE IS REALLY MAJDA’S CAKE

      I never met Majda in person. I heard about her from my sister.

      Aleksandra is in the event planning, she knows every cake maker in town.

      Of those, Majda’s cakes were the best. When offered a choice, people chose Majda’s. 

      I too was a lucky recipient of Majda’s cakes. I really liked this one pudding cake of hers. A really simple cake. The kind you whip up with Petite Beurre cookies and chocolate pudding. It had a soft consistency.  It was a cake to eat while you’re reading a good book.

      (Another great thing about Majda was that she shared her recipes freely. I asked Aleksandra to ask for the recipe several years ago. Majda emailed me right away. I won’t lie, I never got around to making it.)

      But the best cake Majda made is called ‘Spanish Wind.’ (I renamed it for the English text only. ‘Wind’ does not have the same colloquialism in Bosnian/ Serbian/ Croatian.) Everyone loves this cake.

      A few years ago Majda got cancer. Fast one. 

      She stopped making cakes. She stopped taking calls. She disappeared in a manner of many cancered. Quickly. Violently.

      I remember her husband’s FB post that day, a link to a song by a local band named aptly “I don’t feel like parting from you.” I understood him. Few months before this I experienced the same.

      Like those that go, she left behind a lot. A young son. Loving husband. Family and friends. They sit around their dinner table, and she’s there. She never left. In thoughts. In photos. In stories. In memories.

      What they don’t expect is that she’s walked through many of our conversations too. Each time one of us ate a good dessert the discussion easily turned to Majda.

      And each time it was a short conversation. “No one will make cake the way Majda made cake,” was how it started and ended.

      Not that we didn’t try to find the recipe for her cake. It’s a well-known regional cake. Something about hers though.

      It was like a mature woman who knows her worth. She needs no extra trinkets. Rich, but you wouldn’t know it unless you sink your teeth in. She’s sensual and soft. But to grasp that you have to feel her smoothness in your mouth. She’s a minimalist. But her entire substance is pure gold.

      Even as the years put a clear division between Majda and us, our neurons were forever stamped by a memory of her hands' work. 

      A few months ago, Aleksandra, mom and I were again reminiscing about cakes. Inevitably Majda came up. There would never be another cake like hers. There would never be another Majda.

      I suddenly remember the email she sent me years ago, the one with the recipe for the pudding cake. It was a consolation prize, I knew, but comforting that at least we could make something of hers.

      I pulled it up and started to read. The more I read, the more excited Aleksandra and mom got.  I didn’t have as much experience in cakes. But even I noticed there was no mention of Petit Beurre nor the pudding.

      Majda confused the recipes and sent me the wrong one. Her confusion left behind a fortune. In my inbox was the recipe for the cake!

      The email was a glimpse into her prowess. It was written to someone who - she supposed - had made a few cakes in their life. Written the way a doctor scribbles a prescription having full confidence that the pharmacist would decipher it and make the right concoction.  

      Even as an email it was evident it was a cake she’d done thousands of times before.

      She couldn’t have known that at the time she sent the email I had very little experience in cookery. She couldn’t have known that the email would fall down under the weight of other, ‘more pressing’ emails of the time.

      She wouldn't have known back when she sent it that several years later, several years after her, one evening we'd cry collectively after we made it and it was her meringue cake. 

      Several years ago Majda closed that email with “goodbye from the cold Sarajevo.”

      Hello from a warm September Sarajevo evening Majda. And thank you very much darling!

      (Dedicated to Majda Hašimbegović)

      meringue cake, cream cake, meringue cream cake, pavlova, pavlova cake, meringue cream cake | balkanlunchbox.com

      Meringue Cake

      Aida
      Meringue cake is a perfect marriage between (pavlova-like) crunchy but soft, egg-white based cake, and smooth filling made out of whipped cream, butter, egg yolks and hazelnut. If you learn to make one cake in your ENTIRE life, this is it.
      5 from 1 vote
      Print Recipe Pin Recipe
      Prep Time 1 hour hr
      Cook Time 1 hour hr
      Servings 6

      Ingredients
        

      Cake: 

      • 7 egg whites
      • Pinch of salt
      • 14 ounces white sugar
      • 1 tablespoon white vinegar

      Frosting & Filling: 

      • 4-5 ounces whipping cream powder about 3 bags or 135 grams
      • 16 ounces milk
      • 4 tablespoons white flour
      • 14 ounces milk
      • 7 egg yolks
      • 5 ounces white sugar
      • 9 ounces butter
      • 7 ounces walnuts or hazelnuts, ground + a little bit more

      Instructions
       

      Cake: 

      • In a medium (non-plastic) mixing bowl start mixing 7 egg whites plus a pinch of salt with a mixer of choice. When the mixture becomes frothy - or in a soft stiff phase - (somewhat slowly) add sugar and continue mixing. Finally, add vinegar and mix some more until ingredients are whipped into stiff peaks. (To check for readiness flip the mixing bowl upside down. Everything should stay in the bowl.)
      • Line a baking or sheet pan (approximately 13x17 in, or 33x43 cm) with parchment paper. (Optionally, turn the pan upside down and line with parchment paper.) Leaving about 1-2 inches of space in between layers, use the ingredients to create two equal rectangles the thickness of ½-1 inch.
      • Bake, or rather dry, on 300°F (150°C) for 30 minutes. Lower to 265°F (130°C) and bake/ dry another 30 minutes. (Meanwhile, prepare the frosting & filling.)
      • Set aside to cool completely. Once cooled, carefully separate from the parchment paper so that it doesn't break.*

      Frosting & Filling: 

      • In a large mixing bowl combine (16 ounces) milk and whipping cream powder. Work with a mixer of choice for several minutes (or until ingredients stiffen into soft peaks). Set the whipped cream aside in a cool place or fridge.  
      • In a medium mixing bowl mix flour with (14 ounces) milk with a spoon. Start mixing small amounts until flour is dissolved and crumb-free. Only then add the remaining milk and continue mixing until completely integrated. Set aside.
      • Make a water bath (bain marie). Fill a large pot ⅓ with water and bring to boil on high. Lower to medium and place a smaller pot with egg yolks into it. (The smaller pot needs to be touching the water in the larger pot.) Add sugar to yolks and start mixing with a hand mixer. Mix for several minutes.
      • When eggs and sugar integrate, turn light yellow and start separating from the pot walls, add milk and flour mixture. Raise temperature to high and continue mixing. Mix for several minutes more until the ingredients are of pudding thickness. Turn the heat off. Take the small pot out of the big one and set aside. Cool for 10 minutes.
      • Add butter into the smaller pot and mix with a hand mixer until integrated. Cool off for 10 to 15 minutes. Finally, add whipped cream and mix until integrated.
      • Divide in two, and transfer half of the mixture into a different bowl. Set aside for at least 15 minutes in a cool place or fridge. (This half is the frosting.)
      • Add ground walnuts to the second half it and mix with a spatula until integrated. Set aside for at least 15 minutes in a cool place or fridge. (This half is the filling.)

      Combining Cake, Frosting & Filling:

      • Place the first cake half onto a long cake platter. Empty the filling onto it and spread evenly with a spatula. Lightly place the second cake half on top of the filling. Empty the frosting onto it and use a spatula to evenly spread it on the top of the cake and its sides.
      • (Optionally) Decorate with a few handfuls of ground walnuts spread on top.
      • Leave cake in the fridge to cool off and tighten for at least 2 to 4 hours, preferably overnight.

      Video

      Notes

      *If the cake breaks patch it up the best you can. If it breaks completely? Eat the crumbs and make the meringue again.
      Tried this recipe?Let us know how it was!

      Stewed Okra (Bamija, Bamya)

      Sep 5, 2018 · 8 Comments

      Silver bowl with a lid filled with a spoonful of the sauce, a lemon wedge, and a slice of bread on gray background.

      Stewed okra, also known as bamija (and also as baminja, bamia, or bamya), is a yummy, hearty dish made with tender pieces of meat stewed with okra and a blend of aromatic spices. Shall we?

      Silver bowl with a lid filled with a spoonful of the sauce, a lemon wedge, and a slice of bread on gray background.
      [feast_advanced_jump_to]

      Background

      Stewed okra, or bamija, is a beloved Bosnian dish with North African origins. Okra and tender meat (usually veal or beef) are simmered together to create a flavorful sauce that goes well with many sides, or by itself. Bamija's often enjoyed during Ramadan and Eid.

      This dish takes a while to make. However, most of this time is spent waiting for the meat to stew and tenderize, you don't actually have to do much.

      Okra, like tomatoes, is a fruit usually grouped with vegetables. Fresh okra is green, long, a bit bumpy, and tastes best when it's less than 2 inches long. In English, it's often called "Lady Fingers."

      In the Balkans, okra is dried by stringing it like a necklace. This way okra dishes like stewed okra can be prepared year-round. Around the world, okra also goes by bamya, bamia, baminja and okro.

      Okra has a unique taste. Think of it as a blend of tangy beans and asparagus. It pairs really well with different meats. Our stewed okra recipe is a great way to try this tasty vegetable, ahem, fruit.

      Dry and Fresh Okra

      Here's what okra (bamija) looks like dry and fresh.

      Two photos side by side of dry okra (left) on a thread and fresh okra (right) on light backgrounds.

      Dry (photo on the left):

      • Dry okra looks like a beaded necklace. Beads are the size of a fingernail.
      • As okra has a limited harvesting time, drying is a way of preserving it for year-round use. The beads are picked before okra ripens and threaded close together on an approximately 3-foot-long thin twine.
      • Hundreds of these strings are dried together in a shade, or even better, in a shaded drafty place. Buy one at a time. Just one string of okra is enough for a 4-serving main dish (like stewed okra), or for two soups.
      • Once you're ready to use it, take it off the string, and submerse it in water and vinegar. It's ready when it doubles in size. Dried okra never reaches the size of fresh okra, but it's grittier and tastier.

      Fresh (photo on the right):

      • Fresh okra grows into long, thin, pointy pods. It's green when ripe, and each pod can grow between 2.5 and 5 inches. (Shorter okra is tastier!) Okra has a rough stem and stubby, tiny needles on its skin. When cut across it looks like a star from inside.
      • To make stewed okra, look for "baby okra," or rather, okra that's about 2 inches. If you can't find it, get the regular length and then cut it into ½ to 1-inch pieces.

      Ingredients

      Here are all the ingredients you'll need to make stewed okra (bamija).

      Ingredients for stew on a white background: oil, spices, butter, carrots, veal, onion, parsley, garlic, okra, lemon.

      Meat for stewed okra

      • Veal, sirloin, tenderloin, beef chuck, lamb, mutton

      Veggies and Fruit for stewed okra

      • Lemon
      • Okra
      • Onion
      • Garlic
      • Carrots

      Herbs and Seasonings for stewed okra

      • Parsley
      • Stock powder or Vegeta
      • Ground pepper
      • Paprika

      And also...

      • Oil
      • Butter

      Instructions

      Here are simple instructions to make bamija (stewed okra).

      Two photographs side by side of okra on a string (left), and okra submerged in water and lemon juice (right) on light background.

      Step 1. Before making okra stew (bamija), "de-slime" okra. Get the dry okra off the thread (or cut it into pieces if it's fresh). Submerge in boiling water and lemon juice for at least 30 minutes.

      Six photographs (2x3) of black pot filled with different ingredients (oil, butter, carrots, parsley, onion), and seasonings.

      Step 2. Heat oil and butter. Add carrots, onion and parsley. Stir and simmer. Add veal and seasonings. Stir and simmer. Add water a little bit at a time. Simmer for at least 2.5 hours.

      Two photos side by side of okra strained (left) and added to the sauce (right).

      Step 3. Strain okra and add to stew. Simmer stewed okra for 30 more minutes.

      Okra Slime Tips

      Okra contains a thickening substance called mucilage, which is released when it's heated and mixed with moisture. Some cooks like okra specifically because of this ingredient that thickens the okra stew.

      The rest of us don't like this substance and we like to get rid of it. Two easiest ways to get rid of okra slime before making stewed okra are as follows:

      1. Cover okra with cold water, add the juice of ½ lemon, or 3-4 tablespoons of vinegar, and bring to a boil. Bring the temperature down to low and cook for 10-ish minutes. (Dry okra will double in size.) Strain and it's ready to use.
      2. Cover okra with boiling water, and add the juice of ½ lemon, or 3-4 tablespoons of vinegar. Leave it for at least 30 minutes. (Dry okra will double in size.) Strain and it's ready to use.

      Handling

      • Serving: serve stewed okra hot with homemade bread, dough balls called lokumi, a side of rice, or by itself. Most people dip into it with bread, but it can be consumed like stew, with a spoon.
      • Storing: cover the container with stewed okra and transfer it to the fridge for up to 48 hours. Reheat before eating. It's best to warm up only the amount you plan on eating. Do not reheat twice.
      • Reheating: reheat based on your preference. The best option is on the stovetop, on low until steam starts to come out.
      • Freezing: okra does not do well in the freezer. You're probably already using dried or freezer okra anyway, so it's not good to process sensitive produce too many times.

        However, if you must freeze it, turn the stew off and cool it before adding the okra to it. Transfer to a freezer-safe container, and keep up to 2-3 months.

        When you thaw the stew, follow the recipe steps to add okra in and finish cooking it. (Don't forget to cover okra with hot water and lemon juice for a while first.)
      Silver bowl filled with a stew, on a gray background.

      Recipe FAQs

      What are the okra health benefits? What does okra do for the body?

      According to WebMD, studies using concentrated okra suggest a 63% reduction in breast cancer cells. It potentially inhibits fat cell production and promotes cholesterol degradation.

      It's a great source of B vitamins, as well as many minerals. Folklore has it that Cleopatra swore by okra's properties to reduce skin redness and keep its elasticity, and smoothness.

      Finally, this fun plant has also been used as an aphrodisiac in the centuries past.

      Is Bosnian bamija stew the same as Turkish Bamya?

      It's similar. Bamija in Bosnian, just like bamya in Turkish, is the actual word for okra. The dish refers to a stew featuring okra.

      However, in Bosnia and Herzegovina, generally, only one version of the stew is made (types of meat can vary), while in Turkey there are several different kinds of bamya stews.

      What does okra taste like?

      Okra's taste is somewhat like asparagus with a touch of green beans. When you bite into it, you'll sense both grit and freshness. Okra really comes into its own when mixed with tender meat in a sauce or a stew.

      Why is okra called "lady's fingers" in English?

      In English, okra is nicknamed "lady's fingers" because its elongated shape resembles dainty, older lady's fingers.

      Which country food is okra stew?

      It's believed that stewed okra originated in Africa. Today it is made all over the African continent, as well as the Middle East, the Mediterranean, and the Balkans. In North America, okra is especially popular in the Southern USA.

      Other Dinner Ideas

      On the blog:

      • Boss Sauce - Amazing Veal Sauce!
      • Veal Pâté - Talk About a Perfect Condiment!
      • Traditional Okra Bey's Soup - More Aphrodisiac Ideas!
      • Bosnian Veal Sauce - Oooooooooh!
      • Bean Stew - A Balkan Classic!
      • Cabbage Stew - You Haven't Eaten Cabbage Like This!

      Around the web:

      • I found a fantastic plain okra (okro) recipe on My Diaspora Kitchen, a food blog by Chichi dedicated to sharing Nigerian cuisine. Plain okra is prepared by blending and boiling it, then pairing it with various stews, often palm oil-based. This dish is not only visually vibrant but also enhanced by the use of iru, a fermented locust bean seasoning that elevates soups and stews to an ultra-delicious level.
      • And if you're visiting Bosnia and Herzegovina, here's a nice travel guide that can answer most questions about getting to and around here.

      Thoughts?

      If you made Stewed Okra (Bamija, Baminja, Bamya) and liked it, please consider giving it a ⭐️⭐️⭐️⭐️⭐️ (5-star) rating. This helps others find the recipe more easily!

      Also, feel free to leave a comment (I read each one!), and don't forget to tag a photo #balkanlunchbox, or us @balkanlunchbox, on IG.

      Prijatno and bon appetit!

      Silver bowl with a lid filled with a spoonful of the sauce, a lemon wedge, and a slice of bread on gray background.

      Stewed Okra

      Aida
      Bamija (bamya), a Bosnian and Herzegovinian delicacy, showcases tender meat simmered with aromatic spices, resulting in a rich, flavorful sauce. Perfect over rice, mashed potatoes, or by itself.
      5 from 2 votes
      Print Recipe Pin Recipe
      Prep Time 15 minutes mins
      Cook Time 3 hours hrs 30 minutes mins
      Total Time 3 hours hrs 45 minutes mins
      Course Main Course
      Cuisine Bosnian
      Servings 4 to 6
      Calories 561 kcal

      Ingredients


      • ½ lemon (juice only) or 3-4 tablespoons of vinegar
      • 1 strand of dried okra, or ½ pound fresh okra if using fresh, try finding pods that are about 2 inches in length
      • 1 onion large, minced
      • 2 carrots medium, diced
      • 2-3 garlic cloves minced
      • ¼ cup fresh parsley minced, or 2-3 tablespoons dried
      • 2 tablespoons butter
      • 2 tablespoons oil
      • 1-2 pounds veal diced; or sirloin, or tender chuck
      • 1 tablespoon stock powder or Vegeta, or bouillon cube (crushed)
      • ½ tablespoon ground pepper or peppercorn
      • 1 teaspoon paprika
      • (Optional) several lemon wedges for serving

      Instructions
       

      Soaking Okra

      • Method 1. (Preferred!) If using dry okra, take it off the thread making sure no thread is left inside the pods. The best way to do it is pod by pod, or a few pods at once until all of them are off the thread. This may take a few minutes, depending on how strongly it was threaded and how long it was stored. Once it's off, transfer okra pods to a bowl and cover with boiling water. Squeeze half a lemon or add vinegar to the bowl. Set aside.
        If using fresh okra, try to find pieces that are about 2 inches long. If you find these, keep them intact and follow the method above. Finally, if all you can find is longer okra, cut the stems off each okra and discard them. Then proceed to slice each into ½-inch pieces (keep the seeds inside). At this point, follow the same instructions.
      • Method 2. De-thread dry okra, or slice fresh okra (discard stems). Place in a small pot and cover with water. (Like in method 1, if you have fresh okra that's around 2 inches, keep it intact.) Add juice of ½ lemon or vinegar. Bring to a boil. Bring the temperature down to low. Simmer for 20 minutes. Take out and strain.

      Parallel to Okra Soaking

      • In a deep pot (or a skillet), heat oil and butter on high. Lower to medium and add onion, carrots, garlic, and parsley. Simmer for about 15 minutes. Stir frequently, and add a pinch of hot water here and there so all the liquid doesn't evaporate.
      • Add the meat and seasonings, and bring the temperature down to your lowest setting. Stir well at about 10-minute intervals. As you're stirring, and simmering, keep adding a pinch of water at a time, until a sauce forms. Continue simmering and occasionally stirring for about 3 hours on low.
      • You'll add about 2-3 cups of hot water throughout. Maybe a little more, maybe a little less, however, at the end of cooking the sauce should be about ½ inch to 1 inch above the meat. If you prefer a thicker stew, add less water. If you like it thinner, add more water. However, balance the flavor by adjusting the seasonings to the liquid.
      • (Alternatively, bring the temperature up to medium, and simmer for 2 hours. We prefer the longer method as the meat becomes incredibly tender.)

      Adding Okra to the Stew

      • At this point, strain your okra. (Dry okra should have doubled in size by now.) Add it to the sauce. Try the sauce and adjust seasonings as necessary. Continue simmering with occasional stirring for an additional 20-30 minutes.

      Handling Stewed Okra

      • Serving: serve stewed okra hot with or without a side. (Rice, mashed potatoes, and polenta are good choices.) Most people dip into it with bread, but it can be consumed like stew, with a spoon. Serve with a lemon wedge. Storing: keep in the fridge for up to 48 hours. Reheating: reheat based on your preference. Don't reheat twice. Freezing: Freeze the stew before adding the okra to it. Transfer to a freezer-safe container, and keep up to 2-3 months. When you thaw the stew, follow the recipe steps to add okra in and finish cooking it. (Remember to "de-slime" it first.)

      Video

      Nutrition

      Serving: 1of 4Calories: 561kcalCarbohydrates: 12.2gProtein: 57.5gFat: 29.9gSaturated Fat: 11.5gCholesterol: 250mgSodium: 388mgPotassium: 1136mgFiber: 3.7gSugar: 3.7gCalcium: 110mgIron: 14mg
      Tried this recipe?Let us know how it was!

      More Recipes to ❤️

      • Quarter of a burek pie on a plate on gray background.
        Burek
      • Overhead photo of a meat and cheese wooden tray platter on a gray background.
        Balkan Meza: Tapas-Style Appetizer Platter [Meat and Cheese Tray, Charcuterie Board]
      • ajvar, chutney, pepper chutney, eggplant chutney, balkan spread, balkan dip ajvar, red pepper and eggplant dip, pepper dip | balkanlunchbox.com
        Ajvar
      • Cast iron pan filled with yellow stuffed peppers and a kitchen towel on a gray background.
        Easy Vegetarian Stuffed Peppers with Potatoes [Oven Baked, No Rice, Gluten-Free, and Tomato Sauce-Free]

      Veal Stew with Potatoes "Dive Bar Style"

      Aug 6, 2018 · 16 Comments

      Two hands holding a bowl of stew.

      Veal Stew with Potatoes (Dive Bar Style) is inspired by delicious stews one can find in a Balkan kafana (dive bar). You need one hour, some veal, and a bunch of veggies for this perfect weeknight broth. Shall we? 

      Two hands holding a bowl of stew.
      [feast_advanced_jump_to]

      What Is It

      Veal stew with potatoes is a warm, hearty, flavorful dish. Potatoes, veggies and spices combine with the tenderest veal to create magic.

      This recipe is on the menu of pretty much every Balkan kafana, (an old-school Balkan bar). Kafanas are known for whipping up an amazing entre or two, one of them usually being a stew like today's.

      As several kafanas refused to reveal their particular recipe, we recreated it.

      Well, Aleksandra did most of the work. You can thank her for today's flawless broth because (unless you own a dive bar), this is the closest you'll get to this incredible entre.

      Three Reasons to Love Today's Dish

      1. This stew is chockful of veggies and tender veal, so you can be confident in knowing your family will be eating healthy tonight.
      2. This is THE recipe to start experimenting with veal, even if it intimidated you before. (Move over Osso Bucco!)
      3. We know you're strapped on time! With just 1-hour start to finish, you can prepare this dish super fast, even on a weeknight.

      Ingredients

      Ingredients on a honeycomb background.

      Ingredient Notes

      • Veal: If you can't find veal, sub with a younger beef cut.
      • Veggies: cook with tougher, harder veggies that have lower water content. Carrot, onion, bell peppers, and (of course) potatoes work well. For a sweeter taste use sweet potatoes. Avoid: zucchini, squash, and eggplant.
      • Seasonings: these are what really give this stew that special taste, so don't sub them if you can. Our favorites are the paprika (we like the hotter kind, but sweet is ok too), Vegeta or beef stock powder, and (optional) oregano.
      • Flour: sub with cornstarch or blended potatoes. Here's how to thicken your stew without flour or cornstarch.

      Lightning-fast Instructions

      (Our lightning-fast instructions are here to give you an idea of how to make this dish. For more detailed information look at the recipe card below!)

      Four similar photos of a pot filled with ingredients.

      1. Heat butter. Add onion and sauté.
      2. Add carrots and pepper and continue sautéing.

      Four photos of pot with different ingredients.

      3. Add meat and keep sautéing. Add spices and flour. Stir.
      4. Add potatoes and broth, stir and cook. (Optional) garnish with parsley.

      Recipe FAQs

      Why is my veal so tough?

      One of two reasons. You overcooked it or what was sold to you as veal was actually baby beef or beef.

      What kind of meat is veal?

      Veal is the meat from young calves.

      Is veal a lamb?

      No.

      Is veal cow?

      Yes.

      How do you tenderize veal stew meat?

      Veal is tender to start with. You don't need to tenderize it for this stew. If you're making veal cutlets you can flatten them, or marinate them.

      Can you overcook veal stew?

      Any stew that's cooked too long can be overcooked. Just follow today's recipe and you'll be fine.

      How long should veal be cooked?

      Veal cooking time depends on the dish. Today's veal stew takes one hour start to finish.

      Bowl of stew with spoon and a kitchen towel.

      More Veal Recipes

      • Veal Shank Roast
      • Bamija: Phenomenal Traditional Bosnian Okra Stew
      • Veal Pate
      • Veal and Mushroom Boss Sauce: aka Hajj Ćevap
      • Veal Roast

      Would You Do Me a Favor?

      If you make today's Veal Stew With Potatoes and like it, please consider leaving a ⭐️⭐️⭐️⭐️⭐️ (5-star) rating. This will help others find the recipe more easily!

      You can also leave a comment, I read EVERY one! Finally, if IG is more your thing, consider tagging us @balkanlunchbox.  

      Prijatno and bon appetit!

      Two hands holding a bowl of stew.

      Veal Stew with Potatoes "Dive Bar Style"

      Aida
      The type of comforting, hearty stew you'd find in a local dive bar "kafana." On your table in less than an hour.
      5 from 4 votes
      Print Recipe Pin Recipe
      Prep Time 10 minutes mins
      Cook Time 50 minutes mins
      Course Main Course
      Cuisine Bosnian, Croatian, Serbian
      Servings 4 servings
      Calories 388 kcal

      Ingredients


      • 3 tablespoons butter
      • 1 teaspoon oil (optional)
      • 1 onion large, diced
      • 2 carrots medium, diced
      • 1 yellow bell pepper medium, sliced into short thin strips
      • 16 ounces veal diced small
      • salt and pepper to taste
      • 1 tablespoon beef stock powder or seasoned salt
      • 1 tablespoon paprika sweet or hot, per preference
      • 1 tablespoon flour
      • 6 cups beef broth or a bouillon cube dissolved in 5-6 cups of water, divided
      • 2 potatoes large, yukon, white potatoes or similar
      • 1 tablespoon (optional) fresh parsley minced

      Instructions
       

      • In a medium size pot heat butter over medium. (Add oil to butter if worried about butter burning.) Add onion and sauté 2 minutes frequently stirring.
      • Add the carrots and continue sautéing for another 2 minutes, frequently stirring. Add pepper and continue sautéing and stirring for an additional 2-3 minutes.
      • Add meat. Stir well and keep sautéing 10 minutes. Add spices, flour and 1 cup of broth. Stir until well integrated.
      • Add potatoes and remaining broth and stir yet again. Cover pot with its lid and cook 20-25 minutes or until potatoes are fork-tender.
      • (Optional) Garnish with parsley. Serve hot.
      • Due to potatoes, the stew is best served the same day. If you must, keep it in the fridge overnight, but consume within a day. If you plan to freeze it don't add potatoes.

      Video

      Nutrition

      Serving: 1of 4Calories: 388kcalCarbohydrates: 28gProtein: 30gFat: 17gSaturated Fat: 9gPolyunsaturated Fat: 1gMonounsaturated Fat: 6gTrans Fat: 1gCholesterol: 116mgSodium: 1861mgPotassium: 1216mgFiber: 4gSugar: 4gVitamin A: 5493IUVitamin C: 82mgCalcium: 75mgIron: 3mg
      Tried this recipe?Let us know how it was!

      Balkan-Style Jagerschnitzel (Balkanschnitzel, Paprikaschnitzel, or Lovačke Šnicle)

      Apr 29, 2018 · 12 Comments

      Pan with sauce and schnitzels, with a spoon inside of it holding one of them, checkered kitchen towel on a gray background.

      Balkan-style Jägerschnitzel (lovačke šnicle), are mouthwatering cutlets in a light gravy, accented with peppers. Although a misnomer (in German-speaking regions these go by Balkanschnitzel, Paprikaschnitzel, or Zigeunerschnitzel), these cutlets are falling-off-the-fork delicious! Shall we?

      Pan with sauce and schnitzels, with a spoon inside of it holding one of them, checkered kitchen towel on a gray background.
      [feast_advanced_jump_to]

      Background

      Hunter's schnitzels are a very popular dish in the Balkans. Also known as jagerschnitzel, (and locally as lovačke šnicle), these cutlets were brought to the region in the 19th century, during the time of the Austro-Hungarian Empire.

      Confession time!

      Like many dishes, this hunter schnitzel's are called differently in different places. (Remember burek?) The dish we in the Balkans call jagerschnitzel (lovačke šnicle), in German-speaking regions goes by:

      • Balkanschnitzel (Balkan cutlet),
      • Paprikaschnitzel (pepper cutlet), or by the offensive
      • Zigeunerschnitzel (Gypsy cutlet).

      The main difference between these cutlets is that German jagerschnitzel almost always has mushrooms in its gravy.

      On the other hand, the Balkan-style jagerschnitzel (Balkanschnitzel, Paprikaschnigzel, and Zigeunerschnigzel) has peppers as the main gravy ingredient, in addition to others.

      In short, the cutlets are the same, with slight gravy (sauce) differences. For easier preparation, we've included both, the stovetop and Instant Pot (pressure cooker) instructions.

      Balkan Jagerschnitzel (Lovačke Šnicle)

      Here are some more ways to recognize Balkan hunter's schnitzels.

      • They're usually made with veal, beef, or pork.
      • Jagerschnitzels here are not breaded (like it is in the US, and sometimes in German-speaking regions), however the cutlets can be slightly marinated.
      • They're always dredged in flour before frying. The flour, along with the broth and (sometimes) wine, helps create a tasty gravy, while the meat keeps its juices. Gravy thickness varies per preference, from sauce to stew-like.
      • In addition to peppers, you can add and subtract veggies. Carrots and mushrooms are our second favorites.

      Ingredients

      Here are the ingredients you'll need to make Balkan-Style Jagerschnitzel (Balkanschnitzel, Paprikaschnitzel, or Lovačke Šnicle).

      Ingredients for jagerschnitzel on a gray background (seasonings, butter, broth, oil, cutlets, onion, garlic, peppers, flour, carrot).

      Meat

      • Beef, veal, or pork cutlets. Look for thicker pieces, that you can pound.

      Vegetables

      • Garlic.
      • Onion.
      • Carrots.
      • Pepper: yellow, red, and/or green bell pepper. Substitute with bull's horn peppers, Italian sweet peppers, (known as roge and babure).
      • (Optional) Tomatoes, mushrooms, and/or celery root.

      Additional ingredients

      • Herbs and seasonings: paprika, parsley, salt, and pepper.
      • Broth: beef broth or beef bouillon melted in water.
      • Flour: regular white flour works best.
      • Oil: vegetable, canola, sunflower, and avocado oil all work. Substitute with your preferred oil, although we don't recommend olive oil due to a change of taste when it's heated.
      • Salt and pepper: preferably sea salt.
      • (Optional) Vegeta.
      • (Optional) Mustard (if marinating the meat).
      • (Optional) Red Wine and/or Tomato Sauce.

      Marinade Ingredients (Optional)

      Three small white and blue plates with different ingredients (Vegeta, mustard and oil) on dark blue marble background.

      Instructions

      Here are the instructions you'll need to make Balkan-Style Jagerschnitzel (Balkanschnitzel, Paprikaschnitzel, or Lovačke Šnicle). For your convenience, we've included both the stovetop and the Instant Pot (pressure cooker) steps.

      Optional preparation step.

      Four photographs, two by two, of schnitzels marinated with different ingredients: oil, mustard and Vegeta.

      Preparation. If the cut you're buying is a little more muscular, older, or tougher, marinate your cutlets. If you can, do this the night before, and leave them in the fridge. Alternatively, 1-2 hours before cooking will suffice.

      Pound the cutlets after marinating, but just before cooking.

      Stovetop instructions for Balkan hunter schnitzels.

      Four photographs, two by two, of schnitzels (photo one it's pounded, photo two dredged in flour, photo three it's seared in pan, photo four seared on the other side).

      Step 1. Searing the Cutlets for Balkan-Style Jagerschnitzel (Balkanschnitzel, Paprikaschnitzel, or Lovačke Šnicle) on the stovetop. Pound and season each cutlet. In a deep pan, heat the oil on high until very hot. Dredge cutlets in flour and fry for 3-4 minutes on each side. Set cutlets aside and deglaze the bottom of the pot.

      Four photographs, two by two, of a pan with different ingredients (photo one onion and garlic, photo two peppers added, photo three flour added, photo four broth added).

      Step 2. Simmering the vegetables for Balkan-Style Jagerschnitzel (Balkanschnitzel, Paprikaschnitzel, or Lovačke Šnicle) on the stovetop. Add butter, onion, and garlic to the pan. Simmer. Add carrots, celery, pepper (and whatever other veggies you're using), and simmer for 2-3 minutes. Add seasonings and simmer for 8-10 minutes. Add flour and a little bit of broth. Mix well.

      Two photos, side by side, one of pan holding schnitzels with other vegetables, and the last one with more broth added.

      Step 3. Combining veggies and meat for Balkan-Style Jagerschnitzel (Balkanschnitzel, Paprikaschnitzel, or Lovačke Šnicle) on the stovetop. Return cutlets to the pan, and add a little bit of broth. Cover the pan. Simmer on the lowest setting for about 45-60 minutes. Keep adding a little bit of broth at the time. The cutlets are done when they are "falling-off-the-fork" tender.

      Step 4 Parallel to other steps: Prepare your side.

      Instant pot instructions for Balkan hunter schnitzels.

      Four photographs (two by two) of cutlets: cutlet pounded (photo 1), cutlet seasoned (photo 2), oil heated in pan (photo 3), cutlet dredged in flour (photo 4).

      Step 1. Searing the Cutlets for Balkan-Style Jagerschnitzel (Balkanschnitzel, Paprikaschnitzel, or Lovačke Šnicle) in the Instant Pot. Pound and season each cutlet. Select the saute option on the Instant Pot, add oil, and let it heat up well.

      Four photographs, two by two, three of cutlets fried in an Instant Pot and the last one of it being removed to the plate.

      Lightly flour the cutlets, add to the Instant Pot, and fry for 3-4 minutes on each side. Set aside and (not pictured) deglaze the bottom of the pot.

      Six photographs, two by three, of vegetables cooked in an Instant Pot.

      Step 2. Simmering the vegetables for Balkan-Style Jagerschnitzel (Balkanschnitzel, Paprikaschnitzel, or Lovačke Šnicle) in the Instant Pot. Add butter, onion and garlic. Simmer. Add carrots, celery, pepper (and whatever other veggies you're using), and simmer. Add seasonings and simmer for 8-10 minutes. Add flour and a little bit of broth. Mix well. Add the remaining broth.

      Two photographs, side by side, first of cutlets placed in Instant Pot, and the second one of Instant Pot lid secured.

      Step 3. Combining veggies and meat for Balkan-Style Jagerschnitzel (Balkanschnitzel, Paprikaschnitzel, or Lovačke Šnicle) in the Instant Pot. Return the cutlets to the Instant Pot and secure the lid. Cancel the saute option and select pressure cooker on high for 25 minutes. (It will take about 10-15 minutes for Instant Pot to pressurize before the cooking begins.)  After the time is up, release the pressure naturally (about 20 minutes) or use the quick release method  (about 2-5 minutes). The float valve will drop and the lid will unlock and open when all of the pressure is out.

      Step 4 Parallel to other steps: Prepare your side.

      Pressure Cooker Instructions for Balkan hunter schnitzels.

      Follow the instructions for Instant Pot until you're ready to pressure cook. At this point, follow your pressure cooker's instructions for closing, pressure cooking, and releasing the steam.

      A spoon holding a schnitzel in a stainless steel pan.

      Handling

      Here is how to serve, store, and reheat your Balkan-Style Jagerschnitzel (Balkanschnitzel, Paprikaschnitzel, or Lovačke Šnicle). 

      • Serving: serve cutlets and gravy along a side of your choice. Side ideas include pasta, rice, mashed potatoes, quinoa, polenta, and vegetables.
      • Storing: keep in the fridge for up to 2 days.
      • Reheating: reheat based on your preference. Add a little bit of water to the gravy as it will most likely thicken some in the fridge.
      • Freezing: we don't recommend freezing cutlets as they dry out when thawed and reheated after freezing while gravy thickens too much. And these vegetables are not conducive to freezing once they're cooked.

      Recipe FAQs

      Here are some questions we often hear regarding Balkan-Style Jagerschnitzel (Balkanschnitzel, Paprikaschnitzel, or Lovačke Šnicle). 

      Does beef get tender in Instant Pot?

      Absolutely. All types of meat are tenderized to the maximum. This is because Instant Pot is a pressure cooker. Pressure cookers capture the steam from boiling water so that the dish is sort of steamed and cooked at the same time.

      How much water do you put for gravy in an Instant Pot?

      Always put at least the minimum liquid designated by your Instant Pot or pressure cooker. Depending on how thick we want the sauce each time, we put in between 1-3 cups.

      Is this an authentic recipe for Jagerschnitzel?

      It is for the Balkan region.

      However, what we in the Balkans have been calling jagerschnitzel (lovačke šnicle) for over a hundred years, goes by the balkanschnitzel (Balkan cutlet), paprikaschnitzel (pepper cutlet), or the offensive zigeunerschnitzel (Gypsy cutlet) in the German-speaking regions.

      The main difference is that peppers are primarily used for Balkan jagerschitzel gravy, while German jagerschnitzel gravy almost always includes mushrooms.

      Meanwhile, in the US the jagerschnitzel is always breaded, as opposed to other places where it sometimes is, and sometimes isn't.

      My Instant Pot is giving me "burn" message. Why?

      Before you do anything else, always follow your instruction manual!

      In our experience, the "burn" message shows up when the pot isn't properly deglazed after the food is fried, but before it is pressure cooked.

      If using your Instant Pot to sear meat before pressure cooking it, after searing add a little liquid and scratch the bottom of the pot with a spatula until all the crumbs on the bottom dissolve in the liquid. Only then add more water and return the meat for pressure cooking.

      Want More Meat?

      • Djulbastije: Ground Beef Patties in Bechamel Sauce
      • Beef Patties
      • Red Wine Drunk Schnitzels
      • Meat and Okra Sauce
      • Pljeskavica: Balkan Hamburger

      Thoughts?

      If you make today's Balkan-Style Jagerschnitzel (Balkanschnitzel, Paprikaschnitzel, or Lovačke Šnicle), and like them, please consider leaving a ⭐️⭐️⭐️⭐️⭐️ (5-star) rating. This will help others find the recipe more easily!

      You can also leave a comment, I read EVERY one! Finally, if IG is more your thing, consider tagging us @balkanlunchbox.

      Prijatno, Dobar Tek, and Bon Appetit!

      Pan with sauce and schnitzels, with a spoon inside of it holding one of them, checkered kitchen towel on a gray background.

      Balkan-Style Jagerschnitzel (Lovačke Šnicle) [Instant Pot, Stovetop]

      Aida
      Although misnamed, (in German-speaking regions this dish is called Balkanschnitzel (Balkan cutlet), Paprikaschnitzel (pepper cutlet), or by the offensive Zigeunerschnitzel (Gypsy cutlet)), our "fall-off-the-fork" cutlets are unbelivable!
      5 from 1 vote
      Print Recipe Pin Recipe
      Prep Time 15 minutes mins
      Cook Time 1 hour hr
      Total Time 1 hour hr 15 minutes mins
      Course Main Course
      Cuisine Bosnian, Croatian, Montenegrin, Serbian
      Servings 6
      Calories 1995 kcal

      Ingredients


      (Optional) Marinade

      • 3-4 tablespoons mustard
      • 2 tablespoons oil vegetable, canola, avocado
      • 1 tablespoon beef stock powder or 1-2 bouillon cubes, crushed, or 1-2 tablespoons Vegeta

      Cutlets

      • 1-2 pounds cutlets (beef, veal or pork) round or loin, cut into 8-10 cutlets
      • sea salt and ground pepper to taste
      • oil vegetable, sunflower, canola, avocado or coconut
      • 2-3 tablespoons flour for dredging first, and adding to gravy later

      Gravy

      • 2 tablespoons butter
      • 1 onion large, minced
      • 2-3 garlic cloves minced
      • 2 carrots medium, cut into rounds
      • 2 ounces celery root grated, or 1-2 celery stalks minced
      • 1-3 bell peppers or red bull's horn pepper, or Italian sweet peppers, sliced
      • 1-3 cups beef broth volume depends on your preferred gravy thickness
      • (Optional) 2-3 ounces mushrooms portobello or cremini, sliced
      • (Optional) 1-2 ounces red wine for deglazing

      Seasonings

      • 1 tablespoon paprika mild or hot, depending on your preference
      • 2-3 tablespoons parsley fresh, minced, or 1 tablespoon dried
      • (Optional) 1 tablespoon Vegeta or 1 beef bouillon or 1 tablespoon beef stock powder

      Instructions
       

      (Optional) Marinating the Cutlets

      • For tougher cuts of meat, marinate at least 2 hours before cooking, preferably overnight.
      • Combine all marinade ingredients and mix. Spread generously over the cutlets, on all sides. Cover and leave in the fridge.

      INSTANT POT

        Searing the Cutlets

        • Layer cutlets on a cutting board and cover with plastic wrap. Using a meat mallet (or pan or rolling pin), pound meat with medium strength over the entire surface. Do not overdo it (you don't want to see holes in the meat). Take the plastic wrap off.
        • Season on both sides with sea salt and ground pepper.
        • Select the saute option on the Instant Pot, add oil, and let it heat up well. Lightly flour the cutlets, add to the Instant Pot, and fry for 3-4 minutes on each side. Set aside.
        • Deglaze the pot by adding an ounce of liquid (broth or red wine), and then stir and scrape browned bits until they melt into a liquid, and/or are no longer stuck to the bottom of the pot.

        Simmering the Vegetables

        • Add butter to the Instant Pot and heat it on medium. Add onion and garlic and simmer for 2-3 minutes, frequently stirring. Add carrots, celery root, pepper, seasonings and continue simmering and stirring for 8-10 minutes. Finally, add beef broth (1-3 cups per your preference) and flour left over from dredging (or 1-2 tabplesoons of it) and stir again.

        Combining Cutlets and Vegetables

        • Return the cutlets to the Instant Pot and secure the lid. Cancel the saute option and select pressure cooker on high for 25 minutes. (It will take about 10 minutes for Instant Pot to pressurize before the cooking begins.)  After the time is up, release the pressure naturally (about 20 minutes), or use the quick release method  (about 2-5 minutes). The float valve will drop, and the lid will unlock and open when all of the pressure is out.

        STOVETOP

          Searing the Cutlets

          • Layer cutlets on a cutting board and cover with plastic wrap. Using a meat mallet (or pan or rolling pin), pound meat with medium strength over the entire surface. Do not overdo it (you don't want to see holes in the meat). Take the plastic wrap off.
          • Season on both sides with sea salt and ground pepper.
          • In a deep pan, heat the oil on high until very hot. Dredge cutlets in flour and fry for 3-4 minutes on each side. Set cutlets aside.
          • Deglaze the pan by adding an ounce of liquid (broth or red wine), and then stir and scrape browned bits until they melt into a liquid, and/or are no longer stuck to the bottom of the pan.

          Simmering the Vegetables

          • Add butter, onion, and garlic to the pan. Simmer. Add carrots, celery, pepper (and whatever other veggies you're using), and simmer for 2-3 minutes. Add seasonings and simmer for 8-10 minutes. Add flour remaining from dredging (or add 2 new tablespoons of flour) and a little bit of broth. Shake the pan lightly from left to right (instead of mixing the ingredients).

          Combining Cutlets and Vegetables

          • Return cutlets to the pan. Cover the pan. Simmer on low for 45-60 minutes. Keep adding a little bit of broth at the time (1-3 cups in total, depending on how thick you want your gravy). The cutlets are done when they are fork-tender.

          PRESSURE COOKER

          • Follow the instructions for Instant Pot until you're ready to pressure cook. At this point, follow your pressure cooker's instructions for closing, pressure cooking, and releasing the steam.

          PARALLEL TO CUTLETS

          • Prepare your side parallel to cooking the cutlets.

          Handling

          • Serve cutlets and gravy along a side of your choice (pasta, rice, mashed potatoes, quinoa, polenta, veggies, etc.). Store in the fridge for up to 2 days. Reheat based on your preference. Do not freeze!

          Video

          Notes

          Note: the video depicts jagerschnitzels cooked in a pressure cooker. Photographs in the text depict stovetop and Instant Pot preparation. 

          Nutrition

          Calories: 1995kcalCarbohydrates: 181.9gProtein: 46.5gFat: 125.9gSaturated Fat: 43gCholesterol: 143mgSodium: 8197mgPotassium: 2121mgFiber: 20.2gSugar: 11.8gCalcium: 373mgIron: 19mg
          Tried this recipe?Let us know how it was!

          More Recipes to 💙

          • Coffee pot pouring coffee into a small cup on a silver tray.
            How to Make Bosnian Coffee (Bosanska Kafa, Kahva, Kava)
          • Quarter of a burek pie on a plate on gray background.
            Burek
          • Bowl with soup, spoon, two cups of juice, bread and a kitchen towel on a dark background.
            Instant Pot Bean Soup with Sausage (Pasulj or Grah) [No Soak]
          • Stewed apple in a clear bowl, on the table.
            Stewed Stuffed Apples in Syrup (Tufahije)
          • « Go to Previous Page
          • Page 1
          • Interim pages omitted …
          • Page 5
          • Page 6
          • Page 7
          • Page 8
          • Page 9
          • Interim pages omitted …
          • Page 16
          • Go to Next Page »

          Primary Sidebar

          Aida and Aleksandra of Balkan Lunch Box, standing together.

          Welcome! I'm Aida, creator of Balkan Lunch Box, food blog about traditional and contemporary Balkan cuisine. My sister Aleksandra helps me.

          Learn more about me →

          As seen on

          Popular

          • Three biscuits on a gray background, one being halved with a fork.
            Čupavci: Balkan Lamingtons [One Hour]
          • Closeup of four wafers.
            Balkan No Bake Wafer Cake (Oblatne, Oblande)
          • Old Fashioned Goulash with Beef and Mushrooms
          • Stewed apple in a clear bowl, on the table.
            Stewed Stuffed Apples in Syrup (Tufahije)
          • Soup in a silver bowl with a lid, a kitchen cloth, two slices of bread, a lemon wedge and a spoon.
            Okra Soup: Creamy Chicken Soup with Okra (Bosnian Bey's Soup, Begova Čorba)
          • ajvar, chutney, pepper chutney, eggplant chutney, balkan spread, balkan dip ajvar, red pepper and eggplant dip, pepper dip | balkanlunchbox.com
            Ajvar
          • Moussaka in a pan.
            EASY Serbian Ground Beef Potato Moussaka Casserole
          • Closeup of a stuffed pepper.
            Best Classic Baked Stuffed Peppers with Ground Beef and Rice (Punjene Paprike)
          • Quarter of a burek pie on a plate on gray background.
            Burek
          • Rice and chicken in a sheet pan, overhead.
            Easy Baked Chicken Over Rice Casserole (Chicken Thighs and Drumsticks) [4 Ingredients, 1 Pan]

          Favorite Salads

          • Russian Salad or Salad Olivier
          • Bowl with carrots and apple, and carrot and apple and a spoon on a table.
            Grated Apple and Carrot Salad [Two Ingredients, Ten Minutes]
          • A bowl of carrot and beet salad, a beet, carrots and fork on the side.
            Grated Beet and Carrot Salad [Five Ingredients, Ten Minutes]
          • Shopska Salad

          Latest & Greatest

          • A ladle holding bean soup above the blue bowl, on an orange background.
            High Protein Balkan Bean Soup (Visokoproteinski Grah/ Visokoproteinski Pasulj)
          • A glass bowl full of stuffed peppers.
            21+ Pepper Recipes
          • A hand holdling a fork with scallion salad above a black bowl filled with salad on an orange background.
            Scallion Salad with Sour Cream (Lukmira) [2 Ingredients, 5 minutes]
          • Four photographs of different stews in one pin.
            14+ Best Stew Recipes


          Footer

          ↑ back to top

          About

          • Privacy Policy
          • Accessibility Statement

          Newsletter

          • Sign Up! for emails and updates

          Contact

          • Contact

          Copyright © 2014 - 2025 Balkan Lunch Box

          Rate This Recipe

          Your vote:


          A rating is required
          A name is required
          An email is required